There is a Filter button on the reports viewing window. What a filter does generally is restrict the rows displayed in a report, by specifying one or more conditions (called criteria), which the rows have to satisfy to still be displayed. It cannot change the data in any row - it can only determine which of the rows in the report are displayed!
So, for instance, if you do Reports ⇒ Summary ⇒ Income Statement for a given range of dates, you can't use the Filter feature to view the statement for a different range of dates. To do that, you would have to re-run the report. Similarly, you also can't use a filter to restrict that report to show different levels of accounts, because that restriction isn't one of the fields in the report in a clear way. (Fortunately, you can do that via the selection criteria when you run that report, so a filter isn't needed!)
When you change the filter, part of the header of most reports will change to reflect the new filter you have specified. Please note however that each time you create a given report, it will be displayed with no filters. In other words, filters that you previously used on a report are not remembered the next time you run that report. The exception is if you memorize a report with filters, and then re-use it - see the details on that below.
It's very important to be aware that restricting the rows displayed in a report will mean that any totals in the report change. For instance, if for some reason you put a filter on an Income Statement report to restrict the rows displayed, all of the displayed totals (TOTAL REVENUE, TOTAL EXPENSE, and NET INCOME) will then be incorrect.
As of release 2.24 of ACCOUNTS this feature has been greatly simplified with a new Simple Filter window, described below. Prior to that only what is now called the Advanced Filter window was available. (A version of that is still available through the Advanced Filter button on the Simple Filter window, for those who are already comfortable using it, and for the few cases where you need complex criteria that cannot be done with a Simple Filter.)
There is a training video on Filtering Reports on the Demos and Samples web page for the Software4Nonprofits DONATION web site, if you would prefer to see this feature demonstrated live, rather than reading about it. The feature works the same way in both programs, the difference being the names of the fields in the different reports that can be filtered on.
As an example of filtering, suppose you want to see transaction details, but only the parts that affect a certain account. You might start by running the Reports ⇒ Details ⇒ Transactions by Date report. Then click the Filter button. (Do this as you are reading this page, so it will be easier to understand it!) The following window comes up:
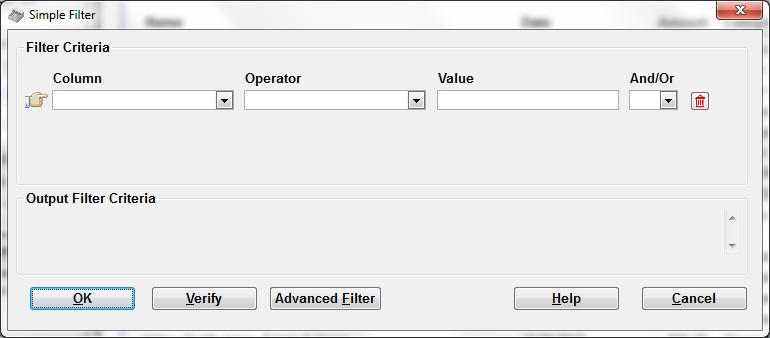
In this case, you could filter on either the account's name or number (if you are showing account numbers). Let's use the name. The obvious guess is the column which is called "acount_name" in the drop-down list under the heading "Column". Select options from the first two column's drop-downs, and fill in the third column (the Value) so it looks as follows:

If you like, you can click on the Verify button and it will tell you whether you have entered a valid filter. If that says the filter is OK, click on the OK button and it will apply that filter to your report. In this case, you would then only see the rows of the report where that was the account name.
You will also notice after you either tab out of the Value column or click Verify, that a text version of the filter appears in the Output Filter Criteria area below the entry fields, as shown in the image above. That text version is actually what is used internally by the program. It is what you would have entered to get the same result in releases of ACCOUNTS prior to release 2.24, or could enter with the Advanced Filter button.
The Column Drop Down
The first column, called "Column", is a drop-down list of all of the internal names of filterable fields in the report, in alphabetical order. Please note that these are not always the same as the column headings on the report. They also aren't always the same as the field names you see when entering values on the program's main window or elsewhere. However, in almost all cases it should be quite clear which field is which.
If you aren't sure what a column name means, you can always try filtering on it and see what happens!
Some reports may contain fields that can be filtered or sorted on, but aren't displayed in the report at all.
The Operator Drop Down
The following operators are available in this drop-down list:
Operator |
Meaning |
Equals |
Displays rows if the selected Column has the exact same value as the entered Value. |
Greater Than |
Displays rows if the selected Column has a larger value than the entered Value. Not available for date fields. For text fields, the comparisons are in "dictionary order", that is, as if all values being compared were upper case (explained further below). |
Later Than |
Displays rows if the date in the selected Column is later than (after) the entered Value. Only available for date fields. |
Less Than |
Displays rows if the selected Column has a smaller value than the entered Value. Not available for date fields. |
Earlier Than |
Displays rows if the date in the selected Column is earlier than (before) the entered Value. Only available for date fields. |
Greater Than or Equal To |
Displays rows if the selected Column has the exact same value, or a larger value, than the entered Value. Not available for date fields. |
Later Than or On |
Displays rows if the date in the selected Column is the same as or later than (after) the entered Value. Only available for date fields. |
Less Than or Equal To |
Displays rows if the selected Column has the exact same value, or a smaller value, than the entered Value. Not available for date fields. |
Early Than or On |
Displays rows if the date in the selected Column is the same as or earlier than (before) the entered Value. Only available for date fields. |
Not Equal To |
Displays rows if the selected Column has a different value from the entered Value. |
Like |
Displays rows where the selected Column's value matches the wildcard in the entered Value (explained below). Only available for text fields, not numbers or dates. |
Not Like |
Displays rows where the selected Column's value does not match the wildcard in the entered Value (explained below). Only available for text fields, not numbers or dates. |
Is Empty |
Displays rows where the selected Column has no value. With this operator, you do not enter a Value, because it is not relevant. |
Is Not Empty |
Displays rows where the selected Column has a value - any value. With this operator, you do not enter a Value, because it is not relevant. |
In |
The Value column in this case must be a list of two or more values, separated by commas. (The commas can have spaces before or after them, but that is not required.) Displays rows where the selected Column's value is equal to any one of those comma-separated values, but nothing else. |
Not In |
The Value column in this case must be a list of two or more values, separated by commas. Displays rows where the selected Column's value is anything other than one of those comma-separated values. |
Between |
The Value in this case must be two values, separated by " and " (the word "and", with at least one space on either side). Displays rows where the selected Column's value is at least the first of those values (the one before the " and ") and no more than the second of those values (the one after the " and "). This is largely the same as using two conditions, the first using Greater Than or Equal To (or Later Than or On for dates), and the second using Less Than or Equal To (or Earlier Than or On for dates), except that it does not use dictionary order for text fields. |
Dictionary Order
When text fields are compared with Greater Than, Greater Than or Equal To, Less Than, or Less Than or Equal To, there is a slightly complex behaviour about how it deals with upper and lower case, and characters that aren't letters. (This behaviour, and its name, come from the program we use to create ACCOUNTS with, and thus we cannot change it.) It is similar to, but not quite identical to, saying that the comparisons are case-insensitive.
What happens is that upper and lower case are ignored - the same way you would ignore them if you were looking up words in a dictionary. In other words, all comparisons are as if both the Column's value and the entered Value were converted to upper case before comparing them.
In addition, all characters other than letters, such as numbers and punctuation symbols, are considered to come before all letters in the dictionary order - to be Less Than them. (That part is different from ASCII order, for those who are familiar with that.)
All other comparison operators when comparing text fields (Equals, Not Equals, Like, Not Like, In, Not In, and Between) are case-sensitive - the upper or lower case of the Value field you enter must match that of the data for the filter condition to be considered to be true.
Wildcards for Like and Not Like
To search for values anywhere in a text field, you use the Like operator, and percent signs. For instance, suppose you wanted to find account names that are anything about offices, and figured that you would find them if "OFFICE" was somewhere in an account name in Reports ⇒ Listing ⇒ Chart of Accounts. To do that you would fill in the fields as follows (shown as a text table representing the main area of the Simple Filter window in the images above):
Column |
Operator |
Value |
And/Or |
name |
Like |
%OFFICE% |
Basically what the "%" means is "anything", that is any number (0 or more) of any characters. So that condition would mean that the name contains "OFFICE" anywhere within it, including right at the start or right at the end, regardless of what else is in the Column's value.
There is one other wildcard character, the underbar, "_". It matches exactly one character - any one character. This would be much less commonly used than the percent sign.
The Value
You enter whatever you are comparing the Column's value to, based on the selected Operator, in the Value column. As mentioned in the table of Operators above, the only exception to this is Is Empty or Is Not Empty, where the Value must be omitted.
Numeric values like transaction and split amounts should not include dollar signs or commas, and they will just be ignored if they are entered.
Do not include quotation marks (single or double) around text values you are comparing things to. (In fact, your filter will be rejected if you enter any quotes, including an apostrophe - which is a single quote - in the Value.) Quotes are added back in for you as needed to the actual technical filter criteria that the program will use internally, which are shown in the Output Filter Criteria area on the window.
Do not include round brackets around your comma-separated list of items for the In or Not In operators.
Dates in the Value column must be a valid date in your current Short Date Format from Control Panel's Regional and Language Options tool (the same as you can enter in date fields in the program when doing data entry), or they can be in the exact format YYYY-MM-DD, such as 2019-01-01 or 2019-12-31. Dates entered in your Short Date Format will be reformatted in the YYYY-MM-DD format in the Output Filter Criteria area.
An example of using Between would be:
Column |
Operator |
Value |
And/Or |
amount |
Between |
100 and 200 |
An example of using In (to choose any one of three values in this case) would be:
Column |
Operator |
Value |
And/Or |
transaction_type |
In |
CHEQUE,BILLPAY,DEPOSIT |
The And/Or Value
If you need multiple conditions in your filter, they must be joined by either "And" or "Or" in this column of the window. "And" means that for rows to be displayed, they must match the conditions on all of the rows. "Or" means that for rows to be displayed, they must match the conditions on any one of the rows.
Do not fill in the "And/Or" value on your last row, or if you only have one row.
To avoid confusion about the meaning, if you have three or more rows, you must either use "And" on all of the rows prior to the last one, or use "Or" on all of the rows prior to the last one. You cannot have some rows with "And" and others with "Or".
If you need to mix "And" and "Or" values, you would set up your criteria using all "And" or all "Or", then click the Advanced Filter button to further edit the resulting text version of the criteria, to change the And/Or values and insert appropriate parentheses (round brackets) for grouping. An example is in the Advanced Filter help topic.
As an example of using one of these values, let's go back to finding account names about offices. If we are aware that it could be all caps or just an initial capital letter, we would change the criteria to:
Column |
Operator |
Value |
And/Or |
name |
Like |
%OFFICE% |
Or |
name |
Like |
%Office% |
An example of another way to do that will be given in the Advanced Filter help topic.
Managing Multiple Rows of Criteria
As soon as you set the And/Or value to either "And" or "Or", another row will appear below that row for further criteria.
If you have entered a row and no longer want it, you can click the red trash can icon to the right of the row to delete it. If you delete the only row, it will be replaced by a new empty row.
Changing a filter to have only the one empty row then clicking OK will remove the filter from the report.
The Buttons on the Window
The OK button first verifies that your filter is valid, then if so, applies it to your report. If it is not valid, you will receive one or more error messages that hopefully will help you fix the filter so that it can work.
The Verify button only verifies that your filter is valid, giving appropriate messages, but does not yet apply it to the report.
The Help button displays this Help topic.
The Cancel button, or pressing ESC, cancels creating or editing a filter for the report.
The Advanced Filter button takes your currently defined filter as displayed in the Output Filter Criteria area, if any, and moves it into a more technical filter window for further editing, in case you need something that cannot be done within the capabilities of this simple filter window. It is described in more details in the Advanced Filter help topic.
Other Areas of this Window
The Output Filter Criteria area below the criteria you enter displays the actual text of the filter you are creating with the simple filter fields in the middle of this window. It shows that in the more technical Advanced Filter format. It is updated for a complete row each time you click out of one field into the next field, or if you click Verify.
There is an additional area that can appear at the top of the window, labelled Input Filter Criteria. It comes up in the case where you are re-doing a filter on a report that has an Advanced Filter, which can either be one you created in the Advanced Filter window, or one saved in a Memorized Report in an earlier release of ACCOUNTS that did not have the Simple Filter window. Here is an example from clicking Filter on a previously memorized report:
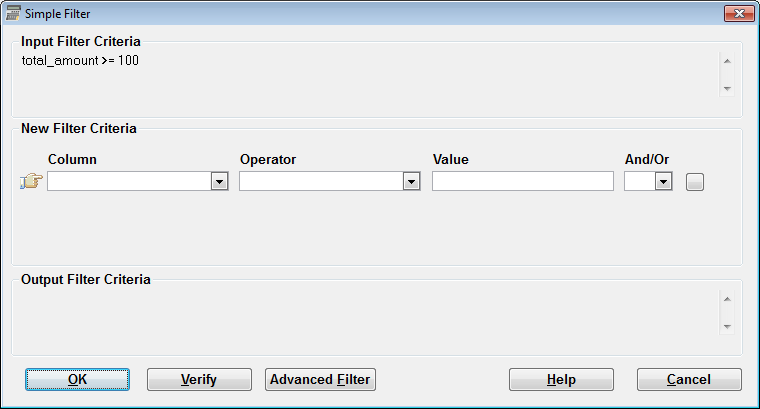
As you can see, it is pretty clear that what was done before could be re-done as a Simple Filter. If you wanted to re-save the report with a Simple Filter doing the same thing, you would just enter the following criteria:
Column |
Operator |
Value |
And/Or |
total_amount |
Greater Than or Equal To |
100 |
then click OK. Then in the displayed report, click Memorize to re-memorize it for future use.
The Advanced Filter Window
If you are already familiar with filtering by typing plain-text filters, from prior releases of ACCOUNTS, or if you encounter something that does not seem to be able to be done with a Simple Filter, you can click Advanced Filter to go to the new window for that. Please see the Advanced Filter window for details and examples.
Memorizing Filtered Reports
Particularly if you want to be able to re-run the same report in the future with the same or a similar filter, you may want to memorize it for re-use with the Memorize button. That will also memorize any Sort you have added, in addition to the Filter. You can then re-run the memorized report with Reports ⇒ Memorized Reports.
Filters and the Sort Order
If you put a filter on a report, then while you are still viewing the same report, change or remove that filter in a way that returns some of the previously filtered out rows back to the report, a somewhat surprising thing can occasionally happen.
Specifically, those rows that return to the report because they are no longer filtered out may appear below all of the other rows that were already there. That will mean that if that report started with a specific sort order, as most do, it would no longer be sorted appropriately. To fix that, you would have to use the Sort button to re-sort the report into the desired order. See Sorting Reports for details on doing that.
Fortunately, we have set up most of the built-in reports to already prevent this potential problem. The most likely case where you could see this problem is with some reports Memorized before the release that included the Simple Filter window.
Reports with Multiple Sections
Some reports, such as Reports ⇒ Fund ⇒ Income Statement, have multiple sections. Some of those reports may not be able to be filtered at all, for technical reasons. Either the Filter button will be disabled (greyed out) for such reports, or if you click Filter on them you will be given a message explaining that.
Others of those reports, such as the Fund Income Statement mentioned in the previous paragraph, allow filtering, but the filter you define will only apply to the first section of the report (in this case, the main income statement part). Any further sections (in this case, the fund summary part) will be unchanged by the filter. In such cases, you will receive a message informing you of that.
This topic was last edited on Mar 23, 2023