Please read the Remote Database Overview section first, if you have not already done so, before reading this section.
Note: This version was previously called the Web Network Version.
Initial Setup
When you run a Remote Database Version on a computer for the first time, after installing it, you will be prompted to register the program, as follows:
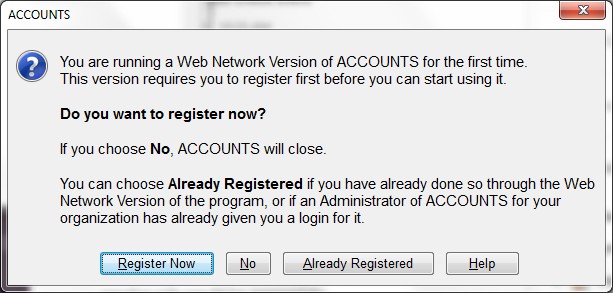
Unless you have already registered the Remote Database Version through the program, or you know that an Administrator for your organization has already assigned you a login, you need to register. If you have already registered, or been given a login, you can click the Already Registered button in the message that comes up about registering, and continue to the login.
If you choose to register, the Registration window will come up. Fill that in and follow the prompts, being sure to Submit your registration. The email address you use in the registration will become your login username.
After the registration, you will be informed that Software4Nonprofits will set up your remote database and login for you, and email you with your login information when that is ready. The program will then exit, since you cannot proceed until we send you that information. We will always get back to you in at most 24 hours, but usually much sooner.
If you already had a login for the Remote Database Version of our DONATION program, using the same login email address, then once you are granted access, the password you use to login to the Remote Database Version of ACCOUNTS will be the same.
Normal Login
On any login after your initial registration (if needed), you will be brought to the following window:
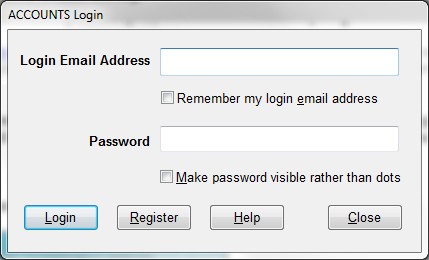
Enter your login email address and password, and click Login. The email address is not case-sensitive (so you can enter it with any capitalization), but the password is case-sensitive.
As you can see, if for some reason you still need to register, there is also a button for that. You can also use the two checkboxes on the window to do what they say:
•Checking "Remember my login email address" means that every time you get to this Login window in the future, the last email address you used to log in with will be filled in automatically for you, and you will only have to enter your password.
•Checking "Make password visible rather than dots" allows you to see what you are typing in the Password field, if you aren't sure you got it right.
If you have access to multiple databases with the same login (described more in this section of the main Remote Database Version Help page), after a successful login a window will come up allowing you to choose between them, by Organization Name.
If you attempt to log in three times in a row unsuccessfully with the same email address, you will be locked out, until you are unlocked by another user with Administrator access. If you are the only Administrator, you will have to ask Software4Nonprofits to unlock you. If there is an Administrator who can unlock you, please ask them first before asking Software4Nonprofits to do it. You will be shown a message with information about this, including the name(s) and email address(es) of your Administrator(s). You will also be sent an email about this. Your Administrator or Software4Nonprofits can also reset your password, if you have forgotten it. See User Management for details.
Further Setup for New Users
If this is your first login after your database was created, and nobody else from your organization has a login and has done the initial setup steps, or if for any reason your database is empty, you will be prompted for options to set up your database.
Uploading your Data from a Local ACCOUNTS Database
The first option is if you had been running a previous version of ACCOUNTS - not a Remote Database Version - on the same computer. In that case, you will be asked whether you wish to convert the data from the local database from that previous version of ACCOUNTS into your remote database. That action is also referred to as an "upload". Choose Upload Now from the options it offers, unless there is some reason you want to skip this and either start with an empty database, or restore a backup from a previous version of ACCOUNTS.
If you do answer Upload Now, a series of message boxes and windows will come up telling you what is happening, and when it is completed. Usually this will be quite quick.
If for any reason this is unsuccessful, or you need to repeat it, you can try it again. If you aren't prompted for it after your login, and you get to the program's main window, you can use the Upload/Download ⇒ Upload Local Database to Remote menu option to do so.
Setup if no Upload was Done
If none of the above steps have been done, you will be taken to a version of the program's normal Startup window. The correct version is shown in the second screen shot shown on that Help page linked to in the previous sentence. The options have basically the same meanings as explained following that page's first screen shot. You can start by initializing a completely empty database, or you can restore and then automatically upload a database backup from a non-Remote Database version of ACCOUNTS - which could be a regular backup file, an emailed backup, or an Internet backup. See that Help page for full details.
If you choose to restore any type of database backup, what will happen is that the backup will be restored to your local database, and then the Upload of your data from the local database to the remote database will proceed, as described above.
Possible Connection Problem: Firewalls
Some users may get an error message when they first try to use the Remote Database Version, saying they cannot connect to the server ("error 1") and mentioning that the problem may be with the firewall. The program needs to be able to make an outbound connection on port 22, which is usually open anyways, but for some users might not be.
If you have this problem and are using the built-in Windows Firewall or Windows Defender Firewall on your computer running the Remote Database Version of ACCOUNTS, you can set up an appropriate Exception as follows:
For Windows 7 or 8:
1.From the Windows Start Menu, select Control Panel.
2.In Control Panel, select Windows Firewall.
3.Assuming the Windows Firewall State is On (if it is Off, this isn't the problem!), click Advanced Settings on the left.
4.In the window that comes up, click Outbound Rules on the left, then New Rule on the right.
5.In the window that comes up, click Port, then Next.
6.Make sure TCP is selected in the next screen, and Specific Local Ports is selected. To the right of Specific Local Ports, enter "22", without the quotes, in the entry field. Click Next.
7.Select Allow the Connection in the next screen, and click Next.
8.You can leave all of the checkboxes selected in the next screen, and then click Next.
9.Enter a Name for this rule on the next screen (for example something like "ACCOUNTS Remote Database"), then click Finish.
10.You can then close the Windows Firewall with Advanced Security window.
For Windows 10 with Windows Defender:
1.Right-click on the Windows Start Menu, and pick Settings from the popup menu.
2.Click on Updates and Security
3.In the window that comes up, click on Windows Defender on the left.
4.In the window that comes up, Click on Firewall and Network Protection.
5.In the window that comes up, click on Advanced Settings near the bottom.
6.At this point just follow steps 4 through 9 in the section above for Windows 7 or 8.
7.Close the remaining windows that you have opened.
For other versions of Windows, it should be something similar to one of the two sets of steps above.
If you are using different firewall software (not Windows Firewall or Windows Defender Firewall), the important thing is to allow outgoing TCP accesses to port number 22 on the computer running the Remote Database Version of ACCOUNTS.
We're sorry, we cannot help you with figuring out how to make firewall changes on other security software. Please read the Help of that software to learn how to make this change, or consult your more general Windows or network support people for assistance if necessary.
If these steps do not resolve this problem of getting the error message that mentions the firewall, please contact Support.
See Also: Remote Database Version Overview
This topic was last edited on Apr 8, 2020