Using Letters ⇒ Mass Mailing, you can create letters for all Donors in the current year's Donor List, or for a selected group of them. They can include just Donor information, or also include information on the individual donations for each donor (within a specified range of dates), on the total donations for that donor (within a specified range of dates), or on a specified range of receipts.
Because Letters ⇒ Mass Mailing allows you to email the generated letters to donors as an attachment, there may be cases when one of the other methods for emailing to donors from DONATION (the Letters ⇒ Email Donors menu option or Using Mass Email Services) would be more appropriate. Please see Using Mass Email Services for a full discussions of the pros and cons of each method.
If you are going to use Letters ⇒ Mass Mailing and have not yet done so, please first read the Help topic Creating Letters for One Donor, because this option builds strongly on that one, with most the controls in its window being the same. Also, please first read Creating Mail Merge Letters for an overview of these features.
There are several training videos on Mail Merge letters and receipts on the Demos and Samples web page, if you would prefer to see these features demonstrated live, rather than reading about them.
Before you can use this Mass Mailing feature, you need to have a template document that will form the basis of the letter. The documents used by this option are exactly the same as the ones used by the One Letter option. (This is a change that started in version 3.10 of DONATION. In prior versions, separate letters with different types of merge fields were used for the two Letters menu options.)
Type of Information Options
The following are the options for Type of Information in in the Merge Letters window that comes up when you use Letters ⇒ Mass Mailing:
| Donor Information only | Creates one letter for for each donor. Note that this includes all donors on the Donor List, whether or not they have any donations. (However, the TotalAmount field can be used to filter out donors with or without donations in the current year.) |
| Individual Donation Information | Prompts for a range of dates when you click Merge, then creates one letter for each donor's donation within that range of dates. (If a donor made more than one donation within that date range, or a donation was split into multiple entries because it was for multiple donation categories, it will generate one letter for each donation.) |
| Total Donations Information | Prompts for a range of dates when you click Merge, then selects only donors that have made donations within that range of dates, and gives information on their total donations. Letters for this option can include the «DetailsTable» and «SummaryTable» merge fields, giving details or summary by category information on the donations included in the totals. |
| Pledge Information | Creates one letter for each donor who has a pledge, with different default letters being used (and different merge fields being available) for the different pledge types, set in the Pledges tab of the Maintenance ⇒ Main Window Options window. No date range is prompted for with this option - it always reports on the entire pledge period, or the entire fiscal year, if you select the option on that window for pledges to be on a fiscal year basis. Letters for this option can include the «DetailsTable» merge field, which gives details of the donations during the current year (or fiscal year) that are considered to be fulfilling the pledge. When you have selected the Annual with Start Date and Category pledge type, one additional special table field is provided: «DetailsTableAllCategories», When you have selected the Multi-Year pledge type, two additional special table fields are provided: «DetailsTableAllYears», which lists all donations that fulfill the pledge over the entire range of dates within the multi-year pledge, and «PledgeYearsTable», which lists the donor's year-by-year pledge amounts. Note: This option is removed if you have selected not to display the Annual Pledge field on the Donor tab of the Maintenance ⇒ Main Window Options window. |
| Receipt Information | Prompts for a range of receipt numbers, then generates one letter (or receipt) for each receipt number. Letters for this option can also include the «DetailsTable» and «SummaryTable» merge fields, giving details or summary by category information on the donations included in the receipt. This option can be used either for Generating Receipts Using Mail Merge, or for creating separate cover letters for receipts. (However, you can instead add a cover letter to the standard template you are using for the receipts, so that this does not have to be done separately.) You cannot create new receipts with this option, only reprint existing ones or create letters based on their existing information. |
| Gift in Kind Receipt Information | This only appears if you are in Canada. It is like Receipt Information, but only processes special gift in kind receipts. It also does not support the «DetailsTable» or «SummaryTable» merge fields, because a gift in kind receipt is always only for one donation, and the details of that donation are available in the merge fields. You cannot create new receipts with this option, only reprint existing ones or create letters based on their existing information. |
When ranges of dates are involved, as in the Total Donations Information letters, or the TotalAmount (which is for the whole year) in the Donor Information letters, the current working year in the program is used. If you are in a country such as the United Kingdom, Australia or New Zealand, and have selected to use Fiscal Year Data Entry and Receipting, and are working on a fiscal year, that is the range of dates that is available.
If you enter the program with the Donors Only Password, only the Donor Information Only type of letters are available, and the donor fields related to donation amounts are removed.
Steps to Create a Mass Mailing
When you select Letters ⇒ Mass Mailing, the following window comes up, which you will see is very similar to the one for Letters ⇒ One Letter, but with the addition of the a second filtering option in section (3), and a new section (4):
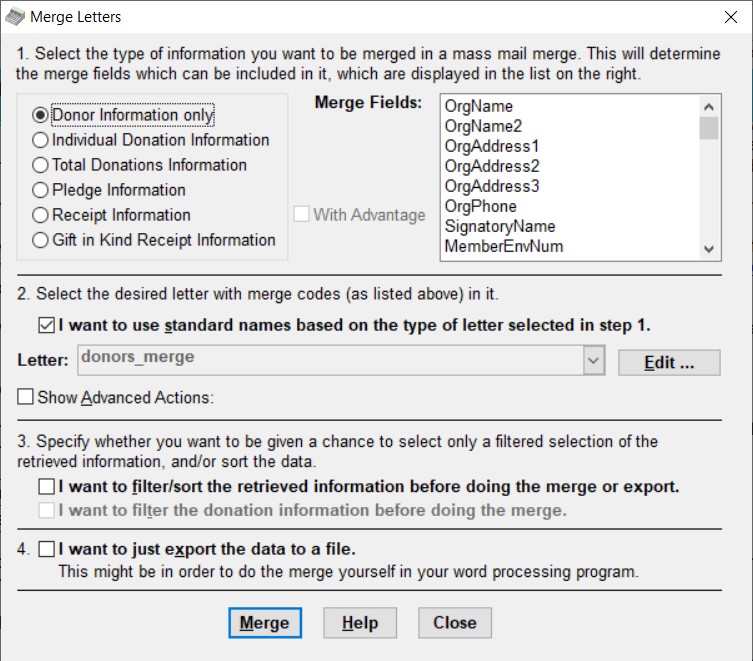
Note: As mentioned in the topic on Creating Letters for One Donor, the 6th option in section (1), "Gift in Kind Receipt Information" only appears if you are in Canada. And the 4th option, "Pledge Information", disappears if you uncheck "Annual Pledge" in the Show Fields area of the Donor Details tab of the Maintenance ⇒ Main Window Options window.
The "With Advantage" checkbox shown in the above image of the window is only present for Canadian users, and is only relevant for Receipt Information or Gift in Kind Receipt Information merges. Selecting it means that the filenames of the default mail-merge documents used have "_adv_desc" added - for instance "receipts_merge_canada_adv_desc" for Canadian English receipts, instead of just "receipts_merge_canada". See Donations and Receipts with Advantage for details.
The second filtering option in section (3), for filtering the donations, is only enabled (not greyed out) when you select the Total Donations Information type in section (1).
In section (1), you select the type of information to be merged into the letter, from the list above. The specific fields that can be merged in for each type of information are listed in the list box at the right. You can't do anything with the Merge Fields list at the right - it is just for information.
I will skip sections (3) and (4) in the window for now, because they are not usually used. There are sections on filtering and exporting further down on this help page about them.
Section (2) is used just like the almost identical section (2) in Merge One Letter, to select and optionally edit the Letter with the merge codes in it. This is described in detail in Creating Letters for One Donor. If you uncheck "I want to use standard names ...", you can select a different template letter or receipt to use from the Letters drop-down list. By clicking the "Show Advanced Actions" checkbox, further buttons are shown (as explained in the one donor letters help page referred to previously) that allow you to make copies of existing letters, or select both HTML files and Microsoft Word files (with either the .doc or .docx extension) from anywhere on your computer. If you select a Microsoft Word file, it will be converted to HTML before editing it.
Click on the Merge button to do the merging of the letters.
If you are using the Individual Donation Information or Total Donations Information options, when you click Merge you will first see a "Select Dates for Mail Merge" window. That allows you to specify a range of dates within the current working year, so that only donations within that range of dates are included in the merged data. This allows you to do things like letters for all donations received in the last week or month (for Individual Donation Information), or quarterly report letters to your donors (for Total Donations Information). The default for this window is from January 1st (or the fiscal year start, if you are working on a fiscal year) up to the current date, which may often be what you will want.
If you are using the Receipt Information or Gift in Kind Receipt Information options, when you click Merge you will first see an "Enter Receipt Numbers" window in which you select the range of receipt numbers you want to recreate (or create associated letters for) via mail merge. If you aren't sure which receipt numbers to select, you can exit this option and use Reports ⇒ Receipt ⇒ All Receipts to see a list of all receipts that have been generated in the current year.
Once you have made these selections, the internal editor window will appear, and display all of the letters or receipts, filling in all of the merge fields with the appropriate data from your donors, donations and/or receipts, depending on which Type of Information you selected.
Page breaks between individual letters are shown with a light grey horizontal line across the page, with the words "Page Break" in the middle of it. That line does not print when you print the document. It is just a visual indicator of the hard page breaks. (If individual letters are longer than one page, the page breaks within them, normally called soft page breaks, are not shown. You can use File ⇒ Print Preview in the internal editor to see the real pagination.)
You can make editing changes in this merged file if you want, for instance to further personalize the letters or receipts. If you wish, save those changes with File ⇒ Save. But changes that you want to be retained for subsequent uses of the same letter must be made in the original file (before the merging), with the Edit button.
Then, just print the letters with File ⇒ Print, the Print toolbar icon in the editor, or Ctrl+P. For Receipt Information merges, you will be prompted to print a 2nd copy for your records. Finally, exit the editor window to come back to the Merge Letters window. You can also optionally email the letters or receipts to those donors who have email addresses (and print the rest if you wish), with the File ⇒ Email/Print menu option or the Email toolbar icon.
If you are done, click Close to close that window and go back to the program's main window. Or, you can do more merge documents.
Filtering, Sorting or Reviewing Information Before Merging
In section (3), you can check a checkbox labelled I want to filter/sort the retrieved information before doing the merge or export. If you check this, after any prompting for a range of dates appropriate to the type of merge you selected, you will be shown the main selected information for all donors - everything except the data that would go into any tables available for this section (1) option, such as the DetailsTable. It appears in a window similar to DONATION's reports viewing window, after you click on Merge. From that window, you can click the Filter button if you wish, and enter filter criteria to determine which of the donors (or other selected information) should be included in the mail merge. See the Help topic on Filtering Reports for more information on how to use this. You can also use the Sort button on that same window to sort the information into a different order, if you want the letters or receipts to be printed in a different order from the one that we designed into the program.
Using this checkbox option and window can also be helpful just to see the information that will be merged, before you do the merge, even if you have no need to filter or sort it further.
You can also click a Save SQL button in this window, to save the SQL command that was used to retrieve this data to a file. You could later retrieve that SQL, in the Database ⇒ SQL Select window, for your own uses, such as exporting the data for use in your own mail merges using your word processor. (However, see the next section on this page for a more direct way to do that, with the checkbox in section (4).)
Click Merge in that window displaying the data when you are satisfied with the data, or Cancel if you decide you don't want to create merged letters for the displayed data.
One example of when you might use filtering is if you have had a special campaign, and all donations for that campaign have been entered with a certain donation category, say "Special Fund". You might want to create customized thank-you letters for only those donations.
If so, first edit a letter for Individual Donation Information as desired. Check the checkbox for filtering, then click Merge. After selecting your desired range of donation dates, in the window showing the selected information, click Filter. In the Filter window, fill in the following options:
Column |
Operator |
Value |
And/Or |
donationcategory |
Equals |
Special Fund |
Click OK in that Filter window, and the data will be redisplayed, but only including the matching donations. Click Merge in that viewing window, and the merge will be done, but including only those donations for the Special Fund.
The second checkbox in this section, I want to filter the donation information before doing the merge, is only enabled for Total Donations Information merges, and only when you haven't checked the checkbox in section (4), described below, for just exporting the data.
If you check that checkbox, then after you click Merge, and after any filtering of the overall information based on the first checkbox in this section, you will be shown a window displaying all of the current working year's donations. (If there are a lot of donations, it only shows the first 500.) You can click the Filter button on that window, and add a filter to restrict the donations that will be included, based on rules you supply. See Filtering Reports for details on how filtering works (it is the same for this window as for reports!).
Although all of the donations (or the first 500) were shown so that you can understand what the filtering will do, that same filter will actually be applied on a donor-by-donor basis as the filtering is done. Any donor for which the filtering eliminates all of the donations will be omitted from the overall merge results.
If you do add such a filter, it will affect the totals in the TotalAmount, EligibleAmount and AdvantageAmount merge fields, and also the contents of the tables created by the DetailsTable and SummaryTable merge fields.
One reason that you might want to do filtering on the donations would be to restrict the donations included in these letters to either just the receiptable donations, or just the non-receiptable donations, by filtering on the receiptable field. (See Non-Receiptable Donors and Donations to understand what this means.) If you do want to include only donors that have receiptable donations, along with their receiptable donations, or include only donors that have non-receiptable donations, along with their non-receiptable donations, you should only use the 2nd filter, on the donations, to achieve that! Do not also filter on the receiptable field for the donors themselves, in the first filtering option, as that could create incorrect results. When you are filtering on the donations, the Receiptable field value is only Y when both the donor is receiptable and the donation is receiptable. It is N in all other cases.
Here is one interesting exception to what was just stated, about only filtering on the receiptable field for the donations, not the one for the main donor data. Suppose you want to send Total Donations Information letters with one sort of wording to non-receiptable donors (generally other charities or businesses), and you want to sent letters with different wording to regular donors who may have some non-receiptable donations (perhaps along with some receiptable donations). For the first group, you would use only the first filtering option on the main donor data, filtering on "receiptable Equals N". For the second group, you would use both filtering options, with the first filter (on the donors) being "receiptable Equals Y" and the second one (on the donations) being "receiptable Equals N".
Exporting Data, for Doing Mass Mailings in your Word Processor
If for some reason you prefer to do the mailing using your normal word processor's own mail merge features, there is an option to do so. (For instance, this is used for Generating Mailing Labels using Mass Mailings.)
If you check the I just want to export the data to a file checkbox in section (4), the Merge button gets renamed to Export, and you cannot use section (2) to specify the file names, or the 2nd filtering option in section (3).
When you then click Export, the same data that would be available for merge fields in the built-in mail merges is exported to a CSV (comma-separated value) file. The program tells you the name of this file. You can use this file as a data file for a mail merge in your word processor. (Note: CSV files are known to work well with Microsoft Word. We cannot tell you whether they will work as well with other word processors, but they are a standard data export format.)
It is beyond the scope of this documentation to tell you whatever you need to know about doing mail merge in your word processor. Please consult the program's documentation if you need help with that.
As mentioned, the exported data is stored in comma-separated Value (*.csv) files. It might be more natural to use Microsoft Excel files for the data with Microsoft Word, but it turns out that this requires you to have Excel installed, and some users only own Word but not Excel. If you do have Excel installed, however, after exporting the data, you are given an option to open the exported file in Excel.
The following table lists the names of the exported data files for each type of export information. They are exported into the same directory that the letters are in, the Letters subdirectory of the Data Directory.
Type of Information Exported Filename
Donor Information only export_donors.csv
Individual Donation Information export_donations.csv
Total Donations Information export_donationTotals.csv
Pledge Information export_pledges.csv
Receipt Information export_receipts.csv
Gift in Kind Receipt Information export_receipts_gik.csv
There are also some details on the mail merge features of Microsoft Word in the Help topic on Doing Mail Merges using Save As from Reports.
One major limitation of doing mail merges in Word (or any other word processor) is that it is not possible to export and use the data that would go into the «DetailsTable» and «SummaryTable» merge fields (and some other tables in Pledge Information merges) that are available in the internal editor.
This topic was last edited on Feb 17, 2023