There are some special issues when configuring ACCOUNTS to send email through a Gmail address, or you are using Google Workspace (formerly called G Suite) to have your organization's domain email addresses actually be Gmail addresses.
Note: All email addresses supplied by Telus (e.g. ones ending in @telus.net or @telusplanet.net) are now served by Gmail, so everything on this page also applies to them.
The reason there are special issues for such email addresses is because Google requires what it considers to be a higher level of security for applications other than the most common email software (like Microsoft Outlook) to send and receive emails through Gmail. Although Google refers to such applications as "insecure", in fact ACCOUNTS and most others are still very secure, using encryption to protect your password and the email contents! (Most other email services do not insist on such steps, or call other programs like this "insecure".)
If you try to configure using a Gmail address in the Maintenance ⇒ Email Sending Configuration window, the recommended approach is to choose the Use Gmail-Specific Authorization radio button at the top of the 2nd window shown in that Help page. (This option was introduced in release #2.45 of ACCOUNTS, in August 2021.) See the details for that below.
If instead you use the Use Normal Server Authentication radio button, and the SMTP Server you set up there is "smtp.gmail.com" (the current correct one for Gmail), you will probably receive a large message box when you click Test or OK the first time, about there being a problem doing this. Depending on the internal details of the response received from Gmail, it will either offer you an option to Grant Access for Less Secure Apps, or to learn about generating a special application password just for ACCOUNTS and using that password in your SMTP settings. (For many accounts, the Grant Access for Less Secure Apps option will no longer be available after May 30, 2022!)
This page explains all of these options.
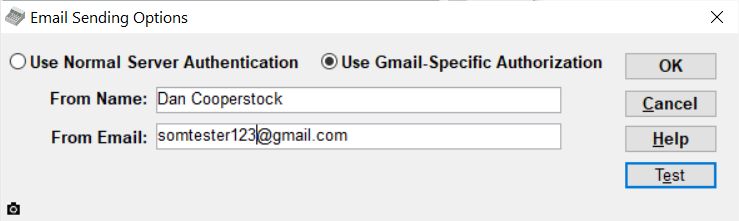
Use Gmail-Specific Authorization
This option allows you to grant authorization only for ACCOUNTS to send emails using your Gmail account. It is arguably more secure than the option Grant Access for Less Secure Apps described below, since it only applies to ACCOUNTS. It is our recommended option for Gmail accounts.
If you click the Use Gmail-Specific Authorization radio button, the window changes to look as follows (using a fake email address):
Clicking Test will give you a message explaining what is about to happen, which is that you will be taken to a Google web page in a web browser to do the authorization, and it tells the steps you will have to follow, which are also explained here.
Unless you only have one Google account, and are already signed into it in your web browser, you will then see a web page prompting you to select the correct Google account corresponding to the email address you entered in the window above. Here's an example: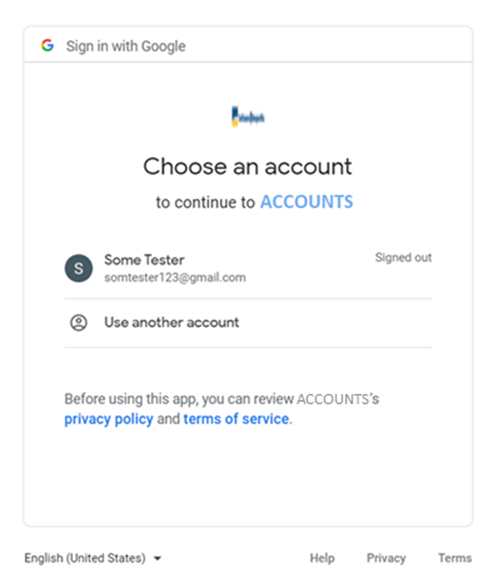
Click on the desired Google account, and enter your password for that account, if you are prompted to do so. If you have 2 step verification set on that account, you will be prompted to do that verification, for instance to enter a code that is texted to you.
Next, you will be taken to a page such as the following:

Important: You have to check the checkbox at the right in the area we have circled in red in the image above, to the right of the words "Send email on your behalf. Learn more." If you do not do that, the authorization will not be completed!
Click Continue after you have checked the checkbox for "Send email on your behalf". You will then see a page stating that you have granted ACCOUNTS permission to send emails via Gmail, and that you can close that web browser or tab showing that message, and return to ACCOUNTS. Do that.
Return to ACCOUNTS (by minimizing the web browser if you didn't close it, or selecting ACCOUNTS on the Windows Taskbar). The test email will also have been sent, to the same email address you are configuring, so you can check that you received it.
This is a one-time set up. Once it has been authorized, emailing using this email account should just keep working in ACCOUNTS.
If you ever change your Gmail password, the authorization you have granted will be invalidated, and you will have to re-do it.
There is also an option to revoke the permission for ACCOUNTS to send emails on your behalf, in the Security settings in your Google account. If you do that, you would also have to re-do this authorization, or use one of the other methods in the rest of this page.
You can click OK in the window above to close it, once you have successfully completed your test.
Possible Problem with this Process
If you fail to complete any of the steps above - choosing your account, logging in to it if required, checking the required checkbox, and clicking Continue - you will get one or more informative messages.
If the authorization process is not completed within 60 seconds, it will "time out" in ACCOUNTS, and you will have to try it again.
Technical Details about Gmail Authorization
The authorization process retrieves a complex string of characters, called a token, and stores it in your database so that it can be used again without needing to ask you for your Gmail password. The token expires after an hour and after that, it gets automatically refreshed by the program the next time you try to email with ACCOUNTS.
This way of sending emails using your Gmail account is done following what is called the Open Authentication protocol version 2 standard, also called OAuth2.
Options when you Choose "Use Normal Server Authentication"
Two-Step Verification
Which of the options are available when you choose Use Normal Server Authentication depends entirely on whether or not you have enabled what is called "2-Step Verification" in your Google Security settings for the Gmail account you are using.
Turning on that setting means that every time you log into your Gmail, you will be sent a code, to either a specified cell phone or perhaps a different email address. You then have to enter that code, before you can access Gmail. (If you have an Android phone, the verification may only require answering Yes to a popup on your phone, rather than using a code.)
If you have multiple users of the same Gmail account, you will probably not want to turn on 2-step verification, because they would probably not all have access to the same cell phone or alternate email address to receive those codes, and so this option would not work for them!
Otherwise, while 2-step verification causes some inconvenience, it also improves the security of your Google account.
When 2-step verification is on, only the 2nd option below, using an Application Password, is available. When it is off, only the first option right below this is available. If you have successfully configured your email sending from ACCOUNTS using one of the methods below, and then you change whether or not you are using 2-step verification, your current email sending setup will stop working and you will have to configure it using the other method.
Grant Access for Less Secure Apps
According to this Google web page, the Less Secure Apps option will no longer be available to most accounts after May 30, 2022. So you will have to use the Gmail-Specific Authorization described above (our recommendation), or an Application Password described below.
This option (as long as it is still available) grants access to your Gmail account, as long as you supply the correct username (your email address) and email password, to all applications that Gmail considers to be insufficiently secure, including ACCOUNTS.
Note: As mentioned above, this option is not available if you have what is called "2-Step Verification" turned on, or after May 30, 2022. See the next section (on Generating an Application Password) for what to do if that is the case.
Choosing to grant access for less secure apps from the prompts that come up will take you to a page in a web browser. If you aren't currently logged in to Gmail (or another Google service with the same account), it will first take you to a page where you can log in to the desired account. After doing that, you should end up on a page such as the following:
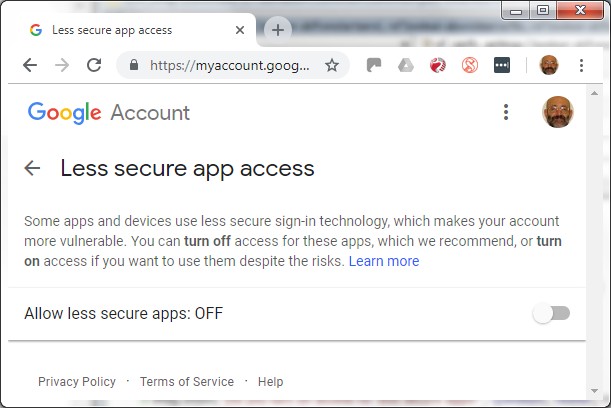
If you click the slider shown towards the bottom right of the image above, it will immediately turn that on. You can then close that window.
Google will likely then immediately send you an email with the Subject "Critical security alert", to confirm that it was you making that change. It may ask you to click a button and go to a security web page to confirm that it was you making that change. You should get that email, and if it says it is required, click that button, and answer Yes on the web page that comes up, before sending email will work.
Back in ACCOUNTS after doing that, you can follow the prompts to try emailing again, and it should work. If it doesn't, please double-check that you have entered the correct Gmail password in the Password field in the configuration window (click "Make password visible, rather than stars" below that field, to make sure you can see it).
Generating an Application Password
This way of resolving Gmail sending problems allows you to generate a separate password only for use for ACCOUNTS, if you have chosen Use Normal Server Authentication.
Note: This method is only available to users who have turned on "2-Step Verification", as explained above.
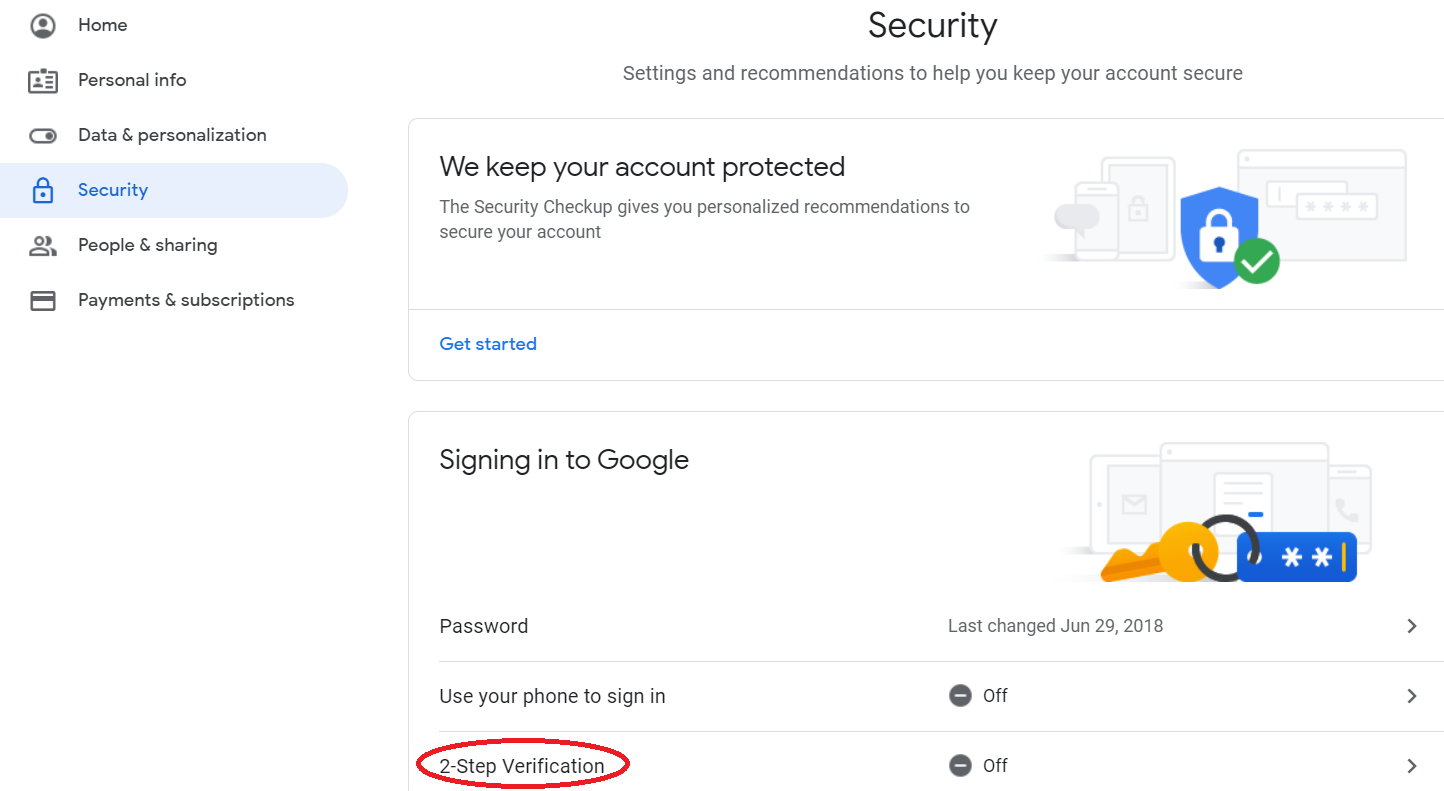
To generate an application password for ACCOUNTS, you need to log in to your Google account, open your account management page and then navigate to the Security page. The link is: https://myaccount.google.com/security.
If you have not turned on the "2-Step Verification" feature yet, you need to first turn it on there, with a link in the "Signing in to Google" section, as follows:
After that setting is done, you will see the "App passwords" option in your Security page, under the same "Signing in to Google" section, as follows:
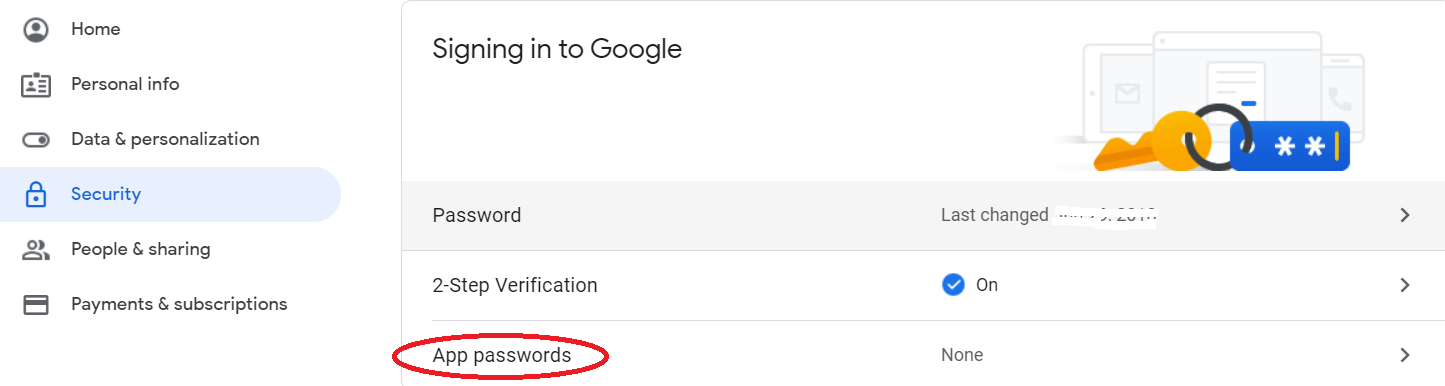
Click on "App passwords" to enter the page for that. You may need to type in your password again before you get to that page. You will then see the following:
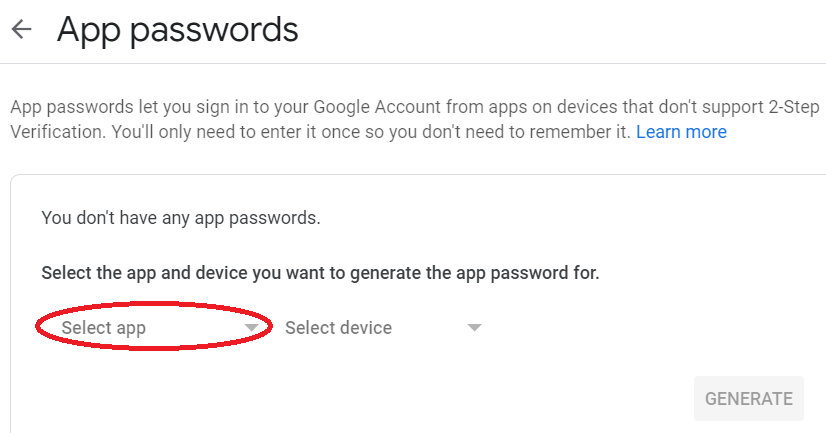
Choose "Other (Custom name)" in the "Select app" drop-down list box, then enter "ACCOUNTS" as the application name. After clicking the "Generate" button, Google will generate and show the password.
The password it shows you appears to be four 4-character sections, but there are no actual spaces between the sections! If you copy it out of the window where it is displayed, by highlighting it with your mouse and pressing Ctrl+C (or right-clicking and picking Copy from the popup menu) it will be all one 16-character password.
Store that password somewhere secure (as well as in ACCOUNTS!), because Google will only show it on this page this first time. If you don't record it, you won't be able to see it from any page.
Once you have the password, paste it into the Password field on your Email Sending Options window, and use the Test button to confirm that it is working. That is all you need to do. You will not be prompted with 2-step verification when you send emails from ACCOUNTS.
If you have both of Software4Nonprofits' programs, DONATION and ACCOUNTS, you can actually use the same application password for both of them. It doesn't matter what name you gave in the window above.
There's also a Google help page at https://support.google.com/accounts/answer/185833?hl=en explaining application passwords in more detail.
This topic was last edited on Mar 4, 2022