Starting in version 3.10 of DONATION, there is a new internal editor used for viewing and editing mail merge letters and receipts. It is used both for editing the template letter and receipt files used for mail merging and for viewing, optionally editing and printing completed mail merges.
The editor should be very easy to use. It is pretty much WYSIWYG (What You See Is What You Get), with standard menu and toolbar options for editing. When you are editing the original template letter and receipt files with the codes for the various merge-able fields in them, there is a drop-down list of those fields, and an Insert button that inserts them into the document at the current cursor position. When you are editing the merged documents, those controls for inserting fields are not there.
This editor is actually editing HTML files, like those that are used for web pages. Internally, what DONATION is doing is embedding an Internet Explorer window into its own window, and putting it into "edit mode", which allows editing of the page. (This is not a feature that can be accessed when you use Internet Explorer normally, but it can be controlled by programs.)
Like the main window, the editor window can be resized by clicking and dragging any edge or corner, and moved by clicking on its title bar and dragging it. When you re-open it the next time, it will be the same size and at the same position as when you last used it.
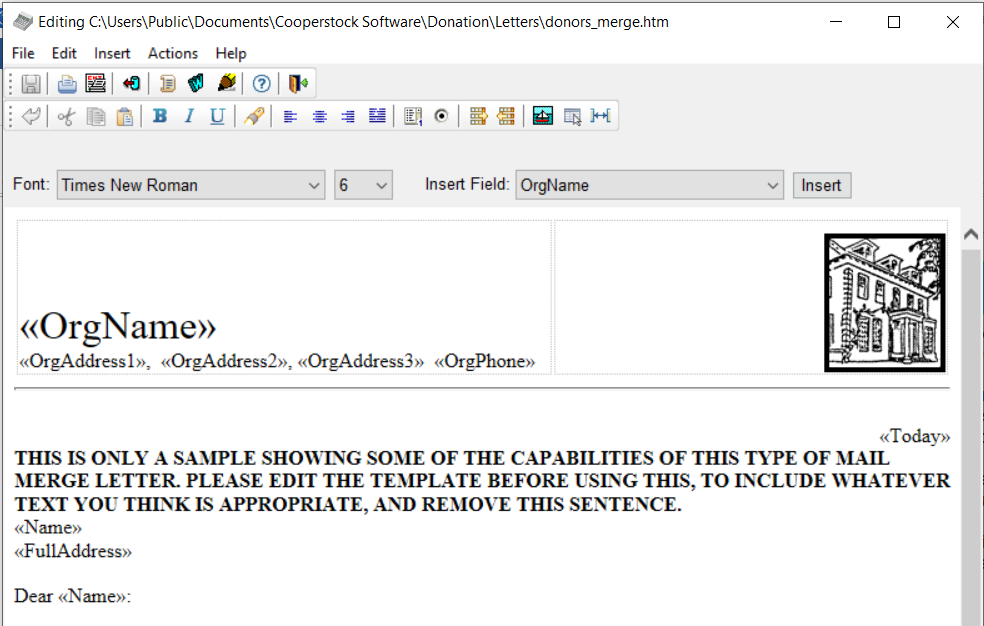
Here is a sample of the top part of the editor (in the case when you are editing a template). If you are looking at a merged document, the Insert Field text, drop-down list of fields, and Insert button are not present.
Borders on Table Cells
In the template documents distributed with version 3.70 or higher of DONATION, all table cells have a thin grey dotted border around them, to help you understand the structure of the document and assist in your editing. Those borders disappear when you print the merged document, save it to PDF, or email it. If you are editing a previously edited document from an earlier version of DONATION, and do not see those borders, you can turn them on with the Edit ⇒ Show Table Borders on Screen menu option.
Details of the Menu and Toolbar Options
File Menu
Menu Option |
Hot Key |
Toolbar Icon |
Action |
Open... |
Ctrl+O |
Allows you to open a different HTML file for editing. |
|
Save |
|
Saves any changes in the current file back to your hard drive. This is disabled when no changes have been made. Note: Pressing Ctrl+S in the editor will also save, but it is not recommended, because strangely enough the editor won't know you have saved, and it will still prompt you to save when you exit! |
|
Page Setup and |
Brings up a Page Setup dialog box, for settings such as margins.
Note that Internet Explorer's default page header and footer are turned off whenever you are using this editor, and that changes made here apply even to any printing done from a regular Internet Explorer window, but only while this editor window is open. Changes to the page header and footer made here do not persist between uses of this window.
Changes to margins made here do persist between uses of this window, and also apply to Internet Explorer. Changes to margins in Internet Explorer's Print ⇒ Page Setup menu option also persist and apply both to it and to this window. |
||
Print Preview... |
Brings up a Print Preview of the document. Note: for very long merged documents (for example hundreds of pages), this can be very slow. Warning: If you are mail-merging receipts, do not print them from the Print Preview window. Receipts only get saved back to the database if they have been printed (or saved to PDF or emailed), but the program cannot know that you printed them if you print from the Print Preview window. So if you do that, it will be as if those receipts were never created, because they will not get saved. |
||
Print... |
|
Brings up a normal Print dialog box from which you can print the document. |
|
Save PDF... |
|
Brings up a Save PDF File As dialog, in which you can specify the filename and directory to save a PDF copy of the current document in. After the save, it displays the PDF file in your standard viewer for PDF files (usually Adobe Reader). See also: Saving Reports, Receipts and Letters as PDF Files. |
|
Email/Print |
|
This is visible only when viewing merged letters or receipts, not when editing template files. It allows you to email the receipts or letters to donors who have email addresses, and optionally print the rest. |
|
Exit |
Alt+F4 |
|
Exits this editor window. If there are unsaved changes, it prompts for whether you want to save them. |
For technical reasons, there is no Save As option on the File menu, although that option is common in other editors. You can do the equivalent of this by using the Edit Copy button in either Letters menu option's window, which appears after you check the "Show Advanced Actions" checkbox.
Edit Menu
Menu Option |
Hot Key |
Toolbar Icon |
Action |
Undo |
Ctrl+Z |
|
Undoes the last editing action. This is disabled when there is nothing to undo. Note that after Saving a file, you are no longer able to undo any changes prior to the save. |
Cut |
Ctrl+X |
|
Cuts any selected text out of the document, and puts it into the clipboard. |
Copy |
Ctrl+C |
|
Copies any selected text to the clipboard. |
Paste |
Ctrl+V |
|
Pastes any text (possibly including formatting) from the clipboard into the document. Note that you can copy text from other programs, for example word processors like Microsoft Word or WordPerfect, to the clipboard, then Paste them into this editor.
If any images are pasted in, if this was done with this Edit ⇒ Paste menu option (but not if it was done with Ctrl+V) they will be removed, because they could crash the program. Images should only be inserted with the appropriate Insert menu options - the first three on the Insert menu listed below. Images inserted with Ctrl+V will be removed when you try to save your changes. |
Select All |
Ctrl+A |
Selects (highlights) all of the text in the document. |
|
Bold |
Ctrl+B |
|
Changes any selected text to boldface, or to normal if it is currently bold. If there is no selection, toggles whether or not the text you will type after the current cursor position is bold. |
Italic |
Ctrl+I |
|
As for Bold |
Underline |
Ctrl+U |
|
As for Bold |
Find |
Ctrl+F |
|
Brings up a Find dialog box for finding text in the document |
Justify |
Brings up a sub-menu of the following options: |
||
Left |
|
Left justifies the current paragraph, or selected paragraphs |
|
Center |
|
Centers paragraphs, as above |
|
Right |
|
Right justifies, as above |
|
Full |
|
Does full justification, as above |
|
Ordered List |
|
Changes the current paragraph or selected paragraphs to be part of an ordered (i.e. numbered) list. |
|
Unordered List |
|
Changes the current paragraph, or selected paragraphs to be part of an unordered (i.e. bulleted) list. |
|
Indent |
|
Increases the indent level of the current paragraph, or selected paragraphs (i.e. moves them to the right). Note: This indents the whole paragraph, not just the first line. It can also change indent levels of ordered or unordered lists. |
|
Outdent |
|
Decreases the indent level of the current paragraph, or selected paragraphs (i.e. moves them to the left). It can also change indent levels of ordered or unordered lists. |
|
Indent First Line of |
Indents the first line of the paragraph in which the cursor is located, by 1/2 inch. Note: For some reason this action cannot be Undone, except of course by exiting the editor without saving your changes. |
||
Show Table Borders on Screen |
For documents that are not already showing thin grey dotted borders around table cells (when displayed on the screen only), they can be added with this menu option. Those borders disappear when you print the merged document, save it to PDF, or email it. |
Insert Menu
Menu Option |
Hot Key |
Toolbar Icon |
Action |
Image... |
|
Brings up a dialog box where you can specify an image to be inserted into the document at the current cursor position, and some properties for it, as follows: 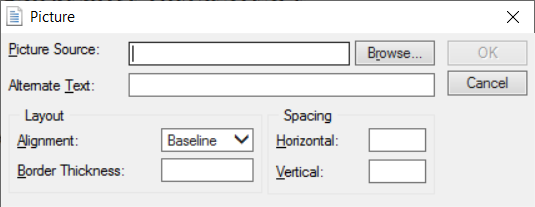
Unlike the next two Insert options (Logo Image and Signature Image), images inserted in this way are not stored in the database. So if you share the database between computers in any way, or move the program to a new computer, any such images will have to also be manually copied, to exactly the same directory they were on in the original computer, for them to appear in the document.
One way to avoid that problem to use an image that is on a website that your organization owns. To do that, enter the full web address of that image, such as http://www.yourorganization.com/imagename.gif, in the Picture Source field in the dialog box shown above. Of course that will only work consistently if all users of this database always have Internet access, and the image isn't moved or changed on your website. |
|
Logo Image |
Inserts the logo image created in the window accessed via the Select Logo and Signature button on the Maintenance ⇒ Receipt Options window. (Because this is usually how and where it is used, it inserts the image with right alignment.) If no logo image has been specified yet, it gives you an option to use that window directly, to specify the required image. If the logo image is not exactly the standard size of 150 x 60 pixels, it gives you an option to scale it to that size.
Logo images inserted in this way are stored in the database and will automatically work on any computer the database is moved to. |
||
Signature Image |
Inserts the signature image created in the window accessed via the Select Logo and Signature button on the Maintenance ⇒ Receipt Options window. If no signature image has been specified yet, it gives you an option to use that window directly, to specify the required image. If the signature image is not exactly the standard size of 166 x 39 pixels, it gives you an option to scale it to that size.
Signature images inserted in this way are stored in the database and will automatically work on any computer the database is moved to. |
||
Table... |
|
Brings up a dialog box where you can specify a table to be inserted into the document at the current cursor position, and some properties for it. Tables can be very helpful for laying out the structure of more complicated documents, like receipts. |
|
Horizontal Line |
Inserts a horizontal line at the current cursor position. |
||
Page Break |
Brings up a sub-menu of the following options, for inserting a page break. Among other uses, this would allow you to create multiple-page letters (for example for a receipt preceded or followed by a cover letter on a separate page). |
||
At Start of |
Inserts the page break at the very start of the document. |
||
At Current Cursor Position |
Inserts the page break at the current cursor position. |
||
At End of |
Inserts the page break at the very end of the document. |
||
Non-Breaking |
|
Inserts a non-breaking space at the current cursor position. (See below, under Shift+Spacebar, to understand what this is.) |
You insert fields into templates by selecting a desired field from the drop-down list to the right of the text "Insert Field", just above the editing area, and then clicking the Insert button. The fields in the drop-down list are shown without the "«" and "»" that will surround their names when they are inserted - which shows that they are merge fields. If you click into the list, you can press the first letter of a desired field name (assuming you know what it is) repeatedly, to cycle through all fields that start with that letter.
Actions Menu
Menu Option |
Hot Key |
Toolbar Icon |
Action |
Refresh |
Ctrl+R |
|
Reloads the current document from the disk. Useful if it has been edited by another program and you aren't prompted to reload it when you come back to this editor (which you actually usually are). |
Zoom |
Just puts up a message box explaining how to zoom in or out on the document (which doesn't change the size when you print it!) using keyboard or mouse controls. |
||
View/Edit Source |
|
Optionally saves the current document, then opens the HTML source code for it in the Windows plain-text editing program Notepad. (Only for use by people who know HTML.) If you make changes in Notepad and save them, you will be prompted to reload the file when you return to this editor. |
|
Edit in Microsoft |
|
Optionally saves the current document, then opens the document for editing in Microsoft Word. If you make changes in Word and save them, you will be prompted to reload the file when you return to this editor. (See below for important notes - this has a danger of damaging the merge fields in your document, and you MUST close the file in Word after editing it, and must save the file as "Web Page, Filtered".) |
|
Edit in Dreamweaver |
|
This menu option and toolbar option only appears if you have the HTML editor program Dreamweaver installed on your computer. Optionally saves the current document, then opens the document for editing in Dreamweaver. If you make changes in Dreamweaver and save them, you will be prompted to reload the file when you return to this editor. |
|
Edit in Microsoft Expression Web |
|
Like Edit in Dreamweaver above, but for the HTML editor program Microsoft Expression Web. |
|
Edit in Microsoft FrontPage |
|
Like Edit in Dreamweaver above, but for the HTML editor program Microsoft FrontPage. |
|
Edit in ... |
|
Edits in an alternative HTML editor, set up with the Configure Alternate HTML Editor menu option on this menu. This menu and toolbar option only appear if you have done that configuration, and the configured name of that program appears in place of "..." in the menu and toolbar item text. |
|
Configure Alternate HTML Editor |
Allows you to set up the name and full pathname to the executable file of an alternate HTML editor, other than any of the ones in the menu options above, which are automatically detected if they are present on your computer. See Configuring an Alternate HTML Editor for full details. |
Help Menu (Toolbar Icon ![]() )
)
There are no options on this menu - just click the Help menu heading itself to bring up this help page.
Other Controls
| Font Drop-downs | There are two drop-downs for the font. The first sets the selected font, changing any selection to that font or if there is no selection, changing anything typed after the cursor to that font. The second drop-down sets the font size of the current selection or what you type after the cursor. Unfortunately, you have to select from special HTML sizes 1 through 7, with 2 or 3 being a "normal" size. Larger numbers are for larger fonts; smaller numbers for smaller fonts. For technical reasons, it does not seem to be possible to use a normal point size drop-down list in this editor. If you need more control over the font size, edit the document in Microsoft Word as described below. |
| Inserting Fields | When you are editing the original letter file, there is a drop-down list of insertable fields. To insert one, place the cursor where you want the field to go in the document, select the desired field from the list, and click the Insert button. A list of detailed explanations of all of the available fields is on the Mail Merge Fields page. You can also copy and paste mail merge fields within one document, or edit them by hand - there is no "magic" in the insertion. |
Right-Click Popup Menu
If you right-click in the body of the editor, a standard popup menu appears. Note that this menu is provided by Internet Explorer, not by the DONATION program, so it has a few quirks in relation to how similar features work on the main menu and toolbar of this editor.
Cut, Copy, Paste, and Insert Image all work just like the same-named features in the window's menu and toolbar.
View Source works a bit differently - it doesn't prompt to save any changes first, so if there are changes, it has you edit a modified document filename. So, any changes you make will not affect the original document.
Browse View takes you out of edit mode on the document, so that you cannot make any further changes to it or save it. (So, we don't recommend using this!)
If you right-click on certain types of content, such as an image, different options may appear. I've noticed that not all of them work, such as when there is a "Properties" option, it does nothing. Sorry about that!
Using the Toolbar
If you hover your mouse over a toolbar icon, it will show a description of what that tool does. If you want to see text with each icon, right-click anywhere in the toolbar and pick Show Text from the popup menu.
Special Keystrokes for Editing
Other than the Hot Keys listed in the table of menu options above, here are few other keystrokes you may want to be aware of (most of which are in common with other word processors):
•Enter enters a paragraph break (with a blank line between paragraphs).
•Shift+Enter enters just a line break (with no blank line).
•Insert or Ins toggles (switches between) insert and overwrite mode.
•Shift+Spacebar inserts what is called a non-breaking space. (It looks just like a space after you insert it, though.) Using this between words, rather than regular spaces, will cause them to not wrap or be split between lines. Also, multiple non-breaking spaces will actually take up space in a line, whereas in HTML (which you are using), multiple regular spaces in a row will be compressed to one space when they are displayed. There's also an Insert menu option and toolbar button for inserting this character.
Other standard word processor actions also tend to work, such as selecting text by either clicking and dragging the mouse through it, or holding down the Shift key and using cursor movement keys (such as arrow keys).
Editing Documents in Microsoft Word
If you use the Actions ⇒ Edit in Microsoft Word option, the current document is first saved if it has changes (and if you agree), then opened for editing in Microsoft Word.
We actually do not recommend doing this if there is any way you can do your editing in the program's built-in editor (or any other pure HTML editor if you have one available). That is because even if you follow all of the instructions below carefully, there is still a danger that editing your document in Word will damage the merge fields in it so that they do not merge properly!
If you do edit in Word, it is crucial that when you save any changes in it, you use Word's File ⇒ Save As menu option, and change the Save As type to "Web Page, Filtered". The other options for web pages either create files that can't be opened at all in this editor, or ones that are extremely complex and comparatively huge. Files saved with the other options may also leave some of the merge fields un-merged, when you do create a letter or receipt with them. And as mentioned above, even if you save correctly this way, there is still a danger of this problem occurring.
Some versions of Word, to get to Save As "Web Page, Filtered", under Save As on the Office menu, you need to pick Other Formats, and then you get to a Save As window on which you can change the "Save as type" to "Web Page, Filtered",
Also, you must Close the file in Word before returning to edit it further in this editor. If you don't, and you try to save it again in this editor, the file will not be able to be saved, and you may not even get any error messages informing you that it has not been saved!
After you return from Word to the built-in editor, you will be prompted with a message saying that the file was edited outside of the editor, asking whether you want to reload it. Answer Yes, or you will lose the changes you made.
So, why would you still want to take these risks, and edit the document in Word? Well, it's just a more full-featured editor. For editing plain text, or text with simple formatting, this internal editor is perfectly fine. But when you go beyond that, you may need more power.
The biggest issue, in our experience, is for documents like the sample receipt layouts that are installed with the program, that use tables for layout. In this internal editor, although table boundaries are visible, there is very little capability to manipulate the structure of the table. In Word, you can use lots of menu options to make changes to the structure of tables.
You can also edit the properties of things like images and horizontal lines in Word, which you can't do in this editor. (If you want to change the properties of an image in this editor, you have to delete it, then re-insert it and choose the properties you want in the insertion dialog box that comes up.)
Please note that there are many features in Microsoft Word that do not translate properly when saved as HTML. In some cases, you may have to touch up files edited with Word in this editor a bit after saving them.
Word can also actually damage some things in the HTML of mail-merge documents provided with DONATION, such as deleting some CSS (Cascading Style Sheet) codes used for setting the font sizes for the tables that can be included in receipts and other document with merge codes like «DetailsTable». That would be one reason for using the other options described in the following section of this page. If that problem does happen, please see the sub-section "Changing the Font Size for the Details and Summary Tables" in the section on the Details Table in the Help page on Mail Merge Fields for how to fix it.
Again, if it is at all possible to do all of your editing without using Microsoft Word (either by using just the internal editor, or by using other HTML editors as described below) we recommend that. Too many problems can occur after editing in Microsoft Word.
Editing Documents with Other Word Processors or HTML Editors
Although there is no menu option in this editor for doing this, if you do not use Microsoft Word but use another word processing program (such as WordPerfect), you could also try editing the letters with that word processor. Almost any relatively recently word processor should have the ability to both load and save HTML files.
Of course, we cannot guarantee exactly how compatible the HTML editing and saving capabilities in other word processors will be with the internal editor in DONATION. You will have to test that out and see how it works for you. It will always be best to just use the internal editor as much as possible.
If you have a professional HTML editor like Dreamweaver, Microsoft FrontPage or Microsoft Expression Web installed, you can also optionally edit in them. The Actions ⇒ Edit in Dreamweaver, Edit in Microsoft FrontPage and Edit in Microsoft Expression Web menu options and corresponding toolbar icons appear for editing in them, if you have each of those programs installed respectively. If you are familiar with HTML or any of these programs, they are a better choice than editing in Microsoft Word.
If you have another HTML editor installed, you can configure editing with it, through the Actions ⇒ Configure Alternate HTML Editor menu option. After doing that, a new Actions menu option and toolbar icon will appear for editing in the program you configured. The Help topic linked to in the first sentence of this paragraph gives some details about a couple of specific free WYSISYG (what you see is what you get) HTML editors that you might want to try.
Your final option for editing outside of DONATION is the Actions ⇒ View/Edit Source in Notepad menu option, which is only for those who really know their HTML, since it gives you no other assistance than seeing the pure HTML of the document.
As with editing in Word, after you return from any external editor to the built-in editor, you will be prompted with a message saying that the file was edited outside of the editor, asking whether you want to reload it. Answer Yes, or you will lose the changes you made.
Warning about Editing Mail Merge Documents other than through DONATION
With versions of DONATION prior to version 3.66, all template mail-merge documents were just stored in the Letters directory under the program's Data Directory, so you could edit them with external editing programs while DONATION was not running. After doing that, any changed files would be automatically used when you went to use them in DONATION.
Starting in version 3.66 of DONATION, however, the official copies of all template mail-merge documents are stored in the program's database, and only copied out to the Letters directory when you need to use them, either for editing or actual merging. As a result, if you edit those files outside of DONATION (that is, without using one of the menu or toolbar options in the built-in editor), then go to use them, your changes will be lost, because they will be overwritten by the copy from the database.
The solution to this is to always do editing with external editors by opening up the desired template in the internal editor first, then using one of the Actions menu options or corresponding toolbar buttons to do that editing. When you do it that way, after saving your changes in the external editor, and returning to the internal editor, it prompts you to reload those changes - be sure to answer Yes. It will all work perfectly then, and you won't lose any changes.
Editing Tables, Images etc.
Once you have entered a table, image or horizontal line in the editor, you can't change them very much directly. If you click in them, they become selected with drag handles, which you can click and drag on to change their size. (A table becomes selected if you click on its border, rather than into a cell.) They may also be able to be affected with menu options / toolbar controls such as Indent/Outdent and the Justify options. However, you can't do anything like changing the name of a file used by an image, or the number of rows or columns in a table. For that, you would have to either delete the object (by pressing the Del or Backspace key on your keyboard when they are selected) and recreate it, or use one of the Actions menu options described above to edit it in an external editor.
Of course, you can edit the text in table cells, by clicking into the cell and editing normally. Many of the regular menu/toolbar options work within cells as well, such as justification, fonts, etc.
This topic was last edited on Apr 18, 2025