Sometimes users who start using DONATION have previously been using QuickBooks to record their individual donors and donation details. Such users may wish to export that data from QuickBooks and import it into DONATION. As you will see from the details below, it is possible to import the donors, but it may not be possible to import the donations.
Once you have done that, whatever overall accounting program you continue to use (whether or not it is QuickBooks), you will no longer enter details of donors and donations into it. Instead, we recommend recording only summary totals from each bank deposit into your accounting program, by using the DONATION program's Bank Deposits feature.
QuickBooks Desktop Pro 2020
This section applies to QuickBooks Desktop Pro 2020. Likely the details are the same or very similar in other Desktop versions, but you will of course have to check that out for yourself. See below for a section on QuickBooks Online.
Most likely you have recorded your donors as Customers. In some editions you may have had an option to rename Customers to Donors, but likely the details are still the same as will be described here. If you are going to try to also import the donations (see below) it will be crucial that each Customer / donor has their email address recorded.
To export the Customers from QuickBooks Desktop Pro 2020, go to the Customers area, and pick Excel ⇒ Export Customer List from its menu. Likely you will leave the default options on the window that comes up as is, then click Export. That will bring up the exported list of customers in Excel. Save that file somewhere you can find it.
Here is a table of a sample exported customer list from QuickBooks Desktop Pro 2020.
We have actually turned the data sideways to make it understandable (and fit on a page!). So if this was in Excel, the rows would be columns and vice-versa. We added a first column to the table below to count the field numbers. What is listed as Field 1 is really Column A in Excel, Field 2 is Column B, etc. The 2nd column of the table below is the row of headings from the data, and the 3rd column is a made-up sample data row.
Field # |
Heading |
Data |
1 |
none |
|
2 |
Active Status |
Active |
3 |
Customer |
John Smith |
4 |
Balance |
0.00 |
5 |
Balance Total |
0.00 |
6 |
Company |
Smith Incorporated |
7 |
Mr./Mrs.... |
Mr. |
8 |
First Name |
John |
9 |
M.I. (middle initial) |
Q. |
10 |
Last Name |
Smith |
11 |
Primary Contact |
John |
12 |
Main Phone |
123-456-7890 |
13 |
Fax |
|
14 |
Alt Phone |
|
15 |
Secondary Contact |
|
16 |
Job Title |
|
17 |
Main Email |
|
18 |
Invoice To 1 |
John Smith |
19 |
Invoice To 2 |
123 Main St. |
20 |
Invoice To 3 |
Suite 100 |
21 |
Invoice To 4 |
Anytown ON M1M 1M1 |
22 |
... |
|
There are a bunch of further columns that do not seem relevant.
You can import that file described above, from QuickBooks Desktop Pro 2020, with DONATION's Database ⇒ Import ⇒ Donors menu option.
Please first read the Help topic Importing Donors from Excel first to understand the general issues about doing this type of import. What follows are the specifics for this QuickBooks data. This page will not repeat the details from that overall instruction page.
Importing the Donors
Based on the data above, the following list of columns could be selected in the Fields to Import list of the Database ⇒ Import ⇒ Donors window:
•Skip 5 Columns
•Business Name
•Title
•First Name
•Middle Initial
•Last Name
•Skip 1 Column
•Phone
•Skip 4 Columns
•Skip 1 Column
•Addr1
•Addr2
•Addr3
The rest of the columns seem to be irrelevant, so we will ignore them. When importing donors, if there are extra columns at the end of each row, you will be warned about that, but given an option to just ignore them, so we don't need to have a big "Skip ... Columns" at the end to skip them.
If you have both Active and Inactive customers in QuickBooks, you may want to eliminate the rows with inactive ones before importing.
You can then import that possibly edited file, with 1 header row, using Email Address as the unique identifier for donors, selecting either Update existing donors ... or Ignore rows ... matching donors (whichever you prefer). In fact, since you are most likely doing this just once when you first switch from recording donors in QuickBooks to using DONATION, the Add all rows ... as new donors option might be the most appropriate choice.
QuickBooks Online
We also tested the mid-2020 version of QuickBooks Online to see how it would export the data. To export Customers from it, go to Sales on the left-hand menu, then Customers. Click the icon for "Export to Excel" above the list of customers that comes up, and save the file somewhere you can find it.
The QuickBooks Online export format for Customers is different from the one used by QuickBooks Desktop. It has one significant problem: if there are two lines of address (before the City etc.), they are put into one cell in Excel (in Column C) with a line break in the cell, like this:
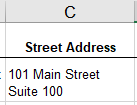
To be importable into DONATION, that needs to be split out into two separate columns, with the line break removed. So we will assume that you inserted a new Column D for the 2nd line of address, and used copy and paste to pull out any 2nd lines of address that appeared like the one above into that column D. You need to also be sure that the line break gets removed from column C, by using Delete or Backspace from an appropriate place when you are editing the field.
Having done that, the following is what you will see in the data. Again, we have actually turned the data sideways to make it understandable (and fit on a page!). So if this was in Excel, the rows would be columns and vice-versa. We added a first column to the table below to count the field numbers. What is listed as Field 1 is really Column A in Excel, Field 2 is Column B, etc. The 2nd column of the table below is the row of headings from the data, and the 3rd column is a made-up sample data row.
Field # |
Heading |
Data |
1 |
Customer |
John Smith |
2 |
Company |
Smith Incorporated |
3 |
Street Address |
123 Any Street |
4 |
Address 2 (added to split things out as described above) |
Suite 100 |
5 |
City |
Toronto |
6 |
Province/Territory (presumably this says State for U.S. users) |
ON |
7 |
Country |
|
8 |
Postal Code (presumably this says Zip Code for U.S. users) |
M1M 1M1 |
9 |
Phone |
123-456-7890 |
10 |
||
11 |
... |
There are a few columns after that that do not seem relevant.
You can import that file described above, from QuickBooks Online, with the Database ⇒ Import ⇒ Donors menu option.
Please first read the Help topic Importing Donors from Excel to understand the general issues about doing this type of import. What follows are the specifics for this QuickBooks Online data.
Importing the Donors Exported from QuickBooks Online
Based on the data above, the following list of columns could be selected in the Fields to Import list of the Database ⇒ Import ⇒ Donors window:
•Name: First Last
•Business Name
•Addr1
•Addr2
•Addr3 (Merge 2 Fields)
•Skip 1 Column
•Postal Code
•Phone
We're assuming you don't need to import the Country.
The rest of the exported columns seem to be irrelevant, so we will ignore them. When importing donors, if there are extra columns at the end of each row, you will be warned about that, but given an option to just ignore them, so we don't need to have a big "Skip ... Columns" at the end to skip them.
You can then import that file, with 1 header row, using Email Address as the unique identifier for donors, selecting either Update existing donors ... or Ignore rows ... matching donors (whichever you prefer). In fact, since you are most likely doing this just once when you first switch from recording donors in QuickBooks to using DONATION, the Add all rows ... as new donors option might be the most appropriate choice.
Importing the Donations
Unfortunately it is not clear to us that this is easily possible from QuickBooks Desktop Pro or QuickBooks Online. If you can figure out a realistic way to do it, please let us know (Contact Information here)! The major difficulty is that donations can only be imported into DONATION if they can be linked to the donors by an email address or member/envelope number field value that is in the import file.
The following are some notes on the ways we have attempted to do this, none of which really worked, and the reasons why they didn't work.
We are aware of two ways of entering donations into QuickBooks Desktop Pro: as a Sales Receipt using the Customers area, or as a Deposit on the Register for the bank account you are depositing into.
If you use Sales Receipts, you seem to need to have defined Items for each income account / donation category that you receive donations on. But if you export them from that Customer area, with the QuickBooks menu option Excel ⇒ Export Transactions, that exporting seems to only be one customer/donor at a time, it doesn't identify the customer as part of the exported data, it's in a report format that DONATION cannot import, and it doesn't identify the Item so you can't tell what donation category it's for.
You could also go to the Register window for the bank account that donations are deposited into, and generate a Quick Report including the desired donations. However, it might be hard to filter that to include only donations.
Even if you can get only the deposit transactions for donations in that Quick Report, and you then use the Excel drop-down on the report to export it to a worksheet, it is again a formatted report, not really suitable for importing using the DONATION program's Database ⇒ Import ⇒ Donations menu option. It's grouped by names on their own rows, with no identifying email address that DONATION would need for matching the donors to the donations. The transactions are then on their own rows, under the rows for the names. If a transaction was entered on a Register, as a single deposit transaction using Splits to determine the Customer (donor) and the Income Account being donated to, only "-SPLIT-" is exported to the file, which is not sufficient for importing.
We also experimented with Custom Reports in QuickBooks Pro. It seemed to be possible to create a Transaction Detail Custom Report that includes the "Name E-Mail" field, which would be necessary for importing, to match the donation to the donor. However, what that report does is include rows for both the debits and credits in each transaction. So for donations, there will be a line with a positive number, which should be ignored, and a line with a negative number, which is what you would want to import - after changing it to a positive number. So while you could potentially import that after saving it to Excel, it would take a lot of work to first delete the rows with positive amounts, and then convert the negative amounts to positive ones before importing.
In QuickBooks Online, if you go to the Account History for your bank account, and use the Export icon, you again get something that cannot be imported, because it doesn't include an import identifier such as the email address for the donors (only perhaps the name, as the Payee), and if it's a transaction with Splits, there is nothing in the column for the Account. QuickBooks Online doesn't have a customization option for a transaction report (like the Journal) to include the customer's email address. So there is no way to directly create an importable custom report, without for instance having to manually copy and paste email addresses into a column of an exported transaction report.
This topic was last edited on Feb 17, 2023