In DONATION, you can select groups of donations to make up one bank deposit of cash and cheques etc., print a report for that bank deposit, and optionally export a summary transaction representing that bank deposit to one of two accounting programs: Software4Nonprofits ACCOUNTS, or Intuit QuickBooks Desktop.
You can also use a "bank deposits" feature for listing donations that are deposited automatically into your bank or other accounting accounting, such as eTransfers (for Canada), ACH (for USA) or online donation services like PayPal. Such donations may also have fees for each transaction. They can be reported on or exported as individual transactions for import into ACCOUNTS or QuickBooks Desktop.
If you are using Abundant online donations, they have their own bank deposits feature, for confirming the amounts deposited to your bank, reporting on them, and exporting them for importing into your accounting program. The same configuration steps given in this Help topic are also needed before you can use the Abundant bank deposits features.
You do not have to use the features in DONATION about bank deposits. They are unavoidably a bit complicated, and organizations have used DONATION with no problems for many years without these features being available. For many users, they can see what will be in their bank deposit with other reports, like the Reports ⇒ One Date Donation report (especially for churches) or various of the Reports ⇒ Donation ⇒ All Donations reports, with a suitable date range selected. Also, the features for specifying bank deposits will not work well for users with more complex situations, such as depositing some donations into one bank account, and other donations into another bank account.
If you do wish to process bank deposits in DONATION, you first need to do some configuration. You start that with the Maintenance ⇒ Configure Bank Deposits menu option. That brings up the following window:
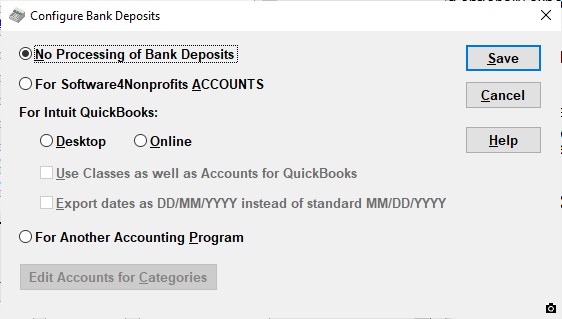
Select which accounting program you will be using from the radio buttons.
If you are using QuickBooks Desktop or Online, the checkbox for "Use Classes as well as Accounts for QuickBooks" will become enabled, and you can check that if you do use classes with your income accounts that match the donation categories in DONATION. Both versions of QuickBooks support the use of Classes, and they are often used to distinguish income and expenses for different funds, for organizations that are doing fund accounting. (Software4Nonprofits ACCOUNTS does fund accounting in a much more automatic way, and with better reporting and maintenance of always up-to-date fund balances, than any version of QuickBooks!)
Also if you are using QuickBooks Desktop or Online, the checkbox for "Export dates as DD/MM/YYYY instead of standard MM/DD/YYYY" will become enabled. Intuit's documentation about the IIF import file format that DONATION exports to, for importing into QuickBooks Desktop, says that dates in such files should always be in the format MM/DD/YYYY. Unfortunately, in our experience at least sometimes if the computer running QuickBooks Desktop has a Short Date Format (as set in Windows Control Panel's Region and Language tool) with the day preceding the month (such as DD/MM/YYYY), imports of IIF files with the date in the MM/DD/YYYY format will either fail with an error message, or reverse the day and the month in the import. If you encounter this problem, and the Short Date Format on your computer running QuickBooks Desktop is something like DD/MM/YYYY, you will need to check this checkbox.
Click Save to save your selection. After that, some messages will come up, and two additional windows for further configuration will be opened for you.
Note: Unlike QuickBooks Desktop, QuickBooks Online does not have a facility for importing the sort of export files exported by DONATION, IIF files. If you selected QuickBooks Online, the Export button in the Bank Deposits windows will explain that it cannot be used. In that case, as with any other bookkeeping or accounting program other than ACCOUNTS or QuickBooks Desktop, you can just manually enter the printed-out summary transaction for Bank Deposits into QuickBooks Online. There are apparently also 3rd-party programs that allow for the importing of IIF files into QuickBooks Online, but doing that would not be supported by us, because it is not our product!
First Additional Window
The first window is for associating the names of accounts in your accounting program with your Donation Categories in DONATION:
The first time this window is displayed, it will copy each donation Category name, shown in the left-hand column, to be its first guess at the accounting program Account name, shown in the right-hand column. You can then edit the Account names in that right-hand column to exactly match whatever you have in your accounting program, corresponding to that donation category.
The Account name corresponding to each donation category must be the exact name of an Income account in your accounting program, or the eventual import into that program will not work. If you are using the ACCOUNTS program, do not use the names of Fund (equity) accounts, even if this is income that should increase that fund balance. Rather, use the name of an Income account that is linked to that Fund account.
Important: Do not include the accounting program's account number at the start of the Account field value. Only the account's name should be there, or neither ACCOUNTS nor QuickBooks will be able to import exported bank deposit transactions correctly.
If you selected ACCOUNTS, and it is installed on the same computer you are running DONATION on, if possible the Account field will be changed to a drop-down list of the usable Income accounts from ACCOUNTS, so that you can just select them from the list. In that case, the Account isn't editable - you must select from the list, to be sure it's an existing ACCOUNTS Income account! You will need to be sure that you have set up all of the desired Income accounts in ACCOUNTS before you do this configuration.
If you selected either version of QuickBooks, and the checkbox for using Classes, the window displayed above will have an additional column on each row, for the Class, You can fill that in as well, when needed.
For QuickBooks, if any of the associated accounts are sub-accounts, you need to put in the full name, for example "Parent Account:Sub Account" (without the quotes). A colon separates each level of parent and sub account. If classes are displayed and you are using sub-classes, they need to be separated by colons in the same way, for example "Parent Class:Sub Class".
It's important to understand that for QuickBooks Desktop, if there are any mismatches of the account names entered here with your actual account names in QuickBooks, the import of the bank deposit transaction will still be accepted, but it may create new accounts in QuickBooks (all of them considered to be bank accounts!) for the incorrect account names. Sorry, we cannot control this, it's just how QuickBooks transaction importing works! For importing into ACCOUNTS, any mismatched account names will cause the import to be rejected, with a helpful explanatory error message saying exactly what is wrong.
Also for QuickBooks Desktop, all matched accounts must be Income accounts in QuickBooks (not Other Income, or any other type) or the imports will not work.
Although in our testing with QuickBooks 2012 Pro the matching of account names is not case-sensitive (the names can vary in the use of upper and lower case between DONATION and QuickBooks), their documentation is silent on that point, and various websites for other products that integrate with QuickBooks say that the matching is case-sensitive. So it will be safer to use the account names in the exact same case as you have them in QuickBooks. For ACCOUNTS, the matching of account names is definitely not case sensitive.
For ACCOUNTS, the Income accounts you use must be bottom-level accounts, i.e. there must not be sub-accounts or sub-sub-accounts underneath them.
If you leave any of the Account entries empty, donations with that donation category will never be included in a bank deposit (because there is no account associated with it). Normally you would associate accounts with all categories.
When you are finished making changes, Save them, then close the window.
Note: If you just need to edit the accounts associated with donation categories, you can access this window by going into Maintenance ⇒ Configure Bank Deposits and using the Edit Accounts for Categories button. (You will also be prompted to go to this window if you edit categories with Maintenance ⇒ Donation Categories, after configuring to process bank deposits.)
If it is important to have a distinction between receiptable/receipted income and non-receipted income in your accounting program, please see the section on Non-Receiptable Donations for some important details about how this works with bank deposits.
Second Additional Window
The next window is a variation of the regular Maintenance ⇒ Donation Paid By Values window, as follows:
This allows you to specify which Paid By values for donations are ones that indicate the donation will be included in a bank deposit for cash and cheques, and which ones will be excluded (because they get into your bank, and/or your accounting program, in a different way). Review those values carefully, make any desired changes (by checking or unchecking the "Include in Bank Deposit" checkbox) then Save the changes, and close the window.
It's important to remember that the values on this window are just the contents of the Cheque # / Paid By drop-down list when you are entering or editing donations, but you can always enter any other value into that field as well (such as actual cheque numbers). Any value that is not on this list is assumed to be a potential part of a bank deposit for cash or cheques. (So, if you want to make sure that a Paid By value is excluded from bank deposits for cash or cheques, it must be on this list, with the checkbox unchecked.)
Important: If you are also doing bank deposits for individual transactions, such as eTransfer, ACH or PayPal, the Paid By values that you can use on that Bank Deposits window are exactly the ones where the "Include in Bank Deposit" checkbox is not checked! So you need to make sure that any such value that you want to use is included in this window, with the checkbox unchecked.
This window actually replaces the normal Maintenance ⇒ Donation Paid By Values window once your Bank Deposits have been configured.
What happens next?
After you have configured your bank deposits, you can create specific bank deposits with the Maintenance ⇒ Create Bank Deposit ⇒ Cash and Cheques menu option, the Maintenance ⇒ Create Bank Deposit ⇒ Individual Transactions menu option, and, if you have configured the use of the Abundant online donation service, the Maintenance ⇒ Create Bank Deposit ⇒ Abundant Donations menu option.
This topic was last edited on Sep 16, 2024