SQL stands for Structured Query Language. It is the basic programming language used by the Firebird database that stores the data in DONATION, and by almost all major database systems today, such as Microsoft or Sybase SQL Server or Oracle. Some very technically experienced users of the program may be familiar with SQL, and may wish to explore the database using it. That is what the Database ⇒ SQL Select feature allows you to do. We may also give you some instructions to use this feature either to help debug problems you are having, or to create simple ad-hoc reports that are not included in the Reports menu and that cannot be created with Reports ⇒ Custom Report.
While this SQL Select utility can be used to create custom reports, most users will prefer to use the much easier (though less powerful) Reports ⇒ Custom Reports option, which does not require any knowledge of SQL. With that option, you just select columns from lists, specify a range of years, and click OK. It generates the SQL for the report automatically, and then optionally puts you into this SQL Select window.
When you select Database ⇒ SQL Select (or come to here after clicking OK in the Custom Reports window), the following window comes up on which you can enter a SQL Select statement:
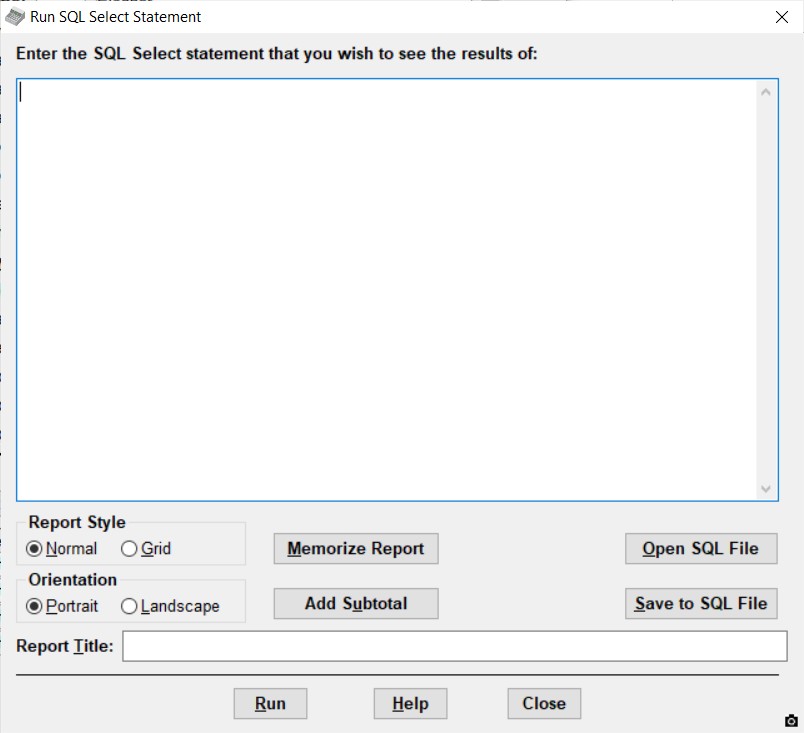
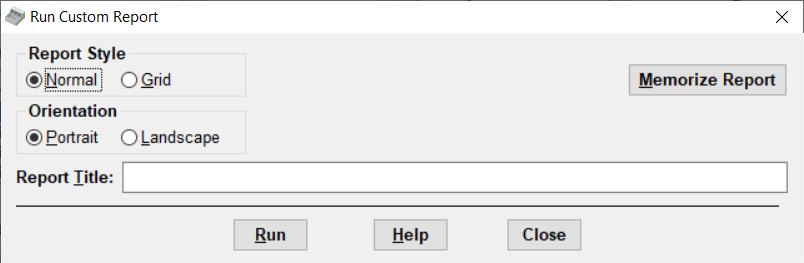
If you have come into here from Reports ⇒ Custom Report, the SQL statement will already be filled in to the large entry box in the window. However, if you checked the Hide SQL Text on Next Window button the Custom Reports window, you will instead see the following simpler window, that does not show the actual SQL, in order to be less confusing:
If the full window is displayed instead of the smaller one, you can save a SQL statement that you enter here (or that was created by a Custom Report) to a file with the Save to SQL File button, or retrieve an existing SQL statement from a file with the Open SQL File button, to re-use it. However, more commonly you would instead use the Memorize Report button - more details on that are below.
On this window you can select a Report Style – either Normal or Grid.
The Normal style looks a lot like the built-in reports. The advantages to using the default Normal Report Style are that it has a standard header section, like the built-in reports, and it starts out in Print Preview mode, so that you can have a better idea of exactly what the printed report will look like.
The Grid style looks more like a spreadsheet, with boxes around each row and column, but it has no header section (except for the column headings). It has some interesting features. You can change the displayed width of columns by clicking on the border between two columns in the row of headings, and dragging it left or right. You can change the order of columns by clicking a heading, and dragging it left or right. When you print the report, the grid is not printed.
You can also select between the Portrait (normal) and Landscape (sideways) Orientations for the report.
In addition, you can specify the Report Title on this window, though it will only be shown on the report if you use the Normal Report Style, not the Grid style.
Once you have your desired statement entered, click the Run button. If there are errors in the SQL, a message box will come up explaining the error. If the SQL is valid, the results will be displayed as a very simply formatted report on the Reports window, as if it was a normal report. From there, you can do anything you could normally do on the Reports window, including Sorting or Filtering the data, Printing the result, and using Save As to save the results to a text file or other file format. However, if you are considering exporting to formatted Excel with the Save As button, please see the warning about problems with that here.
Note: any columns that hold dollar figures (or other currency figures, if you are not in a country that uses dollars) will automatically have a total created for them at the bottom of the report.
If you enter the program with the Donors Only Password, you cannot run SQL that references any database tables or columns that include financial information, such as pledges, donations, receipts, bank deposits and cash counts.
Memorizing your Report
You can memorize a report in the SQL Select window with the Memorize Report button. That will memorize the SQL, Report Style, Orientation and Report Title, and allow you to replay it later with the Reports ⇒ Memorized Reports menu option. Or, you can wait until you are on the report-viewing window after clicking Run in this window, and use the Memorize button there, possibly after using the Sort or Filter buttons, since any sort or filter will also be memorized with the report.
When you replay a report memorized from this window, with Reports ⇒ Memorized Reports, you have two choices, depending on whether or not you check "Display reports memorized from the Database ⇒ SQL Select window in that window, instead of immediately", in that window. If you check it, that will first come back to this SQL Select window to let you review the details, and run it from here. If you don't check that checkbox, it will just immediately run the report.
See Memorized Reports for full details.
Adding Subtotals to your Report
Normally reports generated from this window (or Custom Reports) will automatically add totals at the bottom of the report, for any selected fields that are Amount or Count fields. (Count fields are ones like "# Donors", and "# Donations".)
If the full window is being displayed, showing the actual SQL, there is an Add Subtotals button on the window. Clicking that button changes the Add Subtotals text to read Subtotal break on:, and displays a drop-down list of fields in your SQL to the right of the button, as follows:
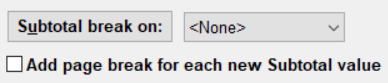
That drop-down list then allows you to pick a field other than an Amount or Count field. Whatever you choose (other than the initial value of "<None>") will be set to be the first field in the sort order (the ORDER BY section of the SQL). And when you Run the report, each time the value of that field changes in the report's data, there will be a subtotal break, with text at the left like "Subtotals on Value:" (with Value replaced by the value of that field in the preceding lines), and subtotals of the Amount and Count fields.
The additional checkbox for Add page break for each new Subtotal value does exactly that, if you check it. That is, when the value in the selected field in the report data changes, then after including the subtotal row in the report, the next displayed rows in the report with different values in that selected field will start on a new page. If you don't check this checkbox, rows with a new value for the selected field just continue on the same page after the subtotal row, as long as there is room for them.
This may sound complicated, but if you try it, and read the messages that come up as you click on things in this area, it should become clear!
Note: If you memorize a report with a subtotal break, that will be included in what gets memorized. And if you use Reports ⇒ Memorized Reports with the "Display reports memorized from the Database ⇒ SQL Select window in that window, instead of immediately" checked, to return to this window for a report has a subtotal break, it will immediately be redisplayed in this window.
Arguments for Donation Date, Category Selection and Working Year
There are six arguments that can be used in different combinations for selecting only a single donation date, a range of donation dates, a range of donation dates and optionally a donation category, the current fiscal year, or the current fiscal year and optionally a donation category, to include in the data selected by the report. These would be included in a WHERE clause in the report (which restricts the data to data satisfying a given condition). There are radio buttons in the Custom Reports window that make these be included automatically, but you can also use them directly if you understand what you are doing. The following are the options:
Please note that these arguments are case-sensitive, so for instance :donation_date would not work if you wanted the first option below, :DONATION_DATE.
•:DONATION_DATE - if this is present, when you Run the report, a window will come up prompting for a single donation date to include in the report. This argument would generally be used in a SQL phrase such as:
WHERE donation.date_received = :DONATION_DATE
•:DONATION_FROM_DATE and :DONATION_TO_DATE - if these are both present, when you Run the report, a window will come up prompting for starting and ending donation dates to include in the report. Example SQL:
WHERE donation.date_received between :DONATION_FROM_DATE and :DONATION_TO_DATE
•:DONATION_FROM_DATE, :DONATION_TO_DATE and :CATEGORYNUM - if all three of these are present, when you Run the report, a window will come up prompting for starting and ending donation dates to include in the report, and optionally a single donation category to include. Example SQL:
WHERE donation.date_received between :DONATION_FROM_DATE and :DONATION_TO_DATE
AND (:CATEGORYNUM = -1 OR category.categorynum = :CATEGORYNUM)
Note: the ":CATEGORYNUM = -1 OR" part makes the SQL work even if you don't select a category in the window prompting for a range of dates and an optional category. Also, you cannot use :CATEGORYNUM alone, without also including the codes for dates.
•:FISCAL_START_DATE and :FISCAL_END_DATE - if these are both present, and you have set up a fiscal year different from the calendar year in the Maintenance ⇒Organization Info window, then when you Run the report, a window will come up prompting for starting and ending donation dates within the current fiscal year. (Note: when you do this, for it to work you have to use the donors_last_2years view in place of the usual donors table. This is done automatically for you when come from the Custom Reports window.) Example SQL:
FROM donors_last_2years donors
...
WHERE donation.date_received between :FISCAL_START_DATE and :FISCAL_END_DATE
•:FISCAL_START_DATE, :FISCAL_END_DATE and :CATEGORYNUM - if all three of these are present, and you have set up a fiscal year different from the calendar year in the Maintenance ⇒Organization Info window, then when you Run the report, a window will come up a window will come up prompting for starting and ending donation dates within the current fiscal year, and for an optional single donation category to include. See the previous two bullet points for notes about the :CATEGORYNUM argument, and the use of the donors_last2_years view. Example SQL:
FROM donors_last_2years donors
...
WHERE donation.date_received between :FISCAL_START_DATE and :FISCAL_END_DATE
AND (:CATEGORYNUM = -1 OR category.categorynum = :CATEGORYNUM)
There are two additional codes that can be used in the SQL in this window, which do not cause any prompting:
•:FIRST_FISCAL_RECEIPT_YEAR - it will be replaced by 0 if fiscal year receipting and data entry is not turned on in the Maintenance ⇒ Organization Info window, or by the number of the fiscal year in which that option was turned on if it is turned on. This is mostly for use in SQL generated by the Reports ⇒ Custom Reports window, when displaying receipt numbers.
•:YEAR - it will be replaced by your current working year in the program, as shown in the title bar of the program's main window (as in "DONATION 2023 data for Your Organization Name", if it was 2023), and as set by the Maintenance ⇒ Change Year menu option.
Details and Examples
The DONATION database is composed of tables, one table for each type of data. The tables in the database are named constants (for your Organization Info, and to hold the current year number you are working on), donor, donation, category (for donation categories), donor_category1 and donor_category2 (for the donor categories) and receipt. There are a couple of other tables, but they are used only for very technical purposes and you are unlikely to want to select from them.
There is also a view (which behaves like a table) called donors_last_2years, which includes all donors in the current working year, plus all donors from the previous working year that are are not present in the current working year, either because you deleted them, or because they were added after the initial copy of all donors to the new year, when you first switched to the new year.
Here is one example of how you might use this SQL Select routine directly, without going through Reports ⇒ Custom Reports. Suppose you wanted a list of your donation categories, for the donation year 2016. There is no report built into DONATION to create such a list. (Well, OK, there is, under Reports ⇒ Category. But this is still a good example!) Enter the following SQL statement:
Select * from category
Where year_number = 2016
Note that "*" means "all columns in that table". When you Run this SQL, you will see that it generates a report listing three columns – Categorynum, Year Number and Description. You may decide that all you really want to see is the Description column. Close the Reports window, and change the SQL to say:
Select Description from category
Where year_number = 2016
Print off the result, and there is your list of donation categories!
To see what columns are available in each table, use "select * from tablename" for the different tables. That will give you a report listing every column. You can then change the "*" to one or more column names, separated by commas, to get the columns you are really interested in. For instance, "select Year_Number, Description from category". All SQL entry is case-insensitive, i.e. it doesn't matter whether you enter upper case or lower case for things like column names and keywords like "Select".
For those who already understand SQL, the table structures are all defined in the file TABLES.SQL in the main program directory, usually C:\Program Files\Donation. For the OnDemand version, the program directory is not accessible - please contact us if you need a copy of this file.
One problem you can have if you use this utility to create reports, is that the report may be too wide to print. There are a couple of things you can do to resolve this problem. If it's only a bit too wide for the standard print format (which is in Portrait mode, where the page is vertical), select the Landscape radio button in the SQL Select window to switch to Landscape mode, where the page is horizontal. Another obvious option is to reduce the number of columns you are displaying. If you use the Grid Report Type, you can click and drag to make the columns narrower.
As with any other report that is displayed, you can export the results of a SQL Select to various output formats, including Excel, using the Save As button once the report is displayed. This is one good way to "pretty up" a report created with SQL Select or Custom Reports, if you are not quite satisfied with the results. However, there are some problems with exporting formatted Excel, which you can read about here.
If you need further help with this option, feel free to contact support for assistance.
For more information on how to write SQL, there is a web page with a list of several SQL tutorials, at http://www.thefreecountry.com/developercity/sqltutorials.shtml.
Making Changes with SQL Statements
It is also possible to use this window to make changes to the data in your database, using the SQL INSERT, DELETE and UPDATE statements. In normal usage there would be no reason to do this, because all normally required tasks can be done using the other features of DONATION. However, in rare cases, particularly if we are helping you with a technical support issue, this may be appropriate. You will need us to give you a special password in order to run such SQL commands.
Note to Users of Version 2.70 or Earlier of DONATION
If you previously used version 2.70 or earlier (last released in mid-2007), which used the Sybase Adaptive Server Anywhere database, and have upgraded to version 3.00 or higher, which uses the Firebird database, some of the database field names have been changed, and also there are some fairly minor "dialect" differences in the SQL used by the two databases. As a result, if you had any saved SQL files that you used with SQL Select with the older version, they will probably need some adjustment in order to work with the new version. You can use the techniques in this help page (for example using "select * from tablename", or consulting the file TABLES.SQL) to determine the new field names. If you get stuck, contact technical support.
This topic was last edited on Dec 4, 2024