You can use Reports ⇒ Custom Report to create your own relatively simple reports, displayed exactly the fields you want.
Quick Instructions
After using that menu option, just pick the fields you want from the displayed lists of columns, if desired pick a range of years or options for date and donation category selection in the 2nd section of the window, check "Hide SQL Text on Next Window", and click OK.
On the next window, you will be able to specify a Title for the report, and a couple of other options, then click Run to show the report.
Full Instructions
This is actually one of two ways to create custom reports. This way using Reports ⇒ Custom Report uses a fairly simple window, where you select fields (also called columns) from lists, and select the range of years to report on. When you click OK, it determines the SQL (Structured Query Language) statement that will be used to select the report data, and optionally displays that SQL in the same window that Database ⇒ SQL Select displays.
The other way to create custom reports is to use the SQL Select utility directly. You should read the section on that to see what it can do. With it, you can adapt the SQL from existing reports, or write your own entirely new reports, but you do have to have at least minimal knowledge of SQL to do so. With the Reports ⇒ Custom Report option, you can create reports without knowing any SQL, so it is a much easier option for most users!
When you use the Reports ⇒ Custom Report utility, the following window comes up:
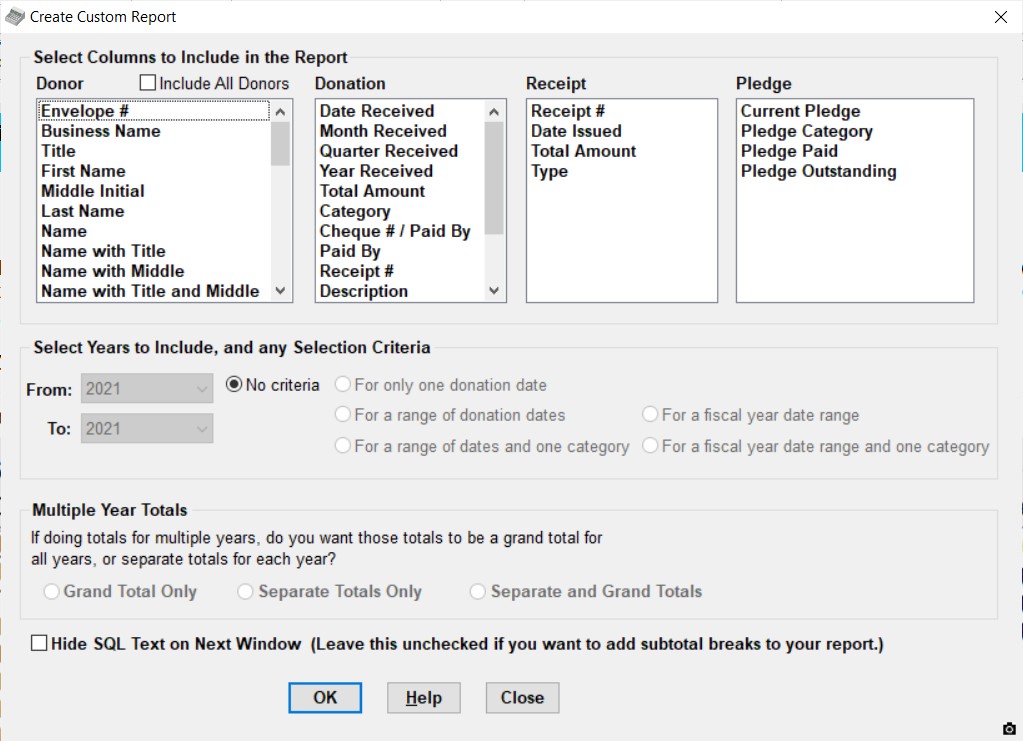
You will see that in the first section of the window, there are four lists of columns that you can select, from the Donor, Donation, Receipt and Pledge tables. A table is what SQL calls the collection of data of one type, for example the Donor table contains all of the Donor information that you type onto the main screen. A column or field is one piece of information within a table, such as the Last Name in the Donor table.
Note: The Pledge fields are not actually in a separate table in the database, but it seemed clearer to group them together into one list for use in Custom Reports. The Pledge list disappears from this window if you have selected not to display the Annual Pledge field on the Donors tab of the Maintenance ⇒ Main Window Options window. If the Pledge list is displayed, which columns are listed in it depends on which option you have selected on the Pledge tab of that same main window options window. (Further details are below.)
If you enter the program with the Donors Only Password, only the Donor list of fields and the buttons at the bottom of the window are displayed - everything else is removed.
Exactly which fields are displayed in each list depend on which fields you have chosen to show, in the Maintenance ⇒ Main Window Options window, and for the Pledge list, depends on which type of pledging you have chosen in the Pledges tab of that window.
Selecting Columns
The first thing you need to do is select the columns that you want to be included in the report. Just click on each column that you want included, which selects it. If you change your mind about including a column, click on it again to deselect it. To see all of the columns in the Donor or Donation tables, you will have to scroll down their lists.
Most of the column names shown in the four lists should be very obvious, because they match one or more pieces of data that are entered or displayed on the main window of the program. The Receipt table columns are mostly not displayed on the main window, but we hope their meanings will also be obvious. Here are a few that aren't quite as obvious, and other important details:
| - | In the Donor and Donation tables, fields that are set to not be displayed on the main window (via Maintenance ⇒ Main Window Options) are not displayed in the lists of fields here. |
| - | In the Donor table, whether the first displayed field shows up as "Envelope #" or "Member #" depends on the setting for "Label for Member/Env. #" in the Maintenance ⇒ Receipt Options window. |
| - | In the Donor Table, "Name" is the Business Name if it exists, and otherwise the same as "First Last" (see below for details on that). |
| - | In the Donor Table, "Reversed Name" is the Business Name if it exists, and otherwise the same as "Last, First" (see below for details on that). |
| - | In the Donor table, "First Last" joins the names in that format, for example "Mary Smith", but it will never display the Business Name. The advantage of using this over using First Name and Last Name separately is that you don't have the First Name and Last Name displayed in separate columns, taking up a lot of width in the report. |
| - | In the Donor table, "Last, First" would similarly display the name in the previous example as "Smith, Mary", but will never display the Business Name. |
| - | None of the four name fields mentioned in the points above this ever include the donor's Title or Middle Initial, if they have been entered. There are additional donor fields Title and Middle Initial for just those fields separately, and Name with Title, Name with Middle, Name with Title and Middle, Reversed Name with Middle, Title First Last, Title First Middle Last, and "Last, First Middle" that include any entered Title and/or Middle appropriately based on the name of the selected field. Those fields will not appear if the relevant "Show Field" checkboxes for showing the Title or Middle Initial donor detail fields on the Maintenance ⇒ Main Window Options window are not checked. |
| - | Unless you select more than one of the various composite name fields like "Name", "Reversed Name", "First Last", "Last First", or the ones including "Middle" or "Title", the column heading for the composite name field you do select (if any) will be just "Name" in the resulting report. |
| - | In the Donor table, the "# Donors" column allows you to do summary reports, that include a count of donors on each row. |
| - | In the Donation table, "Month Received" is the number and name of the month of the Date Received of the donation - values "01 - January" through "12 - December". This could be used for summary reports by month, and you could Sort on it to get them in order. |
| - | In the Donation table, "Quarter Received" is the standard text for the quarter of the calendar year (Q1 to Q4) of the Date Received of the donation. So Q1 is January 1 to March 31, Q2 is April 1 to June 30, etc. This could be used for summary reports by quarter, and you could Sort on it to get them in order. |
| - | In the Donation table, "Year Received" is what you would expect - the year of the donation. You would probably only use that if you were doing a multi-year report, in which case you would also have to choose an option from the Multiple Years Totals section of the window. If you use this field, you should choose Grand Total Only from that section. If you instead chose an option with Separate Totals, there would both be separate rows of data for the different years, and separate columns of data for the different years, which wouldn't be helpful. |
| - | In the Donation table, "Batch" will be a description you put in for a batch entered via Batch Entry, if you use such descriptions. If you have turned off using those descriptions, by unchecking the "Use Batch Descriptions" checkbox in the Donations tab of Maintenance ⇒ Main Window Options, the Batch column will not appear here. |
| - | In the Donor table, the Comments column is obvious, but you should be aware that it won't always print well on reports, and generally only the first line or so will be displayed. However, you will be able to see the complete comment if you export it using the Save As button on the reports window. |
| - | In the Donation table, the Sum(Total Amount) and Sum(Eligible Amount) columns allow you to do summary reports, for example total donation amounts by donor, rather than the detailed reports of donations that you will get if you select other columns from the Donation table but no summary columns. |
| - | In the Donation table, the "# Donations" column allows you to do summary reports, that include a count of donations on each row. |
| - | In the Donation table, Paid By is the same as whatever you have entered in the Cheque # / Paid By column for the Donation, except that if you have entered a cheque number, it will just show as "Cheque" (or "Check" for US users). |
| - | In the Receipt table, Type is "Original", "Duplicate", or "Corrected". (For Canadian receipts, it can be more complex options, as explained in the Help section Replacement or Correction Receipts for Canada.) |
| - | Details about the Pledge list are in a separate section below. |
Include All Donors Checkbox
This checkbox, located to the right of the heading for the list of Donor columns, is only relevant to Custom Reports that include fields from both the Donor and Donation columns, and only those two columns.
If you do not check the checkbox, the only donors that will be included in the report are ones with donations. (If selection criteria, as described below, are used, the only donors that are included are ones with donations matching the selection criteria.) This was the behaviour in all releases of DONATION prior to the addition of this checkbox, in release number 4.20.
If you do check the Include All Donors checkbox, all donors will be included in the report, even if they have no donations (or no donations matching any selection criteria you use). For donors with no matching donations, only the donor fields will appear in the report - the donation columns for those donors will be empty.
Ranges of Years and Selection Criteria
In the second section of this window (as long as you have selected at least one column from the Donation table), you can select a range of years to report on, using the From and To drop-down lists of years present in your database. This defaults to reporting on just the current working year, which in most cases will be what you want. (If you select Pledge fields, you cannot change the year - it is always reporting on the current year, or for multi-year pledging, on all years included in each donors' pledge.)
If you leave the From and To years being the current year, and you have selected at least one field from the Donation table, then the five radio buttons (other than "None") at the right in this section will be enabled (otherwise, they are greyed out, so you can't use them). Selecting one of these will cause the report, when run, to prompt for one donation date to report on, a range of donation dates to report on, a range of donation dates and optionally also a donation category to report on, a range of dates within the fiscal year to report on, or a range of dates within the fiscal year and optionally also a donation category to report on.
If you select any of the radio button options that require the entry of a date, range of dates, and/or a category, you will be prompted for the required information after you click OK in this window, and then click Run in the window that comes up next, titled "Run SQL Select Statement".
The fiscal year selection options are only available if you have set up a fiscal year different from the calendar year in the Maintenance ⇒ Organization Info window. And you can only use them for the current fiscal year. (See Fiscal Years in DONATION for a full explanation of what that means.) If you select the "For a fiscal year date range" or the "For a fiscal year date range and one category" radio button, the date selection window displayed will only allow you to select dates from within the current fiscal year, defaulting to the start and end of that fiscal year.
If you are in a country such as the United Kingdom, Australia or New Zealand, and have selected to use Fiscal Year Data Entry and Receipting, then the years listed in the From and To drop-downs will include fiscal years. If you are working on a year that is a fiscal year, the radio buttons "For the fiscal year" doesn't really do anything, because it would be reporting on the fiscal year anyways. The radio buttons for deleting a date or range of dates work within that working fiscal year.
Donors used in Multiple Year Reports
A report for just the current working year and the previous year will automatically include any donors in the earlier year which are missing in the later year. However, reports for any other two years, or over two years, only include donors that are present in the last of those years.
To make sure that data isn't omitted from your report that should be included, in the cases mentioned above the program will check whether there are donors in any of the prior years that aren't in the last year of the report. If there are, it will ask you whether you want to copy those missing donors forward into the last year, to make the report correct. Answering Yes to that question has the same effect as using the Database ⇒ Copy Missing Donors menu option.
This issue is not relevant, and will not lead to any questions, if you do not select any donor columns, or you do select donor columns but you don't select any donation or receipt columns.
Multiple Year Totals
The third section of this window, for the type of totalling to do, is usually greyed out (inactive) because it does not apply. The only time it applies is if you have selected the Sum(Total Amount) and/or Sum(Eligible Amount) and or # Donations columns in the Donation table, and have also selected a range of years (not just one year) in the second section. In that case, as soon as you change the years in the second section, this section becomes active, and allows you to select whether those Sum fields or # Donation field that you selected should be a Grand Total Only for all years (for example just one column showing the total or count of donors giving during all of those years), Separate Totals Only (one column for each year's total and/or count), or both Separate and Grand Totals.
Hide SQL Text on Next Window, and Subtotals for Reports
If you check this checkbox, then when you click OK to run this report (explained in more details below), the next window that comes up is "Run Custom Report", and does not display the generated SQL. If you do not check it, the next window that comes up is "Run SQL Select Statement" and does display the generated window.
Most users who are not particularly technical and not interested in seeing the generated SQL will probably prefer to check this checkbox.
However, please note the text to the right of "Hide SQL Text on Next Window", namely "Leave this unchecked if you want to add subtotal breaks to your report." If you do leave it unchecked, then when you come to the SQL Select window, there will be an Add Subtotals button that allows you to choose a field on which to have subtotal breaks and subtotals automatically created when the report is run, optionally with page breaks on each change in that field's value. Details are under Adding Subtotals to your Report in the SQL Select help topic.
Sort Orders for Reports
There are three situations in which the SQL generated for a Custom Report will have a built-in sort order ("ORDER BY" section at the end of it):
1.If you include summary columns like "Sum(Total Amount"), the sort order will be on all of the non-summary columns, in the order they appear.
2.If you do not include summary columns, but you include the Envelope # or Member # column, the sort will be first on that (with donors with such numbers appearing first), and then for donors with no such number, if you included a Name field (as described in the next point), the sort for the donors with no such number will be on the donor's reversed name (like "Smith, John"). This is regardless of what Name field you chose to display in the report!
3.If you do not include summary columns or the Envelope # or Member # column, but you do include a full name field (not just partial name fields like Last Name etc.), the sort will again be on the donor's reversed name (like "Smith, John"). This is regardless of what Name field you chose to display in the report!
In all other cases, no sort will be included in the generated SQL, and your report may appear in any arbitrary order when you run it. You can use the Sort button in that case (or if you don't like the order that comes up because of the three rules above) to get the displayed report into your desired order.
Running the Report
Once you have made all of your selections, click OK. Certain selections of columns and other options don't actually make sense (or aren't usable for some tricky technical reasons), so it is possible that you will get an error message at this point. If so, read it carefully, and adjust your selections accordingly. If you don't get an error message, you will then be put onto the SQL Select window (titled "Run SQL Select Statement", or alternatively titled "Run Custom Report" if you clicked the Hide SQL Text on Next Window checkbox).
If it's the Run SQL Select Statement window, the generated SQL that will create this report will be displayed, while if it is the Run Custom Report window the SQL will be hidden. At that point you can use all of the features of that window, including further editing the generated SQL (if it's displayed) and specifying a Report Title, and then click the Run button to generate the report. It is actually at that point that prompting window for a range of dates and/or categories, based on the radio buttons you selected on this Custom Reports window, will appear.
Some of you who have used other report builders may notice that there are several things that they might include that this utility does not. Among other things, we don't allow you to specify the order of the columns, or conditions other than those in the second section (for example "only if the Total Amount is over $1,000"), or sort orders, or totals (other than Total Amount) or subtotals. (The report builder and SQL Select do automatically total any columns containing dollar figures or counts of donors or donations.) We decided that this window should have those limitations in order to keep it simple enough for everyone to use.
Also, those who do know a bit of SQL can get some of these effects (changing the column order, conditions and sorts) by editing the SQL in the SQL Select window. It is easy to change the column order – just cut and paste in the list of selected columns, making sure that each column in the SQL ends with a comma, except for the last one. Those who don't know any SQL can use the Sort and Filter buttons on the Reports window after generating the report to impose sort orders or conditions. You actually can't impose all of the conditions with the Filter button that you could by editing the SQL, but you can cover most of the cases. You can also change the column order in the Reports window, if you select the Grid Style for the report on the SQL Select window. (You can drag the column headers around to change their order.)
If you need to enhance the report further, we suggest that you use the Save As button on the Reports window to save the report to a spreadsheet format (for example Excel), and use your spreadsheet program to enhance it. However, please see the warnings here about possible problems with exporting to formatted Excel.
Re-Using Custom Reports
You can memorize a Custom Report you have created by using the Memorize Report button on the SQL Select window, or on the following window displaying a report, and then replay it with the Reports ⇒ Memorized Reports menu option. (If you wait to memorize the report until you are on the window displaying the report, that has the advantage that if you used the Sort or Filter buttons on that window, the Sort and Filter conditions you added are also part of the memorized report.)
There's one other way to memorize a report, but in general it is not as useful as the Memorize Report option. On the SQL Select window, you can use the Save to SQL File button to save the SQL for this report. Then, by returning to Database ⇒ SQL Select, you can use the Open SQL File button to retrieve that saved SQL, and run the same report again. This will give exactly the same results as if you re-selected the same options on the Create Custom Report window. However, unlike Memorize Report, it doesn't memorize the Report Title, or your Report Style and Orientation options, and since you haven't run the report yet, it can't memorize any Sort or Filter.
Pledge Fields
Which Pledge-related fields are displayed depends on which options you select on the Pledge tab of the Maintenance ⇒ Main Window Options window, as follows:
Type |
Fields |
Simple Annual Pledge |
Annual Pledge, Pledge Paid, Pledge Outstanding |
Annual with Start Date and Category |
Current Pledge, Pledge Start Date (but only if you have not checked the "Pledges are on a fiscal year basis" checkbox on the Pledge tab of the Maintenance ⇒ Main Window Options window), Pledge Category, Pledge Paid, Pledge Outstanding |
Multi-Year |
Current Pledge (this year's pledged amount), Total Pledge (total of all year's pledged amounts), Pledge Start Date, Pledge Years, Pledge End Date, Pledge Category, Pledge Frequency (payment frequency, such as Annual etc.), Pledge Paid (in the current year), Pledge Outstanding (in the current year), Total Pledge Paid (for all years within the donor's pledge period), Total Pledge Outstanding (for all years) |
The Outstanding fields are always the value in the relevant pledge amount field (such as Annual Pledge, Current Pledge or Total Pledge) minus the value in the relevant Pledge Paid field (either Pledge Paid or Total Pledge Paid).
If you have checked the "Pledges are on a fiscal year basis" checkbox on the Pledge tab of the Maintenance ⇒ Main Window Options window, and you create a Custom Report including Pledge fields, you may be prompted for which fiscal year you want to report on. For details, see Pledges in DONATION. One consequence of this is that the generated SQL for the report may include the specific dates of your selected fiscal year, which may make that report less appropriate to memorize, since at some point it will no longer be for the dates you want!
Using Reports Scripts for Custom Reports
You can run memorized Custom Reports with automated reports scripts. The RunMemorizedReport() command will be used, with the argument Name= and the name of the memorized report, as shown in the window for running them.
Any additional arguments to that command will be based on any Selection Criteria you chose in the middle section of the Custom Reports window (or on what you can see it prompting for, if you try to run it normally).
Possibilities include:
1.If you chose "For only one donation date":
Date=, which can be a named date or specific date in your computer's date entry format (see here for more details)
2.If you chose "For a range of donation dates", or "For a fiscal year date range" (if it's shown as an option):
DateRange=, or StartDate= and EndDate= (see here for more details)
3.If you chose "For a range of donation dates and one category", or "For a fiscal year date range and one category" (if it's shown as an option):
DateRange=, or StartDate= and EndDate= (see here for more details)
Category= (All, or a donation category name)
For either of the "fiscal year" options, DateRange= values that you choose will likely be for a fiscal year, such as This Fiscal Year.
This topic was last edited on Feb 17, 2023