It is possible to import donors from Excel, text or CSV files into DONATION using the Database ⇒ Import ⇒ Donors menu option. Most commonly that would be data exported from other programs.
There are special menu options for importing data from certain other programs, which should be used instead of this feature if you are switching from one of those programs. See the following topics if they apply:
•Converting Data from Membership Plus (See also below for further details.)
•Converting Data from GiftWorks
•Converting Data from PowerChurch Plus
•Converting Data from Roll Call
•Converting Data from The Church Assistant
•Importing Data from Viansoft Church Contribution System
With the Database ⇒ Import ⇒ Donors option, you can import Excel files, tab-separated text files, or comma-separated value (CSV) files. They can contain any combination of the fields in DONATION's Donor table, in any order. The only fields that must be filled in are a field or fields for the donor's name, and for Canadian users, Addr1.
If your file to be imported contains both donor and donation information on the same line, it will probably be preferable to use the Database ⇒ Import ⇒ Donors and Donations menu option, which does all of the importing in one step. For this to work, each line would also have to contain a field that you can use as a unique identifier (also called unique ID) matching a field that you will import into DONATION, which will be either the Member/Envelope # field, or the Email Address.
If you select an Excel file to import, DONATION will have Excel invisibly save it to a comma-separated value (CSV) file (described below), and then actually import that CSV file.
A tab-separated text file is a plain-text file where each donor is on its own line, and each field on the line (even optional fields that have no data for the current donor) is separated by one tab character. Fields may optionally be enclosed in quotation marks, but that is not necessary. The file may optionally have one or two rows of column headers at the top. If you currently have the data in a spreadsheet program such as Excel, you can easily export it to tab-separated text with the File ⇒ Save As menu option, using the Save as type "Text (Tab Delimited)" or "Unicode Text" if your data might include accented characters, or characters that are not part of the English alphabet.
A comma-separated value (CSV) file is somewhat similar to a tab-separated text file, but a comma rather than a tab separates the fields on each line, and fields containing commas (or double quotes) are enclosed in double quotes. If you currently have the data in a spreadsheet program such as Excel, you can easily export it to CSV with the File ⇒ Save As menu option, using the Save as type "CSV (comma delimited)" or "CSV UTF8 (comma delimited)" if your data might include accented characters, or characters that are not part of the English alphabet. If you specify to import an Excel file, DONATION will actually do that save to CSV for you, and then import the CSV file.
Other spreadsheet programs (like OpenOffice Calc) may only have options to save files as CSV - that works too, although you will have to do that saving manually. DONATION cannot do that conversion for you if you do not have Excel installed.
Note: Within this Help topic (and in messages from the program when using this option) the words "row" and "line" will be used interchangeably to refer to lines in the input file.
This procedure can replace or update any existing donors, or even ignore rows matching existing donors, depending on the options you choose. The updating or ignoring is based on your selected unique ID, which can be either the Member/Envelope Number or Email Address, matching lines in the input file to that field in the existing donors.
All existing donors will always stay there when you use this procedure. In fact, you can end up with two copies of each donor if you import the same file twice by accident, and either you have selected to Add all rows, or a row being imported doesn't have your selected unique ID field filled in, that allows the program to notice the duplication! This process will never allow adding duplicate Member/Envelope Numbers. It will also warn you if there are names matching existing donors, that might create duplicates.
The importing only affects the current year's donor list. (To understand about the fact that each year's donor list is distinct, please see Changing Years in the Database.)
When you select Database ⇒ Import ⇒ Donors, the following window comes up:
The The Fields to Import, Import File and the choices you made in the other sections of this window are saved when you click Import, and restored on any future visit to this window, so if you have used it with different options before, you may see different settings than the ones above when you open it again.
There is also an option to load and save named sets of settings, which is useful if you have to regularly import files from different sources, with different sets of fields in them. See below for details.
Filling in the Fields on this Window
In section 1 of the window, you select which fields will be imported from the file, and in which order. It defaults to importing the fields Last Name, First Name, Addr1, Addr2, and Addr3, in that order, the first time you use it. The Donor Fields at the left are all fields that can be imported, that have not yet been added to the Fields to Import list at the right. The list of fields at the right shows all fields that you have selected to import, in the order they are expected to be found in the file from which you will import the data.
To import more or fewer fields you can use the Add and Remove buttons, or double-click on a field in either list. The Add button adds a selected field from the Donor Fields list to the Fields to Import list, just below the currently selected field in the Fields to Import List. The Remove button removes a selected field from the Fields to Import list and puts it back into the Donor Fields list. Alternatively, double-clicking fields in either list will move them to the other list, exactly as if you had clicked the Add or Remove button. Certain combinations of columns are impossible, and some columns are required - the program will tell you if you are trying to make a field selection that is not allowed. Please read any messages that come up about this carefully.
If the Fields to Import on the right are in the wrong order, so that they don't correspond to the order in the input file, single-click on one you want to move and use the Move Up or Move Down buttons to re-arrange them. You can alternatively click and drag fields up and down in that list. (Click on a field, keep holding the mouse button down and move it to the desired position, then release the mouse button.) The Donor Fields list on the left is always in alphabetical order, to simplify finding fields in it.
The following table lists the maximum number of characters in each possible column that can be imported, and describes each column. If your data has either the wrong number of columns, or data that has too many characters in some columns, you will get a detailed error message and the import may be cancelled. For some columns where the data to be imported has too many characters, you will be shown how they will be cut down to fit, and allowed to accept that if you wish. If all rows of data have a consistent number of columns that is more than the number indicated by your selected fields to import, you will be given an option to just ignore the extra columns at the end and continue the import. If there is a problem, you will have to fix up your data and try again.
Field |
Max Length |
Description |
Business Name |
60 |
If the donor is a business or organization, the name of that business |
Last Name |
30 |
The donor's last name, or if the donor is an organization, the last name of a contact at the organization |
First Name |
30 |
The donor's first name, or if the donor is an organization, the first name of a contact at the organization |
Name: First Last |
61 |
The first and last names of the donor, combined into one field (for example "John Smith"). If multiple words are found in this field, the last word is considered to be the last name, and whatever precedes it is considered to be the first name. |
Name: Last, First |
62 |
The last and first names of a donor, combined into one field, separated by a comma (for example "Smith, John") |
Title |
15 |
A title (such as "Mr." or "Ms.") to come before the donor's First Name |
Middle Initial |
8 |
A middle initial to go after the donor's First Name |
Addr1 |
40 |
The first line of the donor's address (required for Canadian users) |
Addr2 |
40 |
The second line of the donor's address |
Addr3 |
40 |
The third line of the donor's address (may contain the postal code if the Postal Code field is not used) |
Addr2 (Merge 2 Fields) |
40 |
Merges two fields from the input file (generally City and State/Province) into the Addr2 field in DONATION. You can use this or the regular Addr2 field, never both. |
Addr3 (Merge 2 Fields) |
40 |
Merges two fields from the input file (generally City and State/Province) into the Addr3 field in DONATION. You can use this or the regular Addr3 field, never both. |
Postal Code |
10 |
The Postal Code or Zip Code of the donor |
Phone |
18 |
The donor's phone number. Import values like 1234567 will be reformatted and saved as 123-4567, and values like 1234567890 will be saved as (123) 456-7890. |
Charitable Number |
20 |
If the donor is another charity, their charitable number |
Member/Env. # |
9 |
A member or envelope number for the donor |
Other1 |
50 |
Can be used for any consistent information, for example you might use this one for a fax number |
Other2 |
50 |
Can be used for any consistent information, for example you might use this one for a 2nd email address |
Other3 |
50 |
Can be used for any consistent information, for example you might use this one for children's names |
Other4 |
50 |
Same, but only visible if you check a checkbox to show it in the Maintenance ⇒ Main Window Options window. |
Other5 |
50 |
Same as Other4 |
Other6 |
50 |
Same as Other4. |
Comments |
Any length |
Any desired free-form text about this donor |
Pledge Amount |
Dollar amount |
An annual pledge amount that the donor has pledged to donate. May contain commas at the thousands, but may not include a dollar sign. |
60 |
Email address |
|
Category 1 |
20 |
Donor Category 1 value. It will be added if it is not already present in the pull-down list for that field, which is specified with the Maintenance ⇒ Donor Category 1 menu option. (The match can be case-insensitive, so for instance "MEMBER" would match an existing value of "Member".) |
Category 2 |
20 |
Donor Category 2 value. It will be added if it is not already present in the pull-down list for that field, which is specified with the Maintenance ⇒ Donor Category 2 menu option. (The match can be case-insensitive, so for instance "MEMBER" would match an existing value of "Member".) |
Skip Column(s) |
255 |
See below for details about skipping columns. |
Note: You must import either a business name or both the last and first name for each donor (or all three). So those fields (either a business name, or both the first and last names) must be filled in on every row, in the input file. The first and last name can be input as separate fields, or via the combined fields "Name: First Last" (which will import things like "John Smith") or "Name: Last, First" (which will import things like "Smith, John").
The Addr1 field must always be among the selected fields for importing. For Canadian users, at least one address field must be filled in on every row in the input file, because the Canada Revenue Agency requires donors' addresses to be printed on charitable receipts.
If multiple address fields are being imported, and earlier ones (like Addr1) are empty in the input data while later ones (like Addr2) are filled in, they will be moved up, for instance moving the Addr2 value into the empty Addr1 field, etc.
If you intend to also import donations, you must import either the Member/Env. # field or the Email Address field, because one of those fields is required to be included in the donations import file, to match the donation to a donor.
Figuring out which Columns of your File to Import into which Donor Fields
Ultimately it is your responsibility to analyze the data in the file you want to import, and correctly associate it with the desired Fields to Import, in the correct order. Most errors you make as you try to get this to work will be identified by error messages, or visible when you are shown the data to be imported later in the process.
If you absolutely cannot figure this out yourself and need assistance, we can help, but potentially complex work like that would not be part of our normal paid support expectations. It would be charged, after getting your agreement of course, at our normal hourly rate.
Skipping Columns
The "Skip Column(s)" field from the Donor Fields list is of course not really a donor field. Adding it will prompt you for a number of columns in the input file to skip. An entry such as "Skip 1 Column" or "Skip N Columns" (where N is a number) will then appear in Fields to Import list at the right, based on what you entered. Where you position it in that list with the Move Up or Move Down buttons (or drag and drop) will determine where extra columns are expected to occur, that should be ignored when importing.
If there are extra columns at the end of the lines in the import file that you do not need to import, you don't actually have to add a "Skip Column(s)" for that. Instead, when you do the import, you will be informed that there are more columns in the import file than you have specified to be imported, and asked to confirm that you are OK with that. If you confirm that, the import will proceed, ignoring those columns at the end. However, if you want to avoid that question, you certainly can add an appropriate "Skip Column(s)" at the end of your Fields to Import list to account for all of the fields to be ignored at the end of each line.
Sections 2 and 3
In section 2, you specify the name of the Import File that is to be imported. You can either just type it in (include the full path – drive and directory), or use the Browse button to bring up a standard File Open window to find the file. It can be a tab-separated text file (*.txt), either type of Excel file (*.xls or the newer version, *.xlsx), or a comma-separated value file (*.csv).
When you use the Browse button, it will start out showing only one type of file, "Microsoft Excel Documents". If you need to import a different type (tab-separated text, or comma-separated value), you can change that by dropping down the file type control near the bottom right of that window.
In section 3, you can specify how many lines of column headers are at the top of the import file. Most commonly this should be set to 0 (if there are no column headers in the file) or 1 (if there is one line of column headers in the file).
Section 4 Options
This section looks as follows, as a reminder:
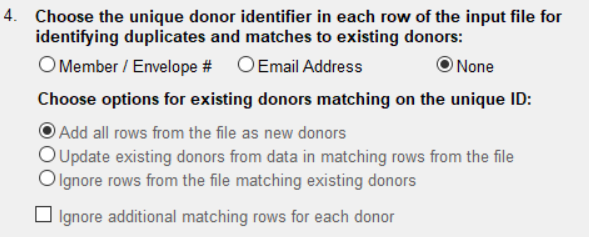
The example above is the initial default, which is to add all imported rows. That would be a natural option if you are using this when you first start using DONATION, to import data that you previously had elsewhere, such as in Excel. It would also be appropriate if you are importing additional donors and you are positive that they are not already in your Donor List.
When the radio button for the unique donor identifier (unique ID) in the first row of radio buttons is set to None, all of the other options below it in this section are greyed out (disabled) and Add all rows from the file as new donors is automatically selected.
However, if you know that your input file contains either a number field matching Member / Envelope Numbers of existing donors in your program, or an email address field matching them, you can select the radio button for that field on the first row here, and then the other options become available.
If you are using the Email Address as the unique ID, you will need to make sure that any email addresses in the input file, that are for donors already in your Donor List in DONATION, are actually recorded as that donor's email address in the program. (Otherwise, they will be added as new donors, causing duplication!)
The next three radio buttons only apply if you have selected a unique ID field on the first row here. They determine what happens if an input line contains a value of that unique ID matching an existing donor in the current year's Donor List. Here is what each of those three options means:
•Add all rows from the file as new donors: Whether or not there is a matching existing donor in your Donor List, this will always attempt to add the row. If you are importing the Member/Envelope # field, and values in it match existing donors, this option will cause the import to be rejected, because values in that field must always be unique in DONATION.
•Update existing donors from data in matching rows from the file: With this option, for rows to be imported that match existing donors in the Donor List on your selected unique ID field (Member/Envelope # or Email Address), filled-in field data in the import file will update (overwrite) your existing donor data. Use this option if you believe that the data in the import file is likely to be more correct (or at least as correct!) as your existing data in the Donor List. Entirely empty fields in the input will not overwrite existing data. See also under Special Processing for Empty Fields when Updating below, though, for a way to force input values to clear existing donor field data.
•Ignore rows from the file matching existing donors: With this option, rows in the import file that match existing donors in the Donor List on your selected unique ID field (Member/Envelope # or Email Address) will be completely ignored for import purposes, as if they were not there. Use this option if you believe that your existing data in the Donor List is more likely to be correct than whatever data you are importing.
One combination to be aware of is if you pick the Email Address as the Unique ID field, and select Update existing donors from data in matching rows from the file. In that case, if you have two or more existing donors with the same email address as a row in the input file, that will be an error and the import will not be able to proceed. That's because the program cannot know which of the existing donors it should be updating! Most commonly this would be a problem if you have spouses recorded as separate donors, and they share an email address. One solution to this would be to merge them into one donor (since at least in Canada and the U.S.A. they can share each other's tax receipts anyways!), with the Database ⇒ Merge Duplicate Donors menu option.
The final checkbox in section 4, Ignore additional matching rows for each donor, is about cases where there might be multiple rows in the input file with the same value of your selected unique ID field (Member/Envelope # or Email Address). The most likely situation would be if you are importing data exported from an online donation service, which contains both donor and donation fields on each row, and you are skipping the donation fields. If there were multiple donations from the same donor, you would not want to attempt to import that donor more than once! Checking this checkbox means that only the first row in the input file with a given value of your selected unique ID field will be imported. All further rows with the same unique ID field will be ignored for import purposes, as if they were not there.
The Ignore rows from the file matching existing donors radio button and the Ignore additional matching rows for each donor checkbox can both cause input file rows to be ignored, so at first this could seem confusing. But the first one ignores them if they match existing donors in your donor list, and the second one ignores them if they occur repeatedly in the input file. Depending on your exact situation, it may be appropriate to use neither of them, one of them, or both of them!
Starting the Import
Once you have entered your desired choices for sections 1 to 4, click the Import button. The first thing that will happen is that it will read the import file, and look for problems in it. If there are any problems, it will tell you that fact, and display the list of problems in a window. Print off that list for later fixing, then close that window. An example of such a problem is a missing Last Name, a missing address, data in a field that is too long for the field lengths in DONATION, or a duplicate Member/Envelope Number if you aren't updating or ignoring them.
That file clearly separates out unfixable problems (like missing required fields) from ones that it will try to fix for you (like overly long names). If there were unfixable problems, you will have to go back to the original file being imported, make the appropriate fixes, and then try the import again.
If you selected to allow updating existing donors, and the program detects that some donors will in fact be updated, you will be asked to confirm that you want to do that.
If duplicate names are detected, matching existing names, that aren't being updated based on a matching Member / Envelope Number or Email Address, you will be told about that, and asked to review it carefully before confirming the import.
You will also be told if input rows are being skipped due to options you selected in section 4. Entirely blank lines in the input file will also be skipped.
Reviewing your Data
Next, the data to be imported will be displayed for you. Take a good look at it. Make sure the right data is shown with the right fields, and that the row of headers from your data is not displayed. (Note: the program will have put in its own headers, in boldface and with a line under them, so what you are checking is that you don't seem to have a row of headers under that!) Also check that all of the donors you expected to be displayed are in fact displayed.
The first column (Status) shows "New" if this row will be imported as a new donor. It can also show "Duplicate?" if this row will be imported as a new donor, but it has the exact same name (except possibly for different capitalization) as an existing donor. That could be an error, or of course you could be adding a second person with a common name like "John Smith"!
If you have selected to allow updating existing donors, the Status column can show "Updated" if it will update an existing donor that was matched by Member/Envelope Number or Email Address, or "Unchanged" if it is a match to an existing donor but no changes were observed.
If everything looks fine, click Import and the import will begin. If there are problems with what you see in the data preview window, just click Cancel instead, and the Import will not be done.
After you click Import in the preview window, it will perform the import. When it is done, it will tell you so, then close the Import window.
As the data is being imported, progress will be showing in the bar at the bottom of the window.
If fixable errors were shown in the window and you printed them off, you should now go back in the DONATION program's main window to each donor that had an error displayed in that printout, and decide how or whether you wish to fix it in the imported record.
Special Processing for Empty Fields when Updating
There's a problem if you are updating existing donors, in distinguishing whether an empty field means you just aren't updating whatever is already in the Donor Details for that field, or whether it means you want to clear the contents of that field.
To allow you to distinguish between those two cases, we came up with a trick:
•An input field that is actually empty will never replace an existing value in a matched donor being updated. The existing value will still be there after the import.
•An input field that contains exactly the value "empty", without the quotes, will cause that field in the matched donor to be cleared.
For donors being added, rather than updated, either an empty field or the value "empty" in the field will cause the resulting imported field to be empty.
Note: We considered using the more commonly used value "n/a" instead of "empty" for this trick, but the problem with that would be that you would then have no way to import the actual value "n/a" into a field, which you might want! We can't really imagine that anyone would want to import the actual value "empty" into a field.
Possible Problems with Complaints about Numbers of Rows or Columns
Sometimes the program will complain that you are only supposed to be importing some number of columns, but some rows have more columns. But when you look at the Excel file, you only see data in the expected number of columns.
Or, it may complain that there are rows with missing data, and the row numbers it mentions appear to be empty and are below the bottom of your data.
In either case, a simple solution is to just copy the rows and columns that do have data in them out of this Excel file, and paste them into another file. Then import that other file instead!
Importing from Membership Plus or other programs whose fields don't match DONATION's organization
First, please note that from all versions of Membership Plus that we have encountered, you can use the Database ⇒ Import ⇒ From Membership Plus menu option to import more than just the donors - it imports your organization info, donation categories (funds), donors (members) and donations (contributions). So it is very unlikely that you would choose to use Database ⇒ Import ⇒ Donors to import data from that program.
However, if you want to import only your donors from Membership Plus, or you have a version of Membership Plus that the menu option mentioned above doesn't work for, you can still use the Database ⇒ Import ⇒ Donors menu option described above.
First, use Membership Plus's Export Wizard to export the donor fields to an Excel file. You may want to open that file to confirm that the fields are organized in a way that can be imported into DONATION, based on the list of columns above.
The only complication is that in Membership Plus, there are separate City and State fields. You handle that in DONATION by importing them using the "Addr2 (Merge 2 Fields)" field, or if you have two lines of address preceding those fields, the "Addr3 (Merge 2 Fields)" field.
Other than that, the import should be straightforward.
Other programs (or simple custom Excel donor and donation-tracking spreadsheets) may have their donor names merged into one field, instead of separated into First Name and Last Name fields as in DONATION. Use the "Name: First Last" or "Name: Last, First" import fields in this window to handle that situation, depending on whether the donor names were stored as "John Smith" or "Smith, John" respectively.
Loading and Saving Settings
As mentioned above, when you click Import, your settings in this window are automatically saved, and automatically restored the next time this window is opened.
However, some users may need to regularly import donors from more than one external source, where the files have different fields in them, in different orders. The Load Settings and Save Settings allow you to save and re-load your settings for multiple import files.
Once you have your settings set up as desired for one import file, click Save Settings to save them. You will be prompted for a name to save them with. If you were for instance using this for importing donors exported from PayPal, you might use "PayPal" as that name.
Then when you return to this window in the future, if you most recently used other settings, those settings will be shown. In that case, you can click Load Settings to re-load any settings you saved and named before. If there is more than one saved set of named settings, you will be prompted with a list, so you can choose which one to load. That list also has a Delete button that allows you to delete a previously saved set of named settings.
If you have either loaded or saved settings during one use of this window, and then you do an Import, your current settings will, as always, be automatically saved, and then automatically loaded the next time this window is opened. In addition, if you have changed the settings at all since the load or save, you will be prompted as to whether you also wish to re-save them to the last named settings that you loaded or saved.
This topic was last edited on Feb 17, 2023