You use the Maintenance ⇒ Main Window Options window to specify some options that affect how the main data entry window works, including how it works for Limited Users who come in to the program by using a Limited User Password. The window has four tabs, that you switch between by clicking on the tab at the top. Some of the options on this window also affect other features in the program.
You can jump to the information on the 2nd through fourth tabs, lower down on this page, with the following links: Donations, Limited Users, and Pledges.
If you enter the program with the Donors Only Password, only the Donor Details tab on this window will be visible.
Donor Details Options Tab
Here is the entire window, showing this tab:
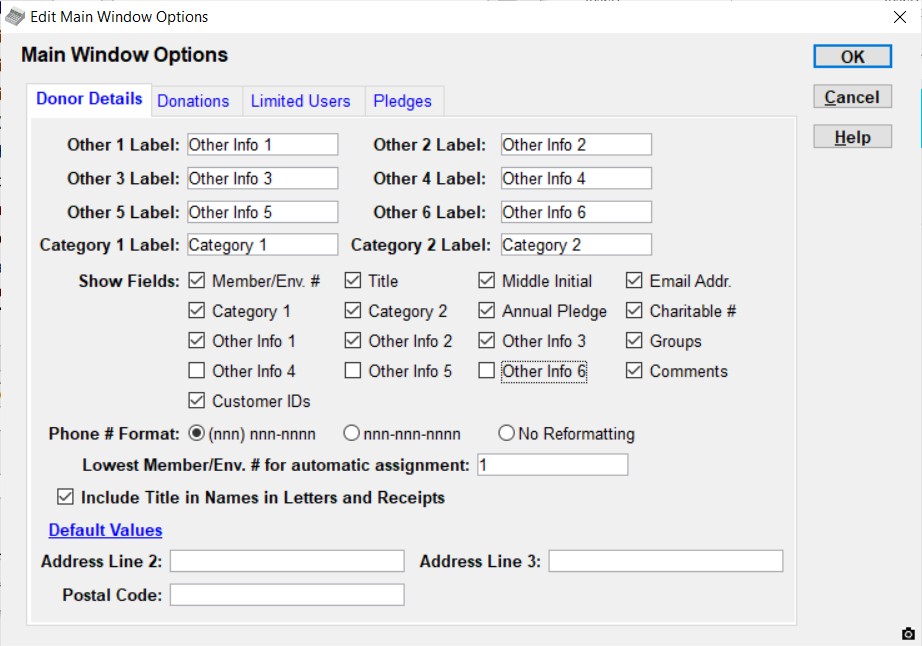
Other 1 through 6 and Category 1 and 2 Labels
You can change the values in the Other 1 Label through Other 6 Label fields to give new labels to the six user-customizable fields in the Donor Details area of the main window. For instance, you might change some of them to be called "Email", "Fax", and "Birthdate". (You do not have to use any or all of these fields if you do not need them.)
Similarly, you can change the Category 1 Label and Category 2 Label to give new labels to those two independent donor category lists. Again, you don't need to use those fields if you don't need them.
If you do change those labels for Category 1 and 2, all related prompts, menu options etc. will change accordingly. For instance, if you set Category 1 Label to "Membership Status", the menu option Maintenance ⇒ Donor Category 1 will instead read Donor Membership Status (Category 1).
Show Fields
There are a number of Donor Details fields that not all organizations will be interested in using. You can remove them from the display by unchecking their checkboxes in the "Show Fields" section. The checkboxes that you can use are:
•Member/Env #: If unchecked, removes this field from both the main window and the File ⇒ One Date Batch Entry window. Do this if you don't use Member or Envelope numbers in your organization. Also, unchecking this removes a number of reports from the Reports menu (that differ from other reports only in that they include the Member/Envelope #).
•Title: If unchecked, removes this field from the main window, and also automatically unchecks the "Include Title in Names in Letters and Receipts" checkbox described below. This Title checkbox also affects what donor fields are available in Custom Reports.
If you have been entering donor's Titles at the start of the First Name field and are satisfied with that approach, you will probably want to uncheck this checkbox so a separate Title field isn't displayed.
•Middle Initial: This field is displayed on the main window as "Mid.Init" because of space limitations. The Canada Revenue Agency requires donors' middle initials to be included with their names on receipts, so Canadian users need to either leave this checked (and also check "Include Middle Initial in donor names in receipts" on the Maintenance ⇒ Receipt Options window), or always include the middle initial at the end of the First Name field. This Middle Initial checkbox also affects what donor fields are available in Mail-Merge Letters and Custom Reports.
If you have been entering donor's middle initials at the end of the First Name field and are satisfied with that approach, you can uncheck this checkbox so a separate Middle Initial field isn't displayed.
•Email Addr.: The Email Address field.
•Category 1 and Category 2: The two Donor Category drop-down fields, whose possible values are set up via the Maintenance ⇒ Donor Category 1 and Donor Category 2 menu options.
•Annual Pledge: If you don't track annual or multi-year pledges from donors, uncheck this field. Unchecking this removes the Reports ⇒ Pledges sub-menu and several other places where pledges can be reported on, like Custom Reports and a Pledge Information option for mail-merge letters.
•Charitable #: This donor field is used to track the charitable numbers of donors to your organization, which are themselves charities.
•Comments: This is the arbitrary-length comments field for the donor.
•Other Info 1 through 6: These are the six fields whose names you can specify with the Other 1 Label etc. fields, also on this window.
•Groups: Tracks groups or committees within your organization that this donor is a member of. You set up the list of such groups via the Maintenance ⇒ Groups / Committees menu option.
•Customer IDs: This one is not actually a field. Instead, checking it enables several features dealing with associating Customer IDs from third-party online donation services (such as Vanco) with your donors. Specifically, checking it enables the IDs button above the Donor Details panel on the main window, Reports ⇒ Donor ⇒ Customer IDs, and Database ⇒ Import ⇒ Vanco Donations. If you have stored any Customers IDs that could be displayed with that IDs button, you should leave this checked, and in fact, unchecking it will be automatically reversed the next time you start the program, so that the IDs button is visible again.
For more details of these fields and features, see Entering a New Donor.
Phone Number Format
Normally when you enter a phone number, if it has 10 digits (with any of various arrangements of spaces, dashes and periods, or nothing, between its parts), when you move out of the field or click Save, it is reformatted into the format "(nnn) nnn-nnnn", where the n's are the digits of the phone number.
If you prefer for such 10-digit numbers to be put into the format "nnn-nnn-nnnn" you can change to that option here.
Those reformattings also apply to 11-digit numbers, where the first digit is a "1". (The "1" is removed.)
Or if you prefer to not have your 10-digit phone numbers reformatted as you enter them at all, you can choose "No Reformatting" here.
Phone numbers that are 7 digits, with either no space or a period between the sections, will always be reformatted as "nnn-nnnn", regardless of your selections here.
If you have the formatting currently set to either "(nnn) nnn-nnnn" or "nnn-nnn-nnnn", and you switch it to the other one, when you click OK you will be given an option to convert all existing phone numbers in your database that are in the old format to the new format.
Phone numbers that do not match any of the patterns referred to above, such as ones with an extension, are never reformatted - it is up to you to format them as you wish to see them.
Lowest Member/Env. # for automatic assignment
This value, which must be a number greater than or equal to 1, determines the starting point for automatic assignment of envelope numbers using the File ⇒ Next Higher Member/Env. # and File ⇒ Lowest Unused Member/Env. # menu options, and the corresponding right-click or drop-down menu options on the Member/Env. # field in the Donor Details area of the main window.
It is also used as the default setting for "Starting Env. # for assignment" on the Database ⇒ Reassign Envelope Numbers window.
Include Title in Names in Letters and Receipts
If you check this checkbox, any Title you enter for a donor will be automatically included as part of Name fields for them in all receipts and all mail-merge letters or receipts. It will also be included with donor names when Emailing Newsletters or Everyone, and in the two statement-like reports, Reports ⇒ Donation ⇒ Details, One Page per Donor and Category Totals, One Page per Donor. If you do not check this checkbox, the Title will never be added in any of those places.
If you only want the Title to be added to names in some of those places, you will have to turn this checkbox on and off sometimes to get your desired results.
Also, this should be obvious, but if you always enter people's titles as part of the First Name field, rather than in the separate Title field, this checkbox will have no effect - the entire First Name, including that title, will always be used everywhere in the program that the First name is used.
Default Address Values
Under Default Values, you can specify initial values for any or all of the Address Line 2, Address Line 3 and Postal Code fields. This would generally only be used by organizations in smaller communities, where most or all of the donors have parts of their address the same. Any of these default values that are filled in will be inserted into any new donors that you create. Of course, you can then edit them if they are not correct for any particular donor.
Donations Options Tab
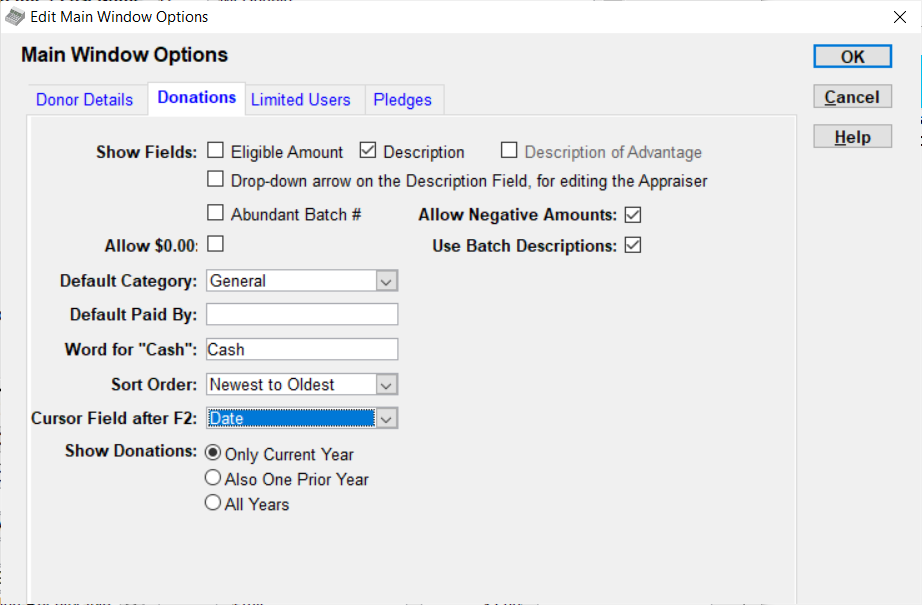
Show Fields
The Show Fields checkboxes determine which "extra" fields are displayed in the Donation Details area of the main window. The three optional fields are Eligible Amount, Description and Description of Advantage. It is not recommended to select to display these fields unless you really need to, because unless you size your window to be fairly wide, this forces each donation to take up two lines on the screen, so you can't see very many at once!
You can only select Description of Advantage if you have also selected Eligible Amount. See Donations and Receipts with Advantage for full details about these fields. These fields are intended primarily for Canadian users, where they are required by the Canada Revenue Agency for certain types of receipts.
If you have selected to show the Description field, you can also check the checkbox for "Drop-down arrow on the Description Field, for editing the Appraiser". If that is checked, a drop-down arrow (as for a drop-down list) appears at the right of the Description field. If you click it (or if you right-click in the Description field) a popup menu appears, with an option to edit the appraiser information for this donation. To the best of our knowledge, this is only applicable to Canadian Gift in Kind donations, and only required for largish donations. As a result, you are only allowed to select this option if you have chosen a Canadian receipt style in the Maintenance ⇒ Receipt Options window. (See Gifts in Kind for more details.)
Abundant Batch #
If you have configured to use Abundant online donations, this checkbox will appear on this window. Unlike most other settings in the program, checking this checkbox only makes a temporary change, until you either turn it off, or exit the program. Checking it and saving your changes also temporarily makes the Eligible Amount and Description of Advantage donation fields, if they are displayed, disappear from the program's main window, to allow room for the Abundant Batch # field.
The only reason for using this option would be if you are having some sort of problem with matching up the totals in Abundant bank deposits, and need to check or change which donations are part of which Abundant batches.
If an Abundant donation has been assigned to the wrong donor, you may need to delete the donation from the original donor - after carefully noting its batch number - then re-enter it for the new donor, and be sure to enter the same batch number for it when you do so.
Also, if Abundant donations were assigned to the wrong donors, that almost certainly means that the two customer IDs imported from Abundant were associated with the wrong donor. Use the IDs button at the right of the various main-window buttons for the donor, to show the Customer IDs window. Copy out the Abundant Account ID and Abundant Customer ID (carefully noting which is which) then delete those rows from that window with the Delete button, and close the window. Go to the donor that those customer IDs should have been associated with, click IDs, and use the New button to add those two IDs back in for that correct donor.
Allow $0.00
If you want to be able to enter Donations with an Amount of $0.00 (which is normally not allowed), check the "Allow $0.00" checkbox. However, you can only do this if the Description field is selected to be shown under Show Fields. This is because donations entered with an Amount of $0 are required to have their Description field filled in.
Allow Negative Amounts
Although for issues like cheques that have been entered into DONATION then come back NSF we recommend just deleting that donation, some users prefer to enter a separate "donation" that has a negative Amount, to reverse the original donation. Checking the Allow Negative Amounts checkbox allows for that.
Please note that if you allow this, and the donation with the negative Amount is receiptable, it will be included on a receipt for the donor, and show up, with its negative Amount, on the table of detailed donations, if that table is included on the receipt.
Negative amounts should be entered as, for instance, -10, or -12.34, not 10- or 12.34-. (Putting the minus sign at the end will make the program think you are trying to do a calculation, and pop up the built-in calculator!)
For more details about all of these donations options, including the meaning of Eligible Amount, see Entering New Donations.
Use Batch Descriptions
This option was added in release 4.30 of DONATION. The point of Batch Descriptions is for organizations, usually churches, that do two or more Batch Entries on some days, and want to be able to report separately on them, with the Reports ⇒ One Date Donation report. If you never do that, you can uncheck this checkbox, and various features related to named separate batches will not be shown to you. This checkbox defaults to being checked the first time you use DONATION, or upgrade to release 4.30 or higher.
Default Category
This drop-down list allows you to specify that your default donation category for new donations is something other than "General", which is what it is if you have not changed it in this window. This default can also be overridden when you are entering the One Date Batch Entry window.
Default Paid By
This field allows you to enter a default for all new donations' Cheque # / Paid By field, such as "Cheque" or "Cash" (without the quotes, of course). This applies both to donations entered via the main window and via the One Date Batch Entry window. (In the latter case, a default set here will apply to donations entered in a batch, even if you choose not to display the Cheque # / Paid By field on the One Date Batch Entry window.) The reason this option is not called "Default Cheque # / Paid By", by the way, is that obviously you can't enter a default cheque number, since they would all be different! If you do frequently enter cheque numbers in the Cheque # / Paid By field, you would probably not set a default here.
Word for "Cash"
Specifies what value you put into the Cheque # / Paid By field for cash donations. This is used to determine the total of cash donations in a Batch Entry or Bank Deposit window, so that when you use the buttons on those windows for Counting Cash, the totals can be confirmed to be correct. Defaults to "Cash".
Sort Order
These choices let you pick between Oldest to Newest (the only option in versions before version 3.22), and Newest to Oldest. Oldest to Newest means that earlier donations are higher up in the list on the main window, and the new empty donation that is automatically added is at the bottom of the list. Newest to Oldest means that later donations are higher up in the list, and the new empty donation is at the top.
Cursor Field after F2
These choices let you pick between Date and Amount. This determines which donation field the cursor moves to when you press the F2 key. (Previous versions always went to the Date field, but that could waste time if you were entering a number of donations for the same date on the main window, since once you set the date on the first donation, it would stay set.) If you do set this to Amount, however, which is useful if you often enter a number of donations for the same date on the main window, instead of using the One Date Batch Entry window, please be careful to check that the Date field, which you are skipping over, has the correct date in it!
Show Donations
These choices let you decide how many years of donations to display on the program's main window, as you select each donor. With the choice "Only Current Year", it behaves as it always did before this choice was added, only showing donations in the current working year. With the choice "Also One Prior Year", it shows the donations in the current working year and the one just before it. And with "All Years", it shows all years of donations.
Only the donations in the current year are ever editable. Prior year donations also cannot be deleted. To edit or delete another year's donations, you must go to that year in Maintenance ⇒ Change Year.
Options for Limited Users only
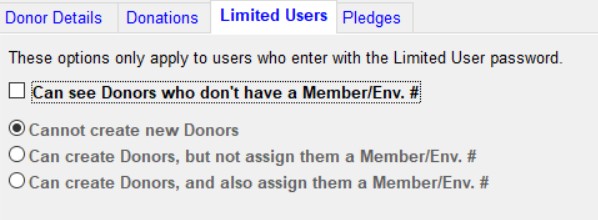
The options on this section of the screen are explained fully under Using a Limited User Password, and are only relevant to users who enter the program with the Limited user password rather than the Program Entry password (or no password). However, changes to this tab (and the rest of this window) can only be made by users who enter the program with no password, or the Program Entry password.
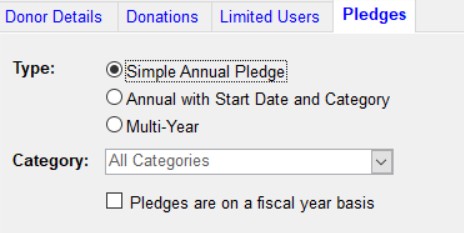
Options for Pledges
Please read Pledges in DONATION to help you understand the program's capabilities in regard to pledges.
DONATION has three methods of entering pledges, in increasing order of complexity, which you can choose between with the radio buttons on this tab:
•Simple Annual Pledge: This was the only option until version 3.34 of DONATION. There is an Annual Pledge field in the Donor Details area, which you enter directly. No further details about the pledge are available (such as limiting it to one donation category), so all donations made by the donor during the current year are assumed to fulfill the pledge.
•Annual with Start Date and Category: This is still for only tracking a single year's pledge. However, you do not enter the Annual Pledge directly in the Donor Details area. Instead, you click on the drop-down arrow that appears on that field, or right-click on the field, and then select "Edit Pledge Details" from the popup menu that appears. In the window that comes up, you can enter both a start date for the pledge (if you want to track when during the year it was made) and optionally a donation Category that the pledge is limited to. (But see below for how Categories work.)
•Multi-Year: This allows for the entry of multi-year pledges. Just like "Annual with Start Date and Category", you click on the drop-down arrow on the Annual Pledge field or right-click on it, then pick "Edit Pledge Details" from a popup menu, to get to a window for entering the multi-year pledge details. The Annual Pledge field's label changes to "Current Pledge" in the Donor Details area, for donors for whom you have entered a multi-year pledge.
Category field: This only applies with the second and third radio button options above. If you select a value other than "All Categories" here, it is the default donation category for all new pledges you will enter for all donors, using the pledge details windows. In this case, although the Category field is displayed on those pledge details windows, it is not editable - it is always set to the Category set on this tab. If you select "All Categories" here, however, you are free to select different donation categories for pledges on the pledge details window, or leave it at "All Categories" on those windows, so that all donations are considered to fulfill the pledge. If you do select a Category here or in the pledge details windows, only donations made to that Category are considered to fulfill the pledge.
If you have previously set the default Category field here to one value other than "All Categories", and then change it to another value, and there are already donors in the current year's data with pledges using the old category, you will be prompted as to whether you would like to have all of them changed to use the new default pledge category.
Pledges are on a fiscal year basis: If you check this checkbox, pledges are considered to be based on your fiscal year, as set in the Maintenance ⇒ Organization Info window. This only applies if your fiscal year is different from the calendar year. Note: if you select the pledge type Annual with Start Date and Category, and also check this checkbox, you will receive a message informing you that Start Dates will be ignored on pledges, for example they will always be considered to be for the entire fiscal year. Also, because of the complexities it would introduce, this checkbox cannot be selected in conjunction with the pledge type Multi-Year.
Once you select this checkbox, Pledge Information mail merge letters and pledge reports are adjusted to work on a fiscal year basis. See Pledges and Fiscal Years for more information.
If you are in a country such as the United Kingdom, Australia or New Zealand, and have selected to use Fiscal Year Data Entry and Receipting, then when you are working on a year that is a fiscal year the Pledges are on a fiscal year basis option is ignored. In this case, pledges are always on a fiscal year basis, and you can set a Start Date for pledges with the pledge type Annual with Start Date and Category.
When you are done making changes on all of the tabs in this window, press Enter or click the OK button to save your changes. Pressing ESC or clicking the Cancel button reverts back to the unedited version of the Main Window Options.
This topic was last edited on Mar 9, 2023