When you are first running ACCOUNTS, or setting up a new database, after filling in the Organization Information window, you are presented with the following window:
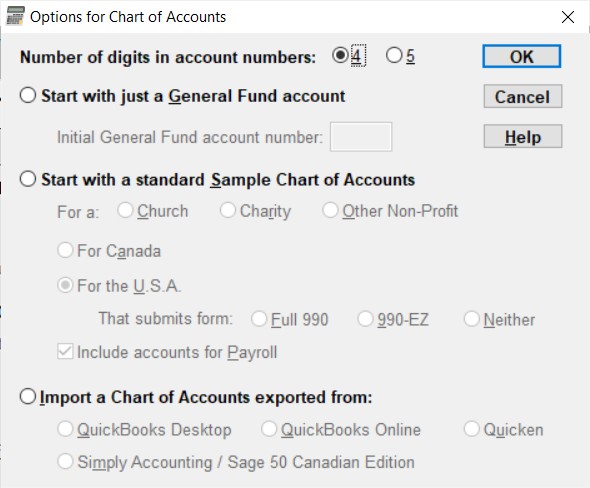
This lets you choose between a number of options for what to start with in your chart of accounts (list of accounts).
Number of digits in account numbers: Choose between 4 or 5 digits. (Note: if you choose to import a chart of accounts from QuickBooks, this will be forced to be 5 digits, because QuickBooks charts of accounts usually use 5 digits.)
Warning: The number of digits in your account numbers cannot be changed after you make the decisions in this window and click OK. If you did need to change it after that, your only option would be entirely start over, with the Database ⇒ Delete All Data menu option!
Start with just a General Fund account: If you select this radio button, you then also need to review the suggested Initial General Fund account number, which starts out as 3000 if you have selected 4-digit account numbers, or 30000 for 5-digit accounts. That will be the only account that the program creates for you, giving you full control over all of the other accounts.
Start with a standard Sample Chart of Accounts: This offers a number of options that determine a specific sample chart of accounts that we have come up with, mostly based on the categories in the required annual returns for charities in Canada or the U.S.A. (the T3010 for charities and churches in Canada, the T2 for incorporated non-profits in Canada, or form 990 or 990-EZ for the U.S.A.). You will still of course be able to make changes after the sample accounts are created for you, if you do select this option. See the section below for further details.
Which of the two options of "For Canada" and "For the U.S.A." can be picked will depend on (and match) your choice of Country in the Organization Info window.
Import a Chart of Accounts exported from: This lets you import a file containing your chart of accounts that you have exported from an existing accounting program, specifically QuickBooks (Desktop or Online), Quicken, or Simply Accounting / Sage 50 Canadian Edition.
If you choose the option for importing from QuickBooks Desktop, see Importing Accounts from QuickBooks Desktop for full details.
If you choose the option for importing from QuickBooks Online, see Importing Accounts from QuickBooks Online for full details.
If you choose the option for importing from Quicken, see Importing Accounts from Quicken for full details.
If you choose the option for importing from Simply Accounting / Sage 50 Canadian Edition, see Importing Accounts from Simply Accounting for full details.
Once you have made your selections, click OK to have the program create your chart of accounts based on those selections. After that, it will go on to the Edit Chart of Accounts window, to let you further fine-tune your desired chart of accounts. Or of course you can instead click Cancel in this window, to stop creating the new database.
Detailed Selections for the Sample Charts of Accounts
The first selection is to specify whether your organization is a Church, Charity or Other Non-Profit. There are actually relatively few changes made to the chart of accounts based on this selection.
The main difference between Church and Charity or Non-Profit is the names of the sample funds other than the General Fund. For a Church, they are Benevolent Fund and Building Fund. For a Charity or Non-Profit, they are Temporary Fund #1 and Permanent Fund #1 (under the headings Temporarily Restricted Funds and Permanently Restricted Funds). In either case, you will quite likely want to rename, add to, or even delete these fund accounts (and their associated Revenue and Expense accounts), depending on what you really use in your organization. For the sample funds for a Church, you may also want to change which category of fund they are listed under (Unrestricted Funds, Permanently Restricted Funds, or Temporarily Restricted Funds).
For a non-profit in Canada (not a church or charity, and thus presumably not having to fill in the T3010 form), a number of detailed accounts required by the T3010 form are eliminated, and the links are instead to the T2 form, a required submission if the non-profit is incorporated.
For a non-profit in the U.S.A., the sample charts of accounts are identical to the ones for a charity.
The next selection is whether your organization is in Canada or the U.S.A. As mentioned above, when you select Canada, accounts that match most of the fields you need to report on the T3010 are included. When you select the U.S.A., accounts required for the form 990 or 990-EZ, or neither, are included, based on the next set of selections.
For users in Canada, one major breakdown from the T3010 is omitted, which is in lines 5000 through 5050 of the form. That is a secondary breakdown of your other accounts, and it did not seem obvious how to decide which of your other accounts would correspond to which of those lines. So you will have to add in that distinction yourself, later.
For users in the U.S.A., not all of the possible things you might need to track for the full form 990 are actually included in the sample chart of accounts, because it would lead to an absolutely enormous chart of accounts. In particular, the breakdown of revenue accounts between Related or exempt function revenue, Unrelated business revenue, and Revenue excluded from tax is not represented. Nor is the breakdown of expense accounts between Program service expenses, Management and general expenses, and Fundraising expenses. If you need those breakdowns for some of your accounts, you can add them yourself. A few other small breakdowns are also excluded, including line 1g, which breaks out noncash contributions included in lines 1a to 1f.
To understand how the form 990 and 990-EZ line numbers are represented in the sample charts of accounts, see here.
Important Note: You need to review the association of government form lines with accounts, via the Reports ⇒ Listing ⇒ Chart of Accounts with Government Form Lines report, to ensure that you agree with the way the samples we supply have matched those government form lines up with your accounts.
The final selection for Include accounts for Payroll should be left checked (the default) if you have any staff on payroll, and unchecked only if you have no paid staff. If you uncheck it, all of the sample accounts for payroll liabilities and expenses are omitted.
What if I Decide I've Made the Wrong Choices Here?
If you choose one option for creating your chart of accounts and decide you should have chosen another option, and you haven't yet started entering any (or many) transactions, you can start from scratch again on this database. You do that by using the Database ⇒ Delete All Data menu option, which does exactly what it says - deletes everything, including the chart of accounts, initial organization information (name, etc.), and any transactions you had entered, including opening balances. After using that menu option you would have to (and get to!) re-do all of the steps listed on the Startup Options page, including the selections on this Options for Chart of Accounts window.
This topic was last edited on Nov 11, 2022