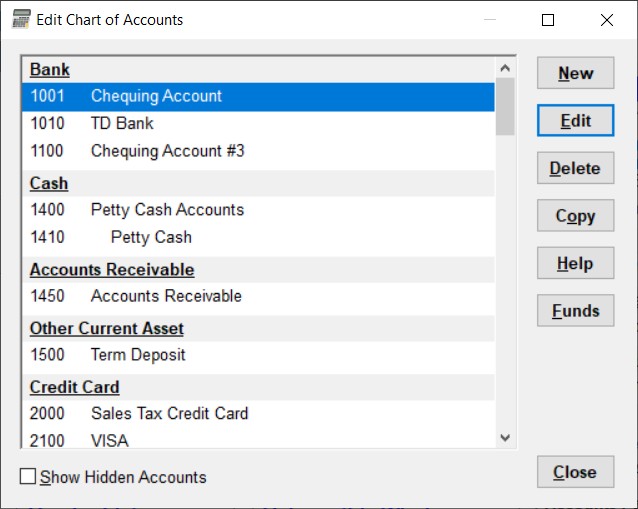
Your chart of accounts is the list of accounts (assets, liabilities, funds/equities, income and expense accounts) that you use in your organization. Use the Maintenance ⇒ Chart of Accounts menu option, or the Chart of Accounts quick link on the main window, to bring up the following window displaying your chart of accounts:
You can resize this window by clicking and dragging on any edge or corner.
Obviously, this is just showing some sample accounts that we entered,
To add a new account, click New. To edit an existing account, make sure it is highlighted on the list, then click Edit, or double-click on the account in the list, or press Enter. Any of those actions will bring up the Edit Account window. Make your desired entries or changes, then click Save and Close or Cancel to return to this window.
If you have an existing account already displayed and want a close copy of it (another account with the same type, and at the same level, next in the list) the Copy button will create a draft for you and show it in the Edit Account widow, for you to finalize as desired.
If you are unclear about the different types of accounts, and setting them up, please consult your accountant. The Help page on Accounting Concepts may also be of assistance.
Ways of Establishing your Initial Chart of Accounts
When you first initialize a new ACCOUNTS program or database, one of the startup windows is the Startup Accounts window. It gives you various options, including starting with one of various sample charts of accounts, or importing from one of three popular general use bookkeeping programs.
The program always starts with a General Fund account, number 3000. That account can be modified in some ways, including changing its name or number, but it cannot be deleted, and cannot have sub-accounts. It can be identified in this window, because when you hover over its Number or Name fields, a message pops up saying it is the original General Fund account.
Deleting or Hiding Accounts
You can also delete accounts from this window, by highlighting them on the list then clicking Delete. However, there are significant restrictions on which accounts can be deleted - you can't delete accounts that you have entered transactions for, and you can't delete accounts that have sub-accounts.
You also cannot delete the account that the program thinks is your General Fund, which is the one that started out as account number 3000 when you first initialized your Chart of Accounts. (Of course, you could have since changed its name and number.) You also cannot delete Fund accounts that have linked Income or Expense accounts.
You also cannot delete accounts that have associated Government Form Lines, or are part of Memorized Transactions, or that have been recorded in the program's Audit Trail of prior transactions.
If you do have an account that you are no longer using, but you can't delete it for one of the reasons above, you can instead hide it via a checkbox on the Edit Account window. Hidden accounts will not show up on drop-down lists of accounts when you are selecting them for transaction entry, but if there are transactions for a given account, they will still show up on reports.
You can view or hide any hidden accounts on this window by checking or unchecking the Show Hidden Accounts checkbox on this window, respectively. When you are showing hidden accounts (the checkbox is checked) the hidden accounts are displayed in italics, for clarity.
Editing the Funds Associated with Income and Expense Accounts
By clicking the Funds button, you can open the Associate Income and Expense Accounts with Funds window (which can also be opened independently by the Maintenance ⇒ Funds for Accounts menu option). That allows you to set the fund/equity account associated with each existing income and expense account. That can also be done, one account at a time, by clicking the Edit button on this window when you have selected an income or expense account, or when you use the New button to create a new income or expense account.
Validation when you Close this Window
When you are done with this window, click Close to close it.
At that point, the program will check whether all of the accounts displayed are in increasing numerical order. If not, it will advise you of that fact, and give you an option to stay in the window and change the account numbers, to put them in order. While it is not necessary for the accounts to be in order, it may be less confusing.
The order that the accounts are displayed in this window is first by the Type (account class, or subgroup of class), then in numerical order for the top-level accounts, with sub-accounts nested within their top-level account, in numerical order, and sub-sub-accounts nested within their parent sub-account, again in numerical order.
A second validation is done to check that all of your fund/equity accounts have at least one associated income account, and one associated expense account. (See the section on Fund Accounting to understand this. Transactions that affect the fund should normally be made to such associated income or expense accounts, not the fund account itself, except for rare inter-fund transfers.) If this problem occurs, you will be given a message about it, and give you an option to stay in the window, to create such accounts. It will also tell you which is the first fund with this sort of problem.
Relevant Reports
After entering accounts, including setting up which funds / equity accounts your income and expense accounts are associated with, you may want to review your list with one or both of the Chart of Accounts and Income and Expense Accounts by Fund reports on the Reports ⇒ Listing sub-menu. (Note: The name of the 2nd of those reports may change, depending on your choices on the Maintenance ⇒ Entity and Report Names window.)
Opening Balances
You will notice that unlike some other programs, you do not enter opening balances as you create new accounts in your chart of accounts. Instead, you can enter your opening balances in one large transaction, using the Actions ⇒ Opening Balances menu option.
This topic was last edited on Sep 20, 2021