To enter a new donor, press F3, click the New button above the Donor Details area on the main screen, or select File ⇒ New Donor. Then fill in all of their details. Remember to press Tab, not Enter, to move from field to field.
You will notice that as soon as you start editing the new donor, if necessary the Donor Details area expands downwards so that you do not have to scroll it to enter all of the fields. If this happens, the Donations area also disappears (though only if the Donor Details area would otherwise be overlapping it). This will change back when you finish editing the donor's information.
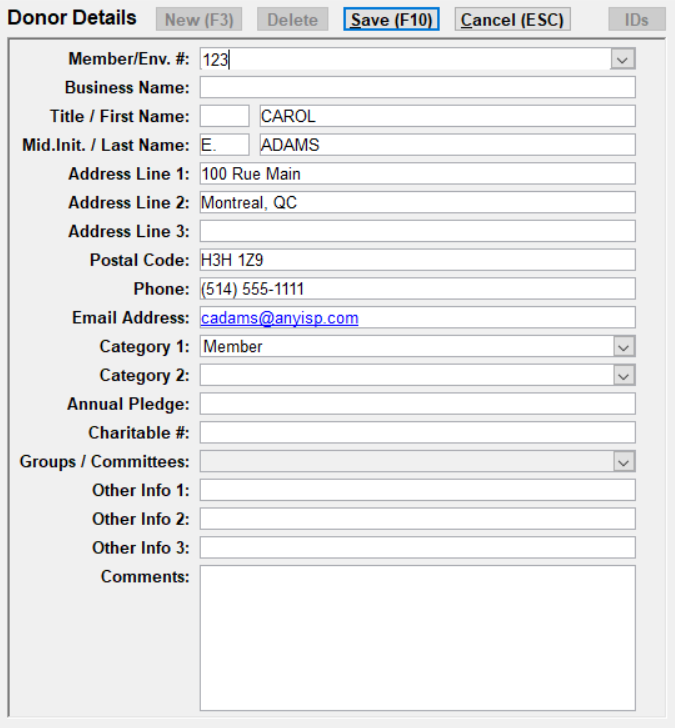
Here is an image of the Donor details area of the main window with most of the optional fields (as mentioned in the next section below) showing:
Optional Fields
Which fields are displayed in the Donor Details area as shown above can be controlled by a number of checkboxes in Donor Details tab of the Maintenance ⇒ Main Window Options window. The fields that can be optionally omitted from the Donor Details are the Member/Env. #, Title, Middle Initial, Email Address, Category 1, Category 2, Annual Pledge, Charitable Number, Groups / Committees, Other Info 1 through 6, and Comments. (In the image above, Other Info 4 through 6 are not showing.)
Member or Envelope Numbers
If your organization uses Member or Envelope numbers, you can fill this into the first field, Member/Env. #. If you are assigning such numbers for the first time, or are willing to reassign the numbers, you can have the program fill them in for you automatically. To do that, either click the drop-down arrow at the right of this field, or right-click in this field. Either action causes a small two-item popup menu to come up, as long as the field is currently blank. The options are:
•Next Higher Member/Env. #, which automatically fills in the field with the number one higher than the highest Member/Envelope # used so far for any other donor, or
•Last Unused Member/Env. #, which automatically fills in the field with the number that is the first gap in the sequential numbering (or 1 if that hasn't yet been assigned to any donor).
Both of those options obey the setting for "Lowest Member/Env. # for automatic assignment" on the Donor tab of the Maintenance ⇒ Main Window Options window. So the first one will always enter a number that is at least that lowest number, and the 2nd one will always fill in the first gap in the number that is at least that lowest number.
You can also use the File ⇒ Next Higher Member/Env. # or File ⇒ Lowest Unused Member/Env. # main menu options, to do the same things, or the Database ⇒ Reassign Envelope Numbers menu option to assign or reassign all or certain donors' envelope numbers.
Name Fields
There are up to five name fields, depending on choices in the Maintenance ⇒ Main Window Options window: Business Name, Title, First Name, Middle Initial (abbreviated as "Mid.Init" to make it fit) and First Name.
When the Business Name is filled in, it is assumed to be the name of a business or organization that is making the donations. In that case, you can also fill in the other Name fields, but they are assumed to just be the contact name within the organization - the main name that is displayed on receipts, reports, the Donor List etc. will be the Business Name.
For individual donors, leave the Business Name field blank, and fill in the other name fields for the person making the donation.
In versions of DONATION prior to version 3.03 (released in late 2007), there was no Business Name field, and users often put the business name into the Last Name field. When version 3.03 or later is first started, this is fixed, by moving names with only a Last Name filled in to the Business Name field. However, for long business names that would not fit into the Last Name field, users sometimes split them between the First Name and the Last Name field. Those ones would have to be moved to the Business Name field by editing the donor record directly.
In releases of DONATION prior to 4.18 (released in August 2019) there were no Title or Middle Initial fields, so users who wanted to record them would usually put both into the First Name field (such as First Name "Mr. John Q."). If you want to continue doing that, you can turn off the display of the Title and Middle Initial fields in the "Show Fields" area of the Maintenance ⇒ Main Window Options window.
If you had been entering the title or middle initials as part of donors' First Names, and you are satisfied with the way they therefore appeared anywhere in the program where the First Name was displayed, there is no need to change to using the separate Title and Middle Initial fields.
For couples donating together, you may want to list them in only one donor record, so they only get one receipt. To do that, select one name to file it under. You can then enter both first names under the First Name field (if they have the same last name), for example:
| First Name: | Bob and Mary |
| Last Name: | Smith |
If they have different last names, you can do something like the following:
| First Name: | Bob |
| Last Name: | Smith & Mary Jones |
Since names are always printed as First Name then Last Name, this will print as "Bob Smith & Mary Jones" which is what you want. However, note that it will always be alphabetized under "Smith", so you can't find it sorted under "Jones", for instance on the Donor List on the main window. However, you can find it by specifying "Jones", without the quotes, in the window reached with the File ⇒ Find Donor menu option.
See also Salutations for Donors for more details about how such names are used after "Dear" in mail-merge letters.
Address Fields
Canadian users must have at least the first line of the address filled in, because the Canada Revenue Agency requires full donor addresses to be printed on the receipts. All other users can leave the address fields blank if they do not need an address to be required for their donors.
You may include a postal or zip code either in the Postal Code field, or as all or part of one of the three Address fields. Do not include it in both, as it will then be printed twice when printing addresses. An advantage of using the Postal Code field is that you can sort or filter on those values. Also, entries in the Postal Code field are automatically forced to be capitalized if they include letters (as in Canada).
When addresses are being printed, as on the official tax receipts generated by the Receipt menu options in the program, or when printing mailing labels or envelopes, the contents of the Postal Code field are always automatically added at the end of whichever is the last filled in of the Address Line 2 and Address Line 3 fields.
If you leave address lines empty, with a filled-in line following them, they will be moved up when you Save the changes, so there are no blank lines left within the address. So a filled-in Address Line 2 will move up into the space of an empty Address Line 1, and a filled-in Address Line 3 will move up into the space of an empty Address Line 2.
If most of the donors to your organization live in the same area, you may want to specify default values for any or all of Address Line 2, Address Line 3 and Postal Code. This can be done with the options on the Donor Details tab of the Maintenance ⇒ Main Window Options window. If you do this, whichever of those fields you set up defaults for will be automatically pre-filled when you start to create a new donor. Of course, if you use these defaults, be very careful to change the values for individual donors whose address doesn't happen to correspond to the default values.
Canadian and US Postal Code field entries that are not formatted properly will in many cases be corrected for you as you tab or click out of the field, or when you Save.
Phone Number
The phone number is only for reference, and is not required or printed on the receipts.
To save you a bit of typing, phone numbers entered as all digits with no separators are automatically reformatted when you tab or click out of the field, or Save, so that 1234567 is changed to 123-4567, and 1234567890 is changed to (123) 456-7890. Various other formats are also fixed appropriately, such as changing 123 456 7890 or 123-456-7890 to (123) 456-7890.
If you prefer the format 123-456-7890 for 10-digit numbers, you can switch to that, with the Phone Format option on the Donor Details tab of Maintenance -> Main Window Options.
Email Address
You may enter an Email Address for the donor. For any donor for whom you have entered an Email Address, if you right-click on that field, a small one-item popup menu comes up, with the option Send Email. If you select that menu option, an email will come up in a window, addressed to the email address in this field. (This requires you to have configured email sending with Maintenance ⇒ Email Sending Configuration.)
This email address is also used for emailing receipts and letters.
The Email field can include multiple email addresses separated by semicolons, such as "john@gmail.com;mary@gmail.com", without the quotes. If you do that, when emails need to be sent to the donor, a single email will get sent, with both addresses on the "To" line. One thing to beware of if you are doing this, if you are planning to export emails to mass mailing services, is that they will almost certainly only allow one email address in the field you export to them, so you will not want to use this capability.
Charitable Number
If the donor is itself another charitable organization, you can enter their Charitable Number in this field, for tracking.
Donor Categories
You can set up two distinct lists of category values, for categorizing your donors, via the Maintenance ⇒ Donor Category 1 or Maintenance ⇒ Donor Category 2 menu options. However, this is completely optional - many users do not use the Donor Category fields at all, and as mentioned above, these fields can even be hidden via options on the Donor Details tab of the Maintenance ⇒ Main Window Options window.
If you wish to select categories for a donor, the easiest way is to Tab or click into the Category 1 or Category 2 field and use the "autocomplete" feature. If you type in a letter or letters that are the initial part of the category value you want to select, the rest will appear, highlighted so it will be overwritten if you keep typing. For instance, if your categories that start with "M" are "Member" and "Minister", typing "M" or "m" will bring up the first match starting with that letter, which is Member, and adding "i" will change it to show Minister. Alternatively, click on the small down arrow button at the right of the field and select the category from the scrolling list that appears. If you need to undo a category selection, the first entry in the scrolling list is always a blank one, which means no category.
There is also always an "<Add New>" option on each of the drop-down lists of donor Categories. Selecting it brings up the appropriate maintenance window, pre-set to add a new category.
See Non-Receiptable Donors and Donations for ways to mark Donor Categories as Non-Receiptable, so that donors marked with those categories will never receive a charitable receipt created with the Receipt menu options. This could be helpful if you have a donor such as "Cash", in which you enter anonymous cash donations, or for donors that are themselves charities to which you should not issue official charitable receipts. (This latter point is true at least in Canada. I'm less sure about it for other countries.)
You can change the labels of these fields to anything you want by using the Donor Details tab of Maintenance ⇒ Main Window Options and changing the values in Category 1 Label or Category 2 Label. For instance if Category 1 was being used to select a membership status for the donor, you might change it to be named "Membership Status" or just "Membership".
Groups / Committees
This field allows you to specify which groups or committees within your organization this donor is a member of. Please see Groups and Committees for a full explanation both of the initial setup required, to set up your list of groups or committees, and how data is entered into this donor field..
Annual Pledge
The Annual Pledge field is an optional field where you can enter the total amount the donor has pledged to give your organization in the current year for which you are entering data. If your donor makes weekly pledges, just multiply that by 52 to get the annual amount.
If you accept annual pledges with a fixed donation category, or multi-year pledges, you can switch to one of two other pledging options that support this, and the name of this field will change. See Pledges in DONATION for more details.
Other Info Fields
After the Annual Pledge, there are six fields which you can use for your own purposes. By default they are called Other Info 1 through Other Info 6. But you can change the labels of those fields to anything you want by using the Donor Details tab of Maintenance ⇒ Main Window Options and changing the values in Other 1 Label through Other 6 Label. For instance, you might change some of them to be called "Title", "Fax", and "Birthdate", if those were some other pieces of information you wanted to track. Note: The Other Info 4 through 6 fields are not initially shown when you install or upgrade DONATION, unless you check the checkboxes for showing them on that same Main Window Options window.
Comments
To edit the comments, you have a few choices. One option is to type directly in the smallish box for the Comments in the Donor Details area. Alternatively, pick the menu option File ⇒ Edit Comments, or with the cursor positioned in the Comments field, right-click in this field and select Edit Comments from the small one-item popup menu that comes up. A mid-sized window will come up on which you can edit the comments. Comments can be virtually any length, and contain anything about the donor that you wish to include. To go onto a new line when editing them, just press Enter. The comments will automatically word-wrap as you type.
Note: If you have made the Comments field invisible by unchecking its checkbox in the Donor Details tab of Maintenance ⇒ Main Window Options, you can still edit it with File ⇒ Edit Comments. It just won't show up in the main Donor Details area.
Saving Changes or Cancelling
When you are done, save the information by pressing Enter or F10, or clicking the Save button, or selecting File ⇒ Save Changes. If you decide you did not want to enter a new donor after all, press ESC, or click the Cancel button, or select File ⇒ Cancel Changes. (Note that you can't do anything else in the program until you choose one of those two options to finish or cancel entering the new donor.) Also note that you can't use Enter to do the save while you are in the Comments field, because it is reserved for inserting a new line into the comments.
Maintaining IDs for Donors
The IDs button is enabled when you are not editing a donor, to maintain any Customer IDs for this donor from third-party online donation services, such as Vanco. This button is only visible if you have checked "Customer IDs" in the Show Fields area of the Donor Details tab of Maintenance ⇒ Main Window Options. See Customer IDs for Donors for full details.
Donors in Different Years are Separate
Once you have multiple years of data in the program, each year's donor records are separate. Please see Changing Years in the Database to understand this more fully.
If you have added one or more new donors to one year, that you want to be present in another year, you can do that with the Database ⇒ Copy Missing Donors menu option.
This topic was last edited on Mar 9, 2023