A journal entry is a way to enter an accounting transaction that does not belong in an obvious way (or at all) to one of the asset, liability or fund accounts, and thus cannot (or should not) be entered on a register window for such an account, or with one of the special purpose data entry windows on the Actions menu. Most users will only enter journal entries at the direction of their accountant, or have their accountant make the journal entries themselves. The Help page on Accounting Concepts may be of assistance in understanding journal entries.
One special instance of a journal entry is an opening balances transaction. That is entered on a variation of this window, but you do not get there in the same way. See Entering Opening Balances for details.
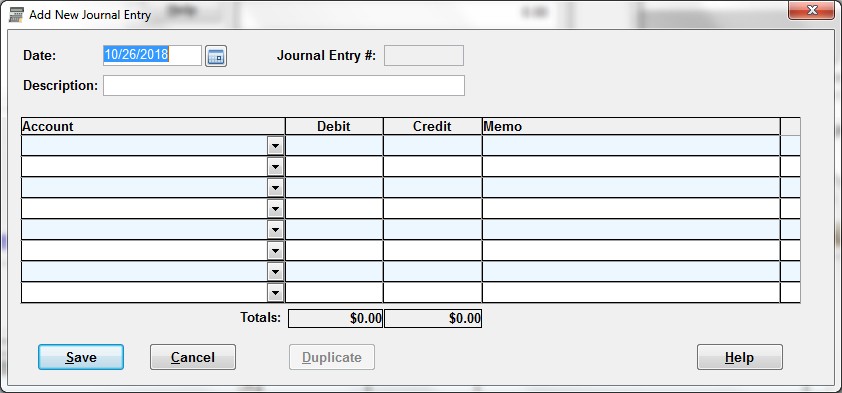
You use the Actions ⇒ Journal Entries menu option, or the Journal Entries quick link on the main window, to bring up the list of all of your prior journal entries. From there, clicking New brings up a blank window for entering a new journal entry, clicking Edit brings up a window to edit an existing journal entry, and clicking Duplicate brings up a duplicate of an existing journal entry, with the Date and Journal Entry # cleared so it can be a new one. The following is an example of a new journal entry:
You can also get to this window, but set to be read-only (i.e. you can't change anything) by pressing Ctrl+Shift+J, or picking View as Journal Entry from the right-click popup menu, in any register window, for non-journal entry transactions. That allows you to see any saved transaction in a more formal accounting view, as debits and credits.
For actual journal entries that you see on a register window, if you press Ctrl+E, or pick Edit Journal Entry from the right-click popup menu, this window will open and allow you to edit the journal entry. You can also Cut, Copy and Paste journal entry transactions displayed on a register window, and also memorize them and re-insert them.
The Date in the top part of this window is the transaction date. It is initialized to today's date, or the last-used transaction date. You can enter the Date directly, or click the button to its right to use a popup calendar. There are also a number of special characters that you can type in the Date field for quick selection and changing of the displayed date.
The Journal Entry # is filled in by the program - it will be empty for new journal entries, until you have Saved them and returned to the Journal Entries list window, at which point a sequential number is assigned. The Description is your overall description of this journal entry.
Next you come to the grid area for the split lines for the journal entry. You have to understand Debits and Credits to enter this correctly, though the arrows in the last column of this grid help you avoid mistakes. (This is explained below.)
There have to be two or more split lines in each journal entry, each with an Account, either a Debit or a Credit, and optionally a Memo that is specific to that split line. The totals of all Debits and Credits for this journal entry must be equal, and those totals are shown below the grid so you can make sure they are correct.
The only accounts displayed in the Account drop-down list are ones with no sub-accounts. You can select "<Add New>" from this drop-down list, to bring up a window to add a new account to use in this transaction.
The Account field normally drops its list down automatically, as soon as you Tab or click into it, though this can be changed with an option on the Maintenance ⇒ Main Options window. (If that option is turned off, you can drop down the list by clicking on it with your mouse, or pressing the keyboard combination Alt+DownArrow.)
The accounts on the list are initially displayed in chart of accounts order, but if you type a letter, it immediately goes to the first account that starts with that letter, and also re-sorts the list in alphabetical order, to make it easier to see and select other accounts that start with that letter. If you press Backspace after that, or Tab out of the field, the list is returned to chart of accounts order.
The Account field uses autocomplete to make selecting existing account names easy.
When entering Debit or Credit amounts, you don't have to enter dollar signs or commas. And if it is an even number of dollars, you don't have to enter the period or cents at the end.
The final column in the grid contains an up or down arrow for each line that has had an Account and a Debit or Credit filled in. That indicates whether that Debit or Credit increases or decreases the balance (for asset, liability and fund/equity accounts) or total (for income or expense accounts). An up arrow indicates an increase; a down arrow indicates a decrease. By checking that carefully, you may be able to avoid errors.
Of course, you have to understand what an "increase" means for each type of account. Increasing an asset balance means having more money in that asset (for example that bank account). Increasing a liability balance means having a larger debt, for example when you take out a loan, you increase (or establish) the balance in that liability account. Increasing an equity account means that your net assets in that fund are greater. Increasing an income or expense account means having a larger total of income or expenses in that account.
When you have entered all of the details at the top and all of the split lines, and they are in balance (total Debits equals total Credits), click Save to save the journal entry and close the window. (If the Debits and Credits are not in balance, the program will not allow you to save it!) Or you can click Cancel to abandon your changes and close the window.
If you came into this window by using the Duplicate button on the journal entry list window, the Duplicate button on this window will have been pre-clicked for you. If you come into this window by using Edit on the journal entry list window, then as long as you have not changed anything, the Duplicate button on this window will be enabled, and you can click it to duplicate the journal entry as a new one. That will clear the Date and Journal Entry # fields. Enter the Date, make any desired changes, then click Save or Cancel as with any other transaction on this window.
The only time you would have to use Duplicate to create a copy of an existing journal entry is if it cannot be viewed on a register window, because it does not contain any asset, liability or fund accounts. If you can view a journal entry on a register window, you can instead use that window's features for Copy and Paste, and/or for Memorized Transactions. Of course, you are allowed to use the Duplicate button here for any journal entry.
Resizing this Window
For the unusual case where you have more than 8 split lines in a journal entry (the number shown by default), you can click and drag the top or bottom border of the window to resize it vertically, to allow more split lines to show. Split lines will be automatically added to fill the space, if necessary.
However, you don't have to resize the window to get additional split lines - a new one will always be created if you do any edits in the existing last split line.
You can also resize the window horizontally, by clicking and dragging on either the left or right side. The memo field will expand when you do that, to fill the space.
Deleting Lines when Editing a Journal Entry
If you are entering a new journal entry, or editing an existing one (or editing a previously saved Opening Balances transaction) you may at times find that you have entered a line for an account that you no longer want to be included in that transaction. To correct that, you can blank out everything in that line before saving - set the Account to nothing (the first thing in the drop-down list for the Account) and clear out anything in the Debit, Credit and Memo fields. If you do that, that blank line will be ignored when you Save the transaction. You can also do this clearing of a line by right-clicking on it and picking Delete Row from the popup menu.
This topic was last edited on May 27, 2022