Register windows, which are similar to a normal paper chequebook register, are one way to do most of your work in ACCOUNTS. You can open a register window for any balance sheet account (Asset, Liability, or Fund/Equity) that does not have sub-accounts. (You cannot enter transactions against accounts with sub-accounts.)
However, there are also special purpose data entry windows for common transactions, which you may choose to use instead of the register window. Those include windows for writing cheques (or other payments), entering deposits, entering credit card charges, recording bills before you pay them, and paying those bills.
Do not use the register window to write cheques for bills entered for later payment using Actions ⇒ Enter Bills or Actions ⇒ Bill List - those ones should always be paid using Actions ⇒ Pay Bills or Actions ⇒ Bill Payment List. If you pay such bills using the register window, they will remain on your list and reports of outstanding bills forever (unless you delete them). (See Entering Bills and Paying Bills for details.)
Transactions that cannot be entered on a register window, because they only affect Income and Expense accounts, or that you do not wish to enter on a register window because they are very complex, can instead be entered as Journal Entries.
You open the register windows from the program's main window, by double-clicking on an account in the list, or clicking on an account and then clicking the Use Register button.
Here is an example of a register window, for a bank account:
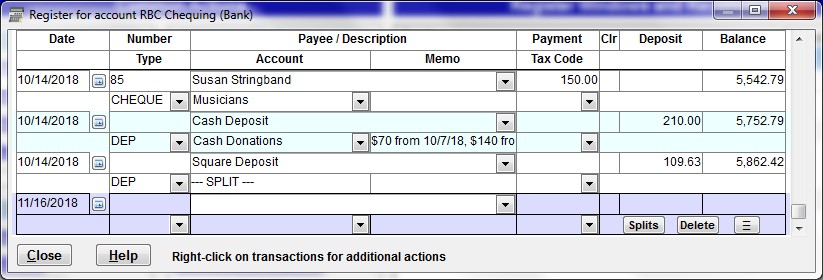
Some things to note are that each transaction takes two rows, and the current transaction row that you are working on is shown in a different colour.
Also, you can resize this window (primarily to make it taller or shorter, because the register area can't be made any narrower, and won't get any wider) by clicking on an edge or corner of the window and dragging. The example above has been resized to be fairly short, to better fit on this help page.
The following fields are on the register window:
| Date | The transaction date (the date it is considered to have happened, not the date on which you are entering it). On new empty rows, it is initialized to today's date, or the last-used transaction date. |
| Number | Any relevant reference number you want to enter for the transaction (optional). For instance, on a bank account this would be the cheque number for cheques. You can select the next cheque number (one higher than the most recently entered one on the same account) by pressing the "+" key (or "=", the unshifted version of "+" on the regular top row of most keyboards). Select the previous cheque number with "-". Do not enter leading zero's in a cheque number, as it will stop you from being able to print that cheque in the program. (You are warned if you do this, and given an option to remove the leading zeros.) |
| Payee / Description | The name of this field actually varies depending on what type of account you are working on. This is where you put the main description or identifier for the transaction. For instance, for a cheque on a bank account, you would enter the name of the payee here. |
| Payment | The name of this field varies depending on what type of account you are working on. (For accountants: This is always the Credit amount, on the account you are displaying the register for.) This value must always be at least zero - if you want to enter a negative, enter a positive in the other amount field instead. |
| Clr | "Clr" is short for "Cleared". For register accounts on which you can do reconciliations, such as bank accounts, this field is automatically filled in with "R" for transactions that have been cleared (reconciled) in this account. The field is never editable - it is only for your information to show which transactions you have reconciled. See Reconciling your Accounts for details on that process. For accounts that cannot be reconciled (Fund accounts) or ones that you don't reconcile, this field is still present in the register but you can just ignore it. In addition, for transactions that have been imported from online banking download files, but not yet reconciled, this Clr field will show "c" for "cleared". That changes to "R" if they are then also reconciled. |
| Deposit | The name of this field varies depending on what type of account you are working on. (For accountants: This is always the Debit amount, on the account you are displaying the register for.) This value must always be at least zero - if you want to enter a negative, enter a positive in the other amount field instead. |
| Balance | This field is not editable - it displays the balance in the account, after the current transaction has been included. For an Asset account like a Bank Account, a positive balance is just what it seems - you have money in the account. For a Liability account like a credit card or loan, a positive balance means you owe that much money. For a Fund/Equity account, a positive balance means you own that much. |
| Type | You can enter an optional transaction type, such as "CHEQUE" or "BILL". If you do enter "CHEQUE" or "CHECK" and omit the Number (cheque number), you are prompted when saving the transaction about whether you want to enter it. |
| Account | The other account (also called "counter account") involved in this transaction, when there are just two. For instance, for a cheque on a bank account, this would be the relevant Expense account. If there are more than two accounts involved in this transaction, "--- SPLIT ---" will be displayed here. (See below for details on splits.) You can also select "<Add New>" from this drop-down list, to bring up a window to add a new account to use in this transaction. The Account field uses autocomplete to make selecting existing account names easy. |
| Memo | Any additional description you want to add about this transaction. |
| Tax Code | A Sales Tax Code, specified via the Maintenance ⇒ Sales Tax Codes window, which causes an automatic split of the transaction to include associated sales tax accounts |
Transactions that were originally entered as journal entries or Opening Balances transactions, but that affect the current register account, are also displayed in the register window. (If they weren't, the balances in this window would be wrong!) Journal entries will always have the journal entry number displayed in the Number field, and "GENJRNL" (which stands for "general journal") in the Type field.
Transactions that were originally entered as bills or bill payments, but that affect the current register account, are also displayed in the register window.
The only field that you can click into and edit for journal entries, opening balances transactions, bills or bill payments is the Number field. However, for journal entries and opening balances, it would not be appropriate to edit the value in the Number field, so any change you make will receive an error message, and the original value will be put back in. To actually edit any of these types of transactions, press Ctrl+E, or right-click, and from the popup menu pick Edit Journal Entry, Edit Opening Balances, Edit Bill or Edit Bill Payment, as appropriate for the type of transaction.
For journal entries, if you cut or copy and paste one in a register window, or insert one that is a memorized transaction, the Date field is also editable, so that you can correct the date.
You use the Tab key to move through the fields on a regular transaction. If you have entered an amount in the first of the two amount fields (Payment in the example of the bank account above), and press Tab, it skips right past the 2nd amount field, because you have already entered the amount.
Press Enter to save the changes in the current transaction. (That will not ask you to confirm the save, it will just save it.)
If you instead click the mouse into another transaction row, when you have made changes in the current transaction, you will be prompted as to whether or not you want to save the changes. Answering Yes saves the changes, No undoes all of your changes to that transaction, and Cancel puts you back into the unsaved transaction row, for you to make further changes. (Closing the window, when there are unsaved changes, also prompts you in the same way.)
There is always a blank row at the bottom of the window for a new transaction. As soon as you start changing that row, another blank row will appear below it, so there will always be a blank row available for a new entry.
When you are done with this register window, click Close or press Alt+C to close it and go back to the main window.
Entering Dates
The date shown for a new transaction row will be today's date, or if you have entered other transactions during the current run of ACCOUNTS, the last transaction date you entered.
You can enter the Date directly, or click the button to its right to use a popup calendar. There are also a number of special characters that you can type in the Date field for quick selection and changing of the displayed date, including "T" for Today, "+" to increase the displayed date by one day, and "-" to decrease it by one day.
Entering Cheque Numbers
You can select the next cheque number (one higher than the previously entered one in the current register window) by pressing the "+" key (or "=", the unshifted version of "+" on the regular top row of most keyboards), when the Number field is empty. You can select the previous cheque number with "-". You can also alter an existing cheque number up or down with those keys.
Of course, the same applies to any Number field entries you use in any other register window (for example for a non-bank account), if you have sequentially numbered transactions in it.
If the Type field is any of "CHECK", "CHEQUE", "CHÈQUE", "CHK", or "CHQ", or even just includes "CH" anywhere within it, then when you go to save a transaction, if the Number field value is not just a number, you will get a warning message, to let you confirm that you have not made an error.
Entering Payees / Descriptions
This field has a drop-down arrow, which shows all previous Payee / Description values within the last year or so in this account's register if you click it. The list also includes all Vendors that you have entered with the Maintenance ⇒ Vendor List menu option (unless this is a register for a Fund account, where it really doesn't make any sense to enter a transaction for a vendor).
You can also just start typing a value, and if it matches a previous value or vendor name, it will come up. As you keep typing, values that match what you are typing will continue to appear. You don't need to do anything special to accept the value. Just move to the next field with Tab.
If you select a Vendor, and that vendor has a default Expense Account or Tax Code filled in, then if the relevant field here (Account or Tax Code) is not already filled in, the default from the Vendor will be automatically filled in. Those default values are applied as soon as you move out of the Description field, to another field or another part of this window, based on the vendor that you picked (if any). However, for technical reasons, if you go back to that field afterwards and make a different selection, no further changes based on vendor defaults will be made.
Entering Amounts
As mentioned above for the Payment and Deposit fields, you cannot enter negative numbers in either of those fields. If that's what you want, enter a positive number in the other of those two fields instead.
Entering Transaction Types
The Type field works very similarly to the Payee / Description field. It has a drop-down arrow, which shows all previously used values within the last year or so of transactions in this account's register if you click it. (However, it excludes the special values, put in by other windows, of GENJRNL, BILL and BILLPAY.)
You can also just start typing a value, and if it matches a previous value, it will come up. As you keep typing, values that match what you are typing will continue to appear. You don't need to do anything special to accept the value. Just move to the next field with Tab.
Entering Accounts
The Account field is used to enter the other account (or "counter account") in the transaction. It normally drops its list down automatically, as soon as you Tab or click into it, though this can be changed with an option on the Maintenance ⇒ Main Options window. (If that option is turned off, you can drop down the list by clicking on it with your mouse, or pressing the keyboard combination Alt+DownArrow.)
The accounts on the list are initially displayed in chart of accounts order, but if you type a letter, it immediately goes to the first account that starts with that letter, and also re-sorts the list in alphabetical order, to make it easier to see and select other accounts that start with that letter. If you press Backspace after that, or Tab out of the field, the list is returned to chart of accounts order.
The Account field uses autocomplete to make selecting existing account names easy.
Splits
Often a transaction involves more than two accounts. For instance, when you are recording a cheque, there may be two different Expense accounts involved, and/or there may also be sales tax accounts.
Transactions like that cannot be entered entirely on the register window, as it only has room for one other account, in the Account field.
Instead, you can click the Splits button in the currently selected transaction's row, or press Ctrl+S (i.e. hold down Ctrl and press S), or right-click and pick View/Edit Splits from the popup menu, to open the Register Splits window. Please see that Help page for details of what you can do there. (If the transaction already has splits, so "--- SPLIT ---" is displayed in the Account field, you can also double-click on that to re-open the Splits window.)
If you use Ctrl+S to open the Register Splits window, it will first prompt you to confirm that you want to open that window, unless you check the Don't prompt before open Register Splits window with Ctrl+S checkbox in the Maintenance ⇒ Main Options window.
After making changes in the Splits window, and saving them with OK, you still need to save the entire transaction as described above, for example by pressing Enter.
You cannot open the Splits window for journal entries, opening balances transactions, bill or bill payments. Instead, as mentioned above, you can edit those transactions with Ctrl+E or an appropriate option from the right-click popup menu.
It's also helpful to understand that although the splits window only shows rows for the other accounts involved in the transaction (excluding the account that the register window was opened for), internally in the database there is another split line stored, for the part of the transaction that affect the register window account itself. You can see this if you view the transaction as a journal entry, as described below. It's also important to understand that if you enter a Memo on the register window, it is associated with that split line that you don't see, for the register window's account, not with the other account (if there are no additional splits) or with the first split account (if there are additional splits).
Entering Memos
The optional Memo field can be used for a further description of a transaction. The Memo you entered will be stored with each split line for the transaction that you do not enter a distinct memo for, when you save the transaction. So for register transactions where you don't open the Splits window, the Memo will be stored with both the split line for the register account itself, and for the other Account (counter account) you specified for the transaction.
If you do open the Splits window, you have the ability to enter separate Memos for each split line. For any split lines on which you don't enter a Memo, if you entered a Memo on the register window itself, that memo will be copied into that split line's Memo area, when you save the transaction.
There is some different behaviour if you change a Memo on the Register window for a previously saved transaction, when you save the new change. If all of the split lines (as seen in the Splits window) had the exact same memo as what was on the Register window before you made that change, then after the save all of them are also changed to what you changed it to on the Register window. If any of them were different, however, only the one on the Register window will be changed.
Automatic Splits with Tax Codes
If you supply a Tax Code (originally set up via the Maintenance ⇒ Sales Tax Codes window) on a new transaction you are entering, an automatic split will happen based on the accounts you associated with that Sales Tax Code. You do not have to use the Splits window, unless you wish to see the details, or you need to add further splits. (Generally Tax Codes are used on purchase transactions, for Canadian charities which are eligible for partial rebates of the sales taxes they pay, and thus need to track those amounts.)
Adding a Tax Code to an existing transaction, or removing an existing Tax Code, does not affect the splits on the transaction, which have already been finalized. You will receive a message to that effect, and asked to confirm that you really wish to make that change.
Changing the percentages or associated accounts for a sales tax code in the Maintenance ⇒ Sales Tax Codes window (and its popup Accounts window) for existing Tax Codes that have already been assigned to register transactions also does not affect those transactions in any way. It only affects new transactions that are entered using that Tax Code.
To see a worked example of using a Tax Code in a register window, with the splits that are generated, click here.
Deleting Transactions
If you decide a transaction was entered in error, you can delete it. You do so by selecting the transaction's row, then clicking the Delete button that appears in the row, or pressing Ctrl+D (i.e. hold down Ctrl and press D). You will then be asked to confirm whether you want to delete that transaction.
Some types of transactions cannot be deleted directly, but rather must be deleted from the special windows for those types of transactions. These include bills, bill payments, opening balance transactions, and journal entries.
The Register Window for Funds
In register windows for Fund/Equity accounts, some extra information is added at the bottom right of the window, below the register balances. In that case, the bottom of the window looks like this:

The date shown for the "implicit balance" will be the current date. This balance will in most cases be different from the balance show in the last register transaction (or the last one up to the current date).
The difference between the displayed balance and the implicit balance is explained in the section on Fund Accounting in the Accounting Concepts help page. In brief. the register only lists explicit transactions on the fund, such as inter-fund transfers, or an opening balance transaction that you have entered. And the balance column in the register thus only shows the total from those explicit transactions, or the "explicit balance". The "implicit balance" shown at the bottom also includes all transaction amounts from income and expense accounts that belong to the fund. Reports on the Reports ⇒ Fund sub-menu mostly display this implicit balance, and also show where the difference between the explicit and implicit balances comes from.
Transactions that affect more than one register account
Some transactions affect more than one account for which a register window can be displayed, for instance say a loan payment. That might have been made from a bank account, and split into two other parts, one to a loan (liability) account for the principal part of your loan payment, and one for an interest expense account for the interest part.
That transaction would most likely be entered in the register window for the bank account, but it could also be viewed (and optionally edited, for example if there was an error you needed to correct) in the register window for the loan (the liability account). ACCOUNTS does not keep track of or care which register it was originally entered in.
Another common example of a transaction that you could view in two different register windows would be a transfer between bank accounts.
Transactions with Multiple Occurrences of the Same Account
The ACCOUNTS program actually prevents you from entering a transaction on the register (or anywhere else) that has two split lines with the same Asset, Liability or Equity/Fund account. The reason is that the running balance in the register for that account would then be incorrect. Why is that? Because the running balance is based on only the primary amount field shown on the register. If there are further lines for the same account within the splits, their affect on the balance will not show up, and thus the balance would be wrong.
Editing Journal Entries or Opening Balances displayed on the Register, or Viewing other transactions as Journal Entries
Accountants, or anyone else who is very comfortable with debits and credits, may wish to see a transaction (especially one with splits) laid out in full, showing the debits and credits as if it was a journal entry. You can do that by pressing Ctrl+Shift+J, or right-clicking and picking View as Journal Entry from the popup menu, when you are on a saved transaction row. (Sorry, you can't use it on ones you are in the middle of editing and have not yet saved.) Pressing Ctrl+Shift+J will ask you whether you want to see that transaction in a read-only journal entry window. Assuming you answer Yes, it will be displayed in the normal journal entry details window, but will not be editable there.
The preceding paragraph describes what happens in the usual case when this transaction was not originally entered as a journal entry or Opening Balances transaction.
The right-click menu option View as Journal Entry actually changes to Edit Journal Entry if you are on an actual transaction for a journal entry (the Type is "GENJRNL"), and it changes to Edit Opening Balances if you are on your Opening Balances transaction (that had been created with the Actions ⇒ Opening Balances menu option). Either of those options allows you to actually edit that current transaction in the specified window, not just view it. And Ctrl+Shift+J does these same things in these cases.
Editing Bills or Bill Payments displayed on the Register
For bills entered with the Enter Bills window, or bill payments entered with the Pay Bills window, if you see them on a register window you can edit them by pressing Ctrl+E, or choosing Edit Bill or Edit Bill Payment from the right-click popup menu. You can also view them as non-editable journal entries as described in the previous section.
Right-click Popup Menu
If you right-click on a transaction, or click on the ![]() button, a popup menu appears, with the following choices:
button, a popup menu appears, with the following choices:
| View/Edit Splits | Opens the Splits window for this transaction (same as clicking the Splits button in each row, or pressing Ctrl+S). For bills entered with the Enter Bills window, this option changes to Edit Bill, and for bill payments entered with the Pay Bills window this changes to Edit Bill Payment. (Both of those are the same as pressing Ctrl+E.) |
| View as Journal Entry | Opens the window to view this transaction as a read-only journal entry (same as pressing Ctrl+Shift+J). Like what's mentioned for the previous option, this option changes to Edit Journal Entry if the current transaction is actually a journal entry, and changes to Edit Opening Balances if the current transaction is your Opening Balances transaction. (Both of those are also the same as pressing Ctrl+E.) |
| Delete Transaction | Prompts for whether to delete the transaction (same as clicking the Delete button in each row, or pressing Ctrl+D). |
| Copy Transaction | See Copying, Cutting and Pasting Transactions for full details. |
| Cut Transaction | As above. |
| Paste Transaction | As above. |
| Memorize Transaction | See Memorized Transactions for full details. (This may also show up as Re-Memorize Transaction, for transactions that were memorized then inserted in version 1.39 or higher of the program.) |
Insert Memorized
| Transaction | As above. |
| Reconcile Accounts | Goes to the window for reconciling this account (same as pressing Ctrl+R). This is only available for Asset and Liability accounts. |
| Print Register | This just shows a message telling you which main menu reports allow you to print the transactions from the Register, which are Reports ⇒ Details ⇒ One Account Details if you need the splits details included, but don't need a starting balance and running balances, or Reports ⇒ Details ⇒ One Account with Running Balances, if you need those balances but don't need the splits details. |
| Print Cheques | Goes to the window for printing cheques, with the Bank Account pre-selected to be the current account. This option is only available for accounts that are bank accounts. |
| Find Transactions | Prompts with the Find Transactions window (also done by pressing Ctrl+F). That allows you to search on all or part of the displayed Payee / Description or Memo, the Number (for example a cheque number), or the Amount (either amount field). |
| Go to Date | Prompts for a date to go to, then goes to the first transaction that has that as its date. If there is no transaction with that exact date, it goes to the one with the earliest date after the specified date. (Ctrl+G does the same thing.) |
Unmatch Online Banking
| Transaction | Only enabled for transactions that have been matched to imported online banking transactions. Prompts for whether to unmatch them, for the unusual case where you decide a transaction has been matched incorrectly. |
The menu options for Copy, Cut and Paste Transaction are useful for a few purposes. One would be to repeat an earlier transaction. Another use would be if you entered a transaction in the wrong register (say, the wrong bank account). To fix that, you could Cut it from the wrong register, close that register, open the correct register, and Paste it on top of the empty row at the bottom of that register, then press Enter to save it.
The Audit Trail
You may be worried about the fact that existing transactions can be changed or deleted. However, ACCOUNTS keeps a detailed audit trail of every change made to a transaction, including its original entry, any changes, and any deletion. See The Audit Trail for details.
This topic was last edited on Mar 24, 2026