For organizations such as churches that have Sunday (or other day) collections or offerings, where a large percentage of their donors make donations on the same date, you can use File ⇒ One Date Batch Entry to bring up a window listing each donor, with a place to enter the Amount, Category, and optionally the Cheque No / Paid By and Description for the donation that each donor gave that day. You can also access this window via the Batch Entry button above the donations area on the main window.
This window can be used both to enter new donations, and to edit existing donations. All existing donations for the selected date can optionally be displayed, along with spaces to enter new donations for all of the other donors. The only existing donations that are not displayed are ones that have already been included in a charitable receipt, because they can't be edited anyways.
Specifying Options
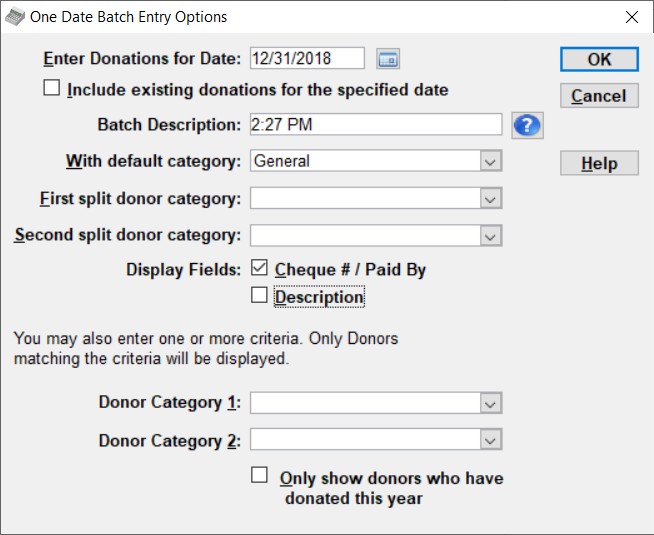
When you select File ⇒ One Date Batch Entry or click the Batch Entry button, the first thing that appears is some version of the following options dialog:
Date
The main thing that you must always set on this window is the date for entry of donations. All donations entered with this window will go in for the same one date that is specified here. If you do not change the date, you will be prompted to confirm that this is indeed your desired donation date. (This helps to prevent errors.)
Include Existing Donations
The next thing is a checkbox for Include existing donations for the specified date. If this is checked, any existing donations for the given date are displayed, so that you can edit them, and there are also blank rows for all other donors that did not have donations on that date. If this is unchecked, there is just one blank row for each donor. Changes you make to this selection are also remembered between uses of this window. (See the next section on Batches for some further cases.)
Note: even if you check Include existing donations for the specified date, donations that have already been included in a receipt are not displayed. (You can tell they have been included in a receipt if you see a Recpt # for them in the Donation Details area of the program's main window.) This omission of receipted donations on this window is because such donations cannot be edited, and the only reason to bring them back up on this window would be edit them. If you just want to see them again, use one of the options for the Reports ⇒ One Date Donation report. If you need to make changes to receipted donations, see Corrected Receipts.
If you have configured Abundant online donations, any imported Abundant donations will also never be displayed in this window. Since they were entered by importing, rather than by direct entry on the main window or by this batch entry method, it does not make sense to display them here.
Batches
Below that is a row that either says Batch Description, with an entry field, or In Batch with a drop-down, or the entire row might be omitted. This was added in release 4.30 of DONATION.
The point of batch descriptions is for organizations, usually churches, that do two or more Batch Entries on some days, and want to be able to report separately on them, with the Reports ⇒ One Date Donation report. If you never do that, you can uncheck the checkbox Use Batch Descriptions on the Donations tab of the Maintenance ⇒ Main Window Options window, and this row of this window, and other associated features, will not be shown to you.
Otherwise, when Include existing donations for the specified date is not checked, you will see Batch Description here, with an entry field, initialized to the current time in your Windows Control Panel short time format. You can edit that field as desired, adding a description of this batch, or even replacing the time with your description.
When Include existing donations for the specified date is checked, you will instead see In Batch, with a drop-down list that defaults to showing the most recently entered Batch Description for the current date, if any. That is the one you are most likely to want to edit. The drop-down list is in order of most recently entered first, with all "All" at the bottom of the list, or as the only entry on the list if you haven't previously saved any batches on this date.
If you pick a batch description other than "All" on that drop-down list, only the donations that were part of that batch will be redisplayed. If you pick "All" from this list when you are including existing donations for the specified date, you will see all donations for the current date, whatever batch they were in (or even if they were entered on the main window), and new donations that you enter will not be part of a named batch.
Default Donation Category
You can also change the default donation category for the donations to be entered, via the With default category field on this Options window, overriding the default set on the Donations tab of the Maintenance ⇒ Main Window Options window. If you have multiple offerings or collections to enter which are for different services or campaigns, and which are each mostly for one category (but different categories between the two services or campaigns), just use One Date Batch Entry twice, setting the desired donation category on the Options window each time. Please note that changes to the default category made here are not remembered between uses of the window - it always starts up showing the default set in Maintenance ⇒ Main Window Options.
Split Donor Categories
Another option is to enter multiple categories of donations in one batch. If you are going to do that, you can set the First split donor category field and also optionally the Second split donor category field. (These values are remembered between uses of this window.) If you set them, and then when you are in the main batch entry window you use the Split Donor button, different things happen depending on how many rows of donations are already present for that donor. If there is only one row for the donor, the donation category set in First split donor category is used (or the category is left blank if that was not set). If there are exactly two rows for the donor, the donation category set in Second split donor category is used (or the category is left blank if that was not set). And if there are three or more rows for the donor, the donation category in any split row you create is always initially left blank.
A third option for handling multiple categories of donations in one collection is to use the Split All button in the main batch entry window. It is described below, in the section on Data Entry. It would be used if a significant percentage of your donors all have donations in the same two or more categories.
Display Fields
On this same options window, you can also specify whether or not you want to see the Cheque # / Paid By and Donation fields on the main batch entry window. Changes you make to those selections are remembered between uses of this window. If you have set a Default Paid By value on the Donations tab of the Maintenance ⇒ Main Window Options window, it will always be used for the initial value of the Cheque # / Paid By field for each donation, whether or not that field is displayed.
The fields Eligible Amount and Advantage Description cannot be entered via the Batch Entry window - they must be entered, if needed, on the program's main window.
Moving on to Entering the Donations
Once the date that is displayed is the desired date, and you have changed the donation category and any other options if desired, if you want to see all donors displayed (which will be by far the most common choice), just click OK or press Enter on the Options window. Details of what else you can do with this options window to restrict the donors that are displayed are described below.
At this point the main window for entering your batch of donations is displayed. Here is one small example of that window, though the exact appearance will depend partly on your selections in the previous window displayed above, and partly on some defaults in the program:

The title of this window will change a bit depending on whether you are creating a new batch entry, or editing an existing on with the Include existing donations for the specified date checkbox checked, and whether you are working on a specific named batch, as explained above.
Sorting the Rows
On this window, you can decide in which order you want to see the donors listed. The default order is by Donor Name. If you prefer to see them sorted by Member/Envelope Number, click the "Member/Env #" radio button. This sort order is remembered between your uses of this window.
Data Entry
Then, just go down the list of donors, entering the donation Amount, Category (when it differs from the default one) and optionally Cheque No / Paid By and Description fields for each donor that made a donation on this date.
It's important to note that none of your changes will be saved until you press the Save button, which exits the window.
You will notice that there is initially only one line for each donor. If a donor made a donation that has to be split between two or more Categories, then after you finish entering the first donation, click the Split Donor button (or press Alt+D) and it will insert another empty line for that donor. Fill that in, and if necessary repeat these steps to put in further splits for this donation. The category for a line added with Split Donor depends on the settings in the Options window's First split donor category and Second split donor category fields. See above for full details.
Just like when you are entering donations on the program's main window, the Category drop-down list shows all categories that have been set up on the Maintenance ⇒ Donation Categories window, and you can use "autocomplete", typing initial parts of the desired category to cause it to appear. There is also always an "<Add New>" option on the drop-down list of Categories. Selecting it brings up that window, pre-set to add a new category.
Some categories you select may be too long to fit within the display area for the category on this window. To allow you to see what the full value is, as your mouse hovers over that field, the entire value pops up in a "tooltip", even if it is short enough to see all of it.
Clicking the Split All button (or pressing Alt+P) on this window prompts you to select a category (other than the default category or any others you have already added with Split All), and then adds a row for each donor, with no amount, and with the selected category. This would be useful, as an alternative to using Split Donor repeatedly, if you have a collection in which most or all of the donors gave to the same two or more categories.
Please note that unlike entering donations on the main window, you cannot enter donations of $0 on this window, even if you have allowed that in the Donations tab of the Maintenance ⇒ Main Window Options window. You also similarly cannot enter negative amounts for donations on this window, even if you have allowed that in the Donations tab of the Maintenance ⇒ Main Window Options window. Our assumption is that entering $0 or negative donations will only be done in exceptional circumstances, and as such does not need to be allowed on this window, which is for speeding up routine data entry.
You can move from row to row of this window with the Enter or Down Arrow keys (which take you to the same column in the next row), or the Tab key (which takes you across the fields of one row, then down to the next row).
Copying Previous Donations
In some churches, many users repeat the same donation (either for a single category or split between multiple categories) in most weeks. To simplify entering such donations when they are split, the field to the right of the Copy Prev button at the top of the window shows the amount that the current donor gave most recently. (Only donations made within the last two months, prior to this batch's entry date, are considered.) In addition, if you hover your mouse over the Name or Member/Env # field for a donor, the latest donation details, including any splits between multiple categories, are displayed in a popup tooltip.
The Copy Prev button is only enabled when there is actually at least one previous donation from that donor within the last two months, prior to the entry date you are working on. It will copy the latest donation or donations (if there were split donations on the same latest date that there are donations for this donor).
If you click Copy Prev (or press Alt+C) when it is enabled, you are prompted as to whether you want to re-enter that donation or those donations for that donor for the current entry date. This can only be done if you have not entered any Amount values for this donor so far during this batch entry. If you answer Yes to the question that comes up, that amount or those amounts are entered. If you are displaying the Cheque # / Paid By and/or Description fields, whichever of them are displayed are also copied in from the previous donation(s) being copied. However, if the previous Cheque # / Paid By value was an actual cheque number, only "Cheque" or "Check" (for the U.S.A.) is copied in. If the new donation is also by cheque, you can then enter its number directly if you wish.
One slightly tricky point is that normally after Copy Prev is finished, the cursor ends up in the Amount field on the last row copied in. However, when the previous donations had an actual cheque number, and so "Cheque" or "Check" was copied in, the cursor ends up in the Cheque # / Paid By field on the first row entered, so you can enter what will presumably be a new cheque number for the new donation.
Note: This is not a recommended way to enter recurring pre-authorized donations. Those can much more conveniently be done via importing, with the Database ⇒ Import ⇒ Donations menu option or the Database ⇒ Import ⇒ PAR Donations menu option (for those using the United Church of Canada's PAR program).
Finding Donors
If you have many more donors in your list than you have donations to enter on this date, finding the donors may require a certain amount of scrolling. You can avoid that by using the Find Donor button (or Alt+F) to find a donor by part of its name, its member/envelope number, phone number, address or email. (This is basically the same function as File ⇒ Find Donor on the main window.)
It may seem odd that you are able to find by phone number, address or email on this window, although you cannot immediately see the values in those fields. However, this window has a popup tooltip, when you hover your mouse over the Name field for a donor, that displays any of the phone number, address, and email fields that have been filled in. So that way you can check it's the right donor that you have found. As mentioned above, that tooltip also includes the latest donation information for the donor.
Checking your Work and Counting Cash
If you are working from input sheets that have subtotaled the day's entries by donation category, and want to make sure that you have entered everything properly before saving, you can click the Totals by Category button at the bottom of the window, beside the overall total. That will tell you how many donors you have made donations for, how many individual donations that includes, the dollar total, and a breakdown of numbers of donations and dollar amounts by donation category.
If you want to count cash that came in as part of this batch, click the Count Cash button at the bottom of the window. That will bring up a window for counting cash, and try to ensure that it matches the total of cash donations you have entered as part of the batch. (Cash donations are considered to be ones where the Cheque # / Paid By value you entered exactly matches the "Word for Cash" recorded on the Donations tab of Maintenance ⇒ Main Window Options.)
Saving your Work
When you are done, click the Save button to save all of the donations that you entered back to the database. It will tell you how many entries you made and their total, and ask you to confirm that you want to save them.
If you decide you do not want to save any of the entries that you may have made, click the Cancel button and no changes will be made to the database, after confirming with you that it is OK to do so (assuming there were in fact changes).
Both the Save button and the Cancel button (if you confirm the cancel) exit this window. Of course, Save only exits the window once the saving is completed! If you need to come back after that to make more entries for the same date, you can come back into it, this time checking the "Include existing donations for the specified date" checkbox in the first window, if you want to see any donations you have previously entered and saved.
If you want to further double-check the total donations you made on one day (with the same entry Date), you can use one or more of the options of the Reports ⇒ One Date Donation report.
If you use member or envelope numbers, you can also use the option in Reports ⇒ One Date Donation that shows that column, for checking your entries. These reports have two “Member / Envelope # Checksum” values at the bottom. The first value is just the sum of all distinct envelope numbers that appear in the report. The second is the sum of all envelope numbers that appear in the report, adding in a number multiple times if there are multiple donations listed with the same number (for example splits). Either one can be used as a double-check that you entered the donations for the correct donors, if you add the envelope numbers up with a calculator before doing your entries. If your calculator total differs from the Member / Envelope # Checksum displayed, either you added them up incorrectly on the calculator, or you entered one or more donations for the wrong donor.
If you find any errors, you can either fix them individually on the main window, or go back in to One Date Batch Entry again to fix them, being sure to check the "Include existing donations for the specified date" checkbox.
Sometimes you may be entering your donations and realize that there are new donors. You can add one and continue entering your donations, by using the Add Donor button or Alt+A.
That brings up a version of the main window with only the Donor Details area on it, and with a blank donor displayed for you to enter. Fill in the desired details, then click Save, or click Cancel if you do not want to save it. When you click either of these buttons, or otherwise close that window, you are returned to the main batch entry window, with the new donor selected if you saved one.
More details about entering donors, which largely apply to this window as well, are in the Help topic Entering a New Donor.
Fixing Date Errors
If you complete a session with One Date Batch Entry, Save the entries, and then realize that you specified the wrong date for the donations you just entered, you can fix this with the Database ⇒ Change Date of Donations menu option.
If you wish, you can use the "One Date Batch Entry Options" window that comes up when you first select File ⇒ One Date Batch Entry to restrict the donors that it shows to you. You can restrict them based on the value in the Donor Category 1 or Donor Category 2 fields, or you can restrict them to only those who have already donated in the current year.
If you wish to restrict them to donors in a certain donor category, just pull down the appropriate drop-down list for that category, and select the desired value from it. An example of when you might want to do this would be if you have given a certain category value to those of your donors who are interested in a certain project, and the collection you are entering is entirely for that project. Or, you might give a category value to your regular donors, who commonly give in collections, and select that value.
To select only those who have already donated in the current year, select the checkbox titled "Only show donors who have donated this year". Checking this would be helpful if you had a lot of regular donors, and quite a few others in your list of donors who currently aren't donating, to avoid having to see those others.
When you have made the desired selections, click OK, and it will restrict the list according to your specifications. If you don't want a restricted list, just don't select any criteria.
This topic was last edited on Dec 4, 2024