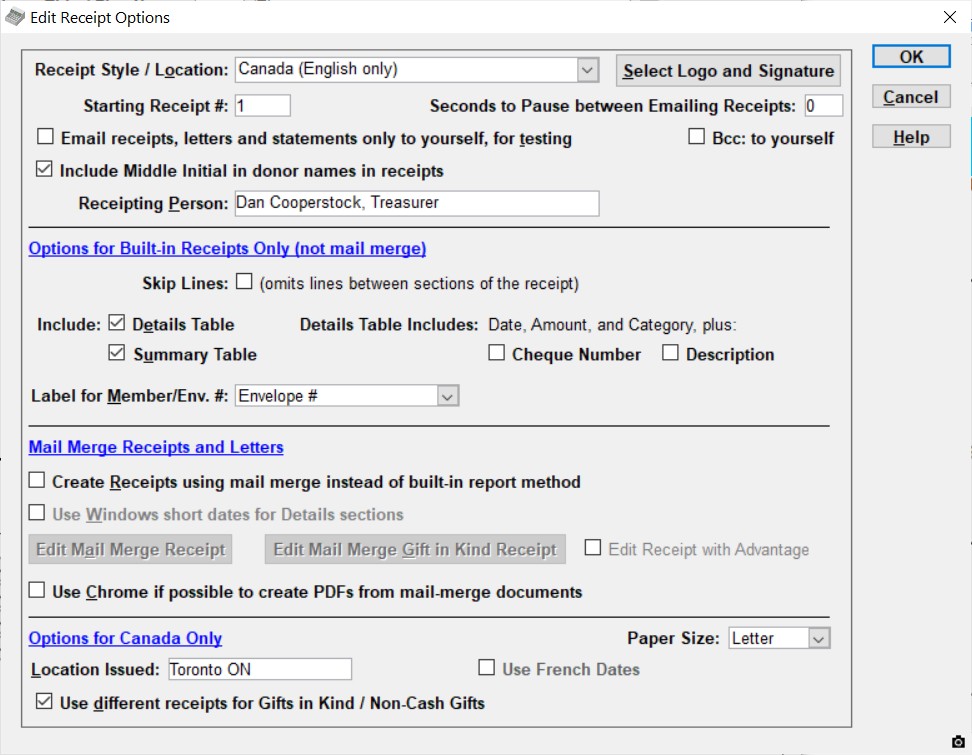
You use the Maintenance ⇒ Receipt Options window to specify various options that affect the output format of your charitable receipts. That brings up the following window:
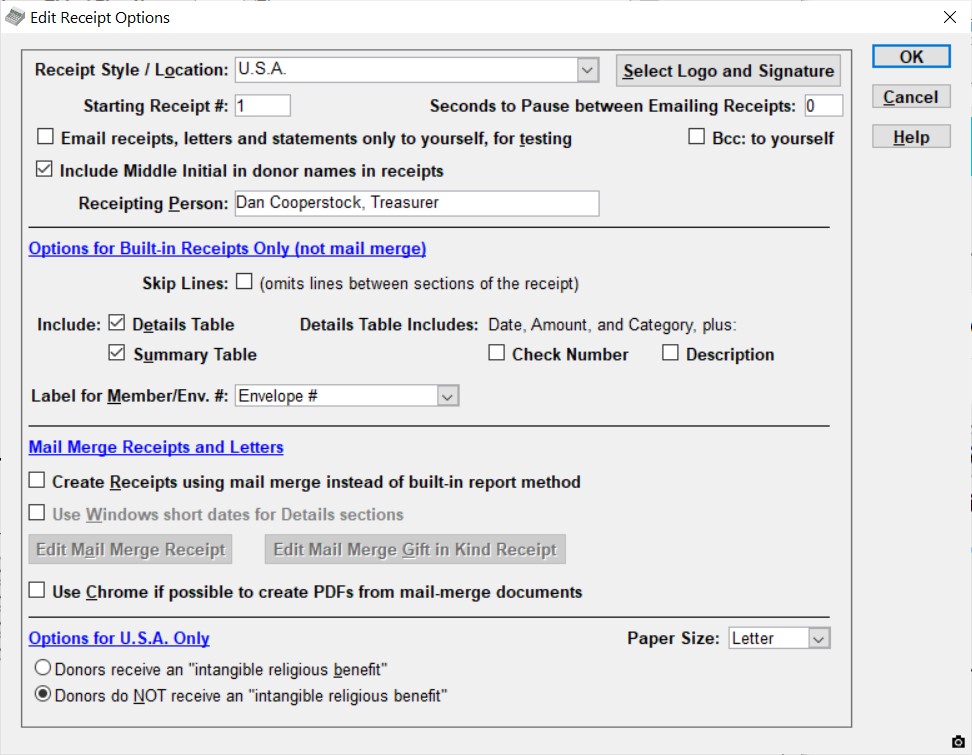
If you select (or have selected) the Receipt Style / Location option for the U.S.A., however, the bottom part of the window changes, and it looks like this:
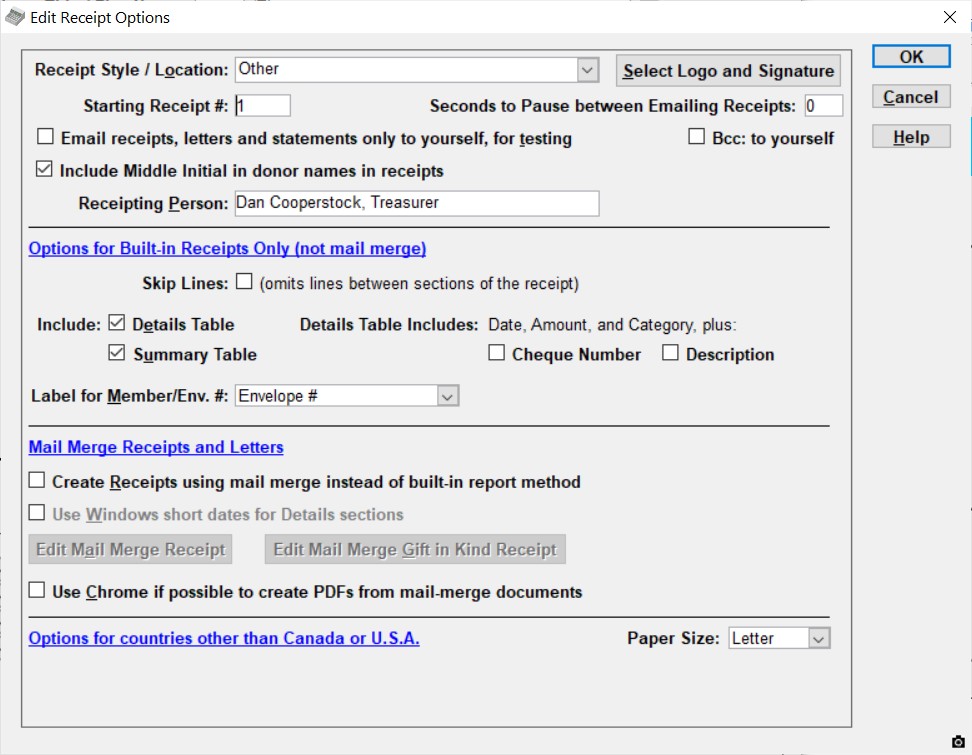
And if you select a Receipt Style / Location for anything other than Canada (including Quebec) or U.S.A., you get the following version:
Receipt Style / Location
This drop-down list includes options for Canada (English Only), Quebec (bilingual French and English), Quebec (French only), U.S.A., Australia (Deductible Gift Recipient), Australia (non-DGR), New Zealand and Other.
The first time you start the program, or when creating any new database, this same field is displayed to you as part of the Maintenance ⇒ Organization Info window, and you specify it there. If you need to change it after that, you do so in this window instead.
Selecting "Canada (English only)" causes the program to include the name and web address of the Canada Revenue Agency (CRA) on the receipt.
"Quebec (bilingual French & English)" is for organizations in Quebec, or national organizations in Canada that want to provide bilingual receipts. If you select it, all receipts you generate will be bilingual, and will include two copies, one for the federal and one for the provincial tax returns. It also includes the CRA's name (bilingually) and web address.
"Quebec (French only)" is for organizations in Quebec that want to provide receipts that are only in French. If you select it, all receipts you generate will have all of their headings in French, and will include two copies, one for the federal and one for the provincial tax returns. It also includes the CRA's French name and web address.
Selecting "U.S.A." causes a significantly different receipt format to be used. Among other things, the Charitable Registration Number field (called Tax ID / EIN in the U.S.A.) is optional, and is omitted from the receipts if it is not entered in Maintenance ⇒ Organization Info. There is no 2nd tear-off section for the donor to keep, because the receipt does not have to be submitted with your taxes. In addition, the receipt includes the required sentence "Pursuant to Internal Revenue Code requirements for substantiation of charitable contributions, no goods or services were provided in return for the Tax Deductible contributions". (But see below, in the section on Options for U.S.A. Only, for further details on how this might change.)
In addition, if you select "U.S.A.", the heading "Cheque # / Paid By" for Donations on the main window and the One Date Batch Entry window changes to "Check # / Paid By", and similar spelling changes are made in various other places in the program.
Selecting "Australia (Deductible Gift Recipient)" changes the phrase "Amount of Donation" to "Amount of Gift", and adds in the phrase "All gifts over $2 are tax deductible". It also displays the charitable number you entered on the Maintenance ⇒ Organization Info window with the heading "ABN Number". This is for organizations in Australia with DGR status.
Selecting "Australia (not DGR)" is for other Australian organizations. It removes the field for the charitable Registration Number, and does not add in the phrase about gifts being tax deductible. It also removes the phrase "Official Receipt for Income Tax Purposes". It does display the ABN Number, however.
Selecting "New Zealand" displays the charitable number you entered on the Maintenance ⇒ Organization Info window with the heading "Charities Commission Number".
Finally, selecting "Other" is for users in all other countries. The receipt generated is just like the Canadian one, with the exception that the name and web address of the CRA is omitted. Of course, if you need a different receipt format, you can switch to Generating Receipts using Mail Merge, via the option below, and edit the format as desired.
For all of "Australia (Deductible Gift Recipient)", "New Zealand" and "Other", the wording on the receipt about what year this is a receipt for changes to say it is for the "tax year ending" on your fiscal year-end date if you are in a year where you have turned on fiscal year receipting and data entry.
Please note that none of these selections affect either the currency display format or date display format used by DONATION. That is controlled by Windows Control Panel's Regional and Language Options tool.
Select Logo and Signature
Clicking this button takes you to a window where you can select and view your desired image files for logos and signatures for use in the built-in and mail-merge receipts and some reports and other letters.
Starting Receipt #
This field, which defaults to 1, sets your starting (or minimum) receipt number for each year to the value that you enter into it. Very few organizations will need to use this, or for that matter should use this!
We are aware of two situations in which this should be used. The first is when an organization for some reason splits its receipting up between two databases, probably on two computers - perhaps for two different campaigns, though they are for the same charity. Charities should not issue duplicate receipt numbers, so one of the two systems could be set up with a Starting Receipt # of (say) 1000, assuming the other system was not expected to issue over 1,000 receipts per year. (The current maximum number of receipts per year in DONATION is 99,999, so the maximum allowed setting for Starting Receipt # was set somewhat arbitrarily at 99000.)
The other situation is when an organization starts using DONATION mid-year, and they have already issued some numbered receipts manually or with a different program. They should set the Starting Receipt # to the next number after the last one that they already issued. Note: in this situation, it is important that after issuing the first receipt with DONATION, with the correct starting number, you set the Starting Receipt # back to 1. Otherwise, the same starting number will apply again next year, which you do not want!
The actual receipt number given to any given receipt is the last receipt number issued by DONATION for the current year plus one, or the Starting Receipt #, whichever is larger. I.e. as soon as you have already issued receipts starting at the Starting Receipt #, it becomes irrelevant for the rest of the current year. (It is not updated as you issue receipts - it is just a minimum receipt number.)
Note: If you have multiple databases that you switch between with the Database ⇒ Switch Databases menu option, each database has its own Starting Receipt number, which is stored with the database. (This is a change in version 3.30 - prior to that, the Starting Receipt Number applied to all databases, which could cause complications.)
Seconds to Pause between Emailing Receipts
A very small number of our users have found, when emailing receipts, letters or statements, that after sending two or three emails, they start getting error messages saying that emails cannot be sent. If this happens, you need to consult your Internet Service Provider that is providing the email address you are sending from. Ask them whether there is some number of seconds that you need to wait between sending, so that they don't stop you for being a suspected spammer. If they give you such a number of seconds, you can enter it here.
The default of 0 seconds, meaning no pause between sending emails, other than the time needed to generate them (which is usually a couple of seconds at least, when emailing receipts), works for almost all users.
Email receipts, letters and statements only to yourself, for testing
There is an option, when you are viewing either the standard receipts or the mail-merged ones, or mail-merge letters, or statement reports, to email them to donors who have email addresses. Other ways to email donors are Emailing Newsletters or Everyone.
However, for all of these actions, you may want to test the sending out first, before actually emailing them to the donors. To do that, check this checkbox, then create (or reprint) your receipts, letters or statements, or do your emailing, and select the Email/Print button on the receipt-viewing window. All displayed receipts, letters, statements or emails for donors that have email addresses will be emailed to your own email address (as set in Maintenance ⇒ Email Sending Configuration) rather than to the donors' actual email addresses. (However, it will say it was sent to the donor's name, to help you identify who would have gotten what if this option wasn't checked.) You can then check that everything seems correct. If so, come back and uncheck this option and then you can reprint the documents again and do the real Email/Print to the donors.
Normally receipts are saved back to the database only if you print them, email them to donors, or save them to PDF. (Sample receipts are never saved.) Otherwise when you exit the window viewing the receipt(s), you are told that they are not being saved because you did not take any of those actions. Emailing receipts to yourself for testing is not considered to be emailing them to donors, so if that is all you did, the receipts also will not be saved and the program will tell you that.
Bcc: to yourself
This option is for use when you have not checked "Email receipts letters, and statements only to yourself for testing", and in fact, only one of these two checkboxes can be checked.
What turning on this option means is that each email sent to a donor will have a Bcc (blind copy) set to go to your own email address (as set in Maintenance ⇒ Email Sending Configuration), so that you will receive a copy of it in your Inbox. Since it's a blind copy, the donor will not see that fact.
The reason you may want this is that the emailing is done by an internal component within DONATION, not by your email program, so emails you send out will never appear in the Sent folder in your email program. So doing this allows you to know exactly what each donor should have received.
Include Middle Initial in donor names in receipts
The Canada Revenue Agency requires receipts to include the donor's middle initial as part of their name. So most Canadian users should be sure to check the "Show Field" option for Middle Initial on the Maintenance ⇒ Main Window Options window, and also this checkbox. (You can't check this one without the Main Window Options one!)
If this is checked, any Middle Initial field values you enter will automatically be included as part of the Name fields in all receipts (regular or mail-merge). If it is not checked, the Middle Initials will not be added.
For Canadian users, if you choose not to show the Middle Initial field and check this checkbox, you need to instead enter donors' middle initials at the end of the First Name field.
Users in other countries can of course choose to use this option or not, as they wish.
Also, this should be obvious, but if you always enter people's middle initials as part of the First Name field, rather than in the separate Middle Initial field, this checkbox will have no effect - the entire First Name, including that middle initial, will always be used everywhere that the First Name is used in the program.
Receipting Person
This is the name and, if you wish, the office of the person who will sign the receipts when they are printed, for example "Bob Smith, Treasurer". It will be printed on the receipts, with a space for their signature. In mail merge receipts, it is the SignatoryName merge field. This field can also be edited on the Maintenance ⇒ Organization Info window.
Options for Built-in Receipts only (not mail merge)
The four settings in this section only apply to the standard receipts built into DONATION, which are actually created with the same technology as all of the reports. These settings are disabled if you check the Create Receipts via mail merge instead of built-in report method checkbox lower down on the window.
Skip Lines
Checking this checkbox causes the row of dashes (two rows of dashes in the case of Bilingual or French-only Receipts) on the receipt to be omitted. This does not apply to U.S. receipts, as they don't have a tear-off section.
Include
The Details Table and Summary Table checkboxes allow you to select which sections are included in the bottom section of the receipt. This is the part that (except for U.S. users) is to be torn off and kept by the donor. Normally (if you check both check boxes) first there is a section listing each individual donation that's included in that receipt. Following that, there is a section summarizing those same included donations, by category.
Unchecking either checkbox causes it to omit that section. Although we believe donors would generally like to receive at least one of these sections, especially when receipts include multiple donations, it is also allowable to uncheck both of these checkboxes, to omit both sections.
To make similar changes on the mail-merge version of the receipt, edit its template (as explained below) and remove one or both of the «DetailsTable:...» or «SummaryTable» fields.
Details Table Includes
These checkboxes only apply if the detailed donations section is included, i.e. if Details Table is checked in the previous section. Normally, if you do not check either "Cheque Number" or "Description", then the details section includes just the three fields Date, Amount, and Category, and it is in two columns on the page.
If you check the "Cheque No" checkbox, the Cheque Number / Paid By field from the donation (or "Check Number / Paid By" for U.S. receipts) is also printed in the details section, and (because this is wider) it is always just in one column on the page.
If you check the "Description" checkbox, it adds the Description from each donation into the details section of the receipt, and again causes it to always print the details in just one column on the page.
Obviously, if you check both checkboxes, both of those fields are included. Please note though that to make this fit across the page, both the Category field and the Description field have to be shorter than might be desirable. Longer values in the Description field will wrap to a 2nd line.
Label for Member/Env. #
Donors who have a Member/Envelope # will normally have that number shown on their receipts. This drop-down list determines whether the field on the receipt where this is shown is labelled "Envelope #" or "Member #", or whether this number is always omitted from the receipt (if you select the option "Don't display on receipts").
This field defaults to "Envelope #" if you have not set it yourself, because most organizations that choose to enter Member/Envelope numbers for their donors are churches, who usually call it an envelope number.
Changes to this value currently affect the built-in receipts, but not the mail-merge version of the receipts described just below here. You can change the text for the name of this field in mail merge receipts yourself, by editing your receipt template(s).
Mail Merge Receipts
This section of this window is for when you prefer to use the mail-merge version of the receipts, whose format you can edit.
Create Receipts using mail merge instead of normal report method
If you check this checkbox, receipts being created or reprinted with the Receipt menu options are displayed on the mail merge display/editing window, using your edited receipt format. If it is unchecked, receipts from the Receipt menu options are displayed with the standard built-in receipt formats (which cannot be edited, though they can be somewhat affected by the other options on this Maintenance window). The built-in receipts are created using the same technology as the reports in the program.
If you are going to use this option, you need to make sure that the standard receipt mail merge letter file is to your satisfaction, before you generate any real receipts. To do that, use the Edit Mail Merge Receipt button(s) described below to edit its format.
If you are going to use the mail merge receipts and edit their format, please be aware that you are entirely responsible for ensuring that the content of your receipts is in accordance with government regulations. The default sample mail merge receipt formats distributed with the program are in accordance with those regulations, but of course it is possible for you to remove or change elements that are required!
Note: when this option is checked, the settings in this window for Skip Lines, Details Table, Summary Table, Details Include, and Label for Member/Env. # are irrelevant, and cannot be changed, because they only apply to the built-in receipts. However, similar changes change be made in the mail-merge receipt format. The Receipt Style / Location selection determines which mail-merge letter file is used by default for your receipts, and the Location Issued field's entry can be included on the receipts.
Use Windows short dates for Details sections
This option is mostly only intended for users in countries where the receipt should be in a language other than English or French. It only affects mail-merge receipts.
Normally the table of included donations in a receipt, or certain other type of mail-merge letter, called the Details Table, shows the donation dates in a medium-length format, things like "Dec 31, 2015" for English or "31 déc. 2015" for French. If that won't work for your language, or you just want it to only use the short date format as defined in Windows Control Panel's Regional and Language options tool, you can check this checkbox. That short date format is the same format used for date display in the program's main window's Donation Details area.
Changing this also changes the format of the DonationDateOrYr mail merge field, which displays the donation date when the receipt is only for a single donation.
Edit Mail Merge Receipt
If you are using the mail merge receipts, this button is enabled, and allows you to edit their template. After clicking this, make any changes you want in the mail merge editor, and be sure to save the changes.
Edit Mail Merge Gift in Kind Receipt
If you are using the mail merge receipts, and you are in Canada, this button is also enabled. It allows you to edit the template for the mail-merge gift in kind receipts. After clicking this, make any changes you want in the mail merge editor, and be sure to save the changes.
Note: It is also possible to edit the format of the standard and gift in kind mail merge receipts from the Letters ⇒ One Letter or Letters ⇒ Mass Mailing windows - the buttons on this window are just an easier way to get to editing them.
Edit Receipt with Advantage
This checkbox is only visible for users who have selected a Receipt Style / Location for Canada. If it is checked, when you use either of the above buttons for editing a mail-merge receipt, it instead edits the template for the alternate receipt for donations with Advantage - where the Eligible Amount is entered, and it is less than the Total Amount. See Donations and Receipts with Advantage for details.
Use Chrome if possible to create PDFs for mail-merge documents
If you check this checkbox (which is always checked for users of the OnDemand version), the Chrome web browser is used silently and invisibly in the background to create the PDFs from mail-merge letters and receipts, rather than using the installed novaPDF printer. Some users find this gives better results. This option affects both emailing mail-merge documents, and the Save PDF button.
Options for Canada Only
Location Issued
For receipts to be issued in Canada, the location they were issued must be printed on them. This location can be entered in this field. It is ignored for receipts for all other countries. The CRA is vague about what exactly they want here, but generally the city or town and province is probably appropriate, for instance "Toronto ON". We believe the reason the CRA introduced this requirement was to distinguish which office a receipt came from when national charities do receipting from multiple regional offices.
Use French Dates
If you select either Quebec option under Receipt Style / Location, you can also optionally check the Use French Dates checkbox. You actually must check it if you select "Quebec (French only)". When this is checked, all dates printed in the built-in receipts and in all mail-merge letters and receipts will be in French. See the section on bilingual receipts for more details.
Note: This option can be overridden in specific mail-merge letters or receipts by including the special mail-merge fields «French» or «English».
Use different receipts for Gifts in Kind / Non-Cash Gifts
In Canada, there are various different data items required on a receipt for a Gift in Kind (what the CRA calls non-cash gifts), and so in order to be completely in compliance with CRA regulations, a different receipt format is needed. There used to be a checkbox on this window for whether to use such a different format, but because doing so is a CRA requirement, the checkbox was removed in version 3.83 of DONATION, and the option to do that is always turned on for Canadian users.
So for Canadian users, the Gift in Kind Receipts sub-menu always appears as the last option on the Receipt menu. The regular Receipt menu options only receipt for donations whose Cheque # / Paid By value is not "Gift in Kind", while the Receipt ⇒ Gift in Kind Receipts sub-menu options are used to create receipts for donations whose Cheque # / Paid By value is "Gift in Kind".
See Gifts in Kind for more details on all of this.
Options for U.S.A. Only
There is a further selection that you must make on this window if you are in the U.S.A., about whether your donors receive an "intangible religious benefit". This may apply to churches and other tax-exempt organizations operated exclusively for religious purposes. One IRS publication explains this as: "An intangible religious benefit means a benefit that generally is not sold in a commercial transaction, such as admission to a religious ceremony."
There was a court case in late 2012, where a donor with fairly large donations to their church was audited by the IRS, and their donations ended up being disallowed as tax deductions because there was no wording on the receipt mentioning that no goods or services were provided in return for the contributions. Although the actual court judgment does not say that the wording should have included anything about intangible religious benefits being received, many commentators on the web are recommending adding such wording. You may want to consult your lawyer or accountant for advice on whether or not to do this.
So, if you are a church or other organization operated exclusively for religious purposes, and you choose to check the radio button for "Donors receive an intangible religious benefit" in the bottom section of this window (Options for the U.S.A. Only), the phrase added to the built-in receipts will change to ""Pursuant to Internal Revenue Code requirements for substantiation of charitable contributions, no goods or services other than intangible religious benefits were provided in return for the Tax Deductible contributions".
If you instead check the radio button for "Donors do NOT receive an intangible religious benefit" (definitely the correct choice for any organization that is not a church or other organization operated exclusively for religious purposes) that extra phrase in the disclaimer about "other than intangible religious benefits" will be omitted from the built-in receipts.
Mail Merge Receipts and Intangible Religious Benefit
If you check the checkbox for "Create Receipts via mail merge instead of built-in report method", and the radio button for "Donors receive an intangible religious benefit", things unfortunately get a bit more complicated.
If your first installation of DONATION on your computer was version 3.48 or later, the standard mail-merge receipt template for the U.S.A. includes some "magic" that will include or exclude the desired phrase about "other than intangible religious benefits", depending on your setting of the radio buttons in this window.
However, if you have previously installed an earlier version of DONATION, you will already have a copy of the mail-merge receipt template for the U.S.A. on your computer, and any upgrade will not overwrite that with the never version with that "magic" in it. (It would be wrong to do so, because you might have made your own changes to that template, for other reasons!) In that case, if you do want this wording to be added, just edit the template yourself, with the Edit Mail Merge Receipt button on this window, and add it in, and save it.
The only complication to that approach of adding in the wording yourself comes if you are using the program for multiple organizations, and some of them are churches for which you want the additional wording, but some of them are not churches, so you do not want the additional wording. In that case, first of all, you have to choose the setting in this window about intangible religious benefits separately for each organization's database. And you will want to edit the disclaimer section in the mail merge receipt template, with the Edit Mail Merge Receipt button on this window, to look substantially as follows:
Pursuant to Internal Revenue Code requirements for substantiation of charitable contributions, no goods or services «if:ReligiousBenefit»other than intangible religious benefits «endif»were provided in return for the Tax Deductible contributions.
See the section on if and endif in the Help topic on Mail Merge Fields if you want to fully understand this, but you don't have to understand it - it just works!
Paper Size Options
All Receipt Style / Location options have a final section at the bottom of the window, with one or more options in it.
All of the versions of that section have a drop-down field for selecting Paper Size. That can be Letter or Legal, the usual choices for users in Canada or the U.S.A., or also A4 for users in any other country - the Receipt Style / Location options "Australia (Deductible Gift Recipient)", "Australia (non-DGR)", "New Zealand" and "Other".
If you change the Paper Size option and save the changes, then both built-in reports and receipts, and mail-merge letters and receipts, try to print on specified paper size.
For mail-merge letters and receipts, it is important that both your default printer, and the "novaPDF Pro v7 for DONATION" printer, be set to default to A4 page size (also called paper size) for A4 to work, if you have selected that. This is done from Windows Control Panel.
In Windows 10, you first select Devices, then Printers and Scanners, then double-click on the desired printer, then click Manage, then Printing Preferences on the left.
In Windows 7, you first select Devices and Printers from Windows Control Panel or directly from the Start menu. Then, right-click on the printer, and pick Printing Preferences from the popup menu. Other versions of Windows should have similar options.
Then find the setting in the preferences window for the page size or paper size, and be sure it is set to A4. (You may have to click between different tabs, and/or click an Advanced button, to find the setting.) If you had to change it, be sure to click OK or Save to save the change.
You will have to do these actions twice, once for your default printer, and once for the novaPDF printer. Of course, they may both already be set correctly to A4!
The appearance of that Printing Preferences window will vary, depending on your printer. Here is what it looks like for the novaPDF printer:
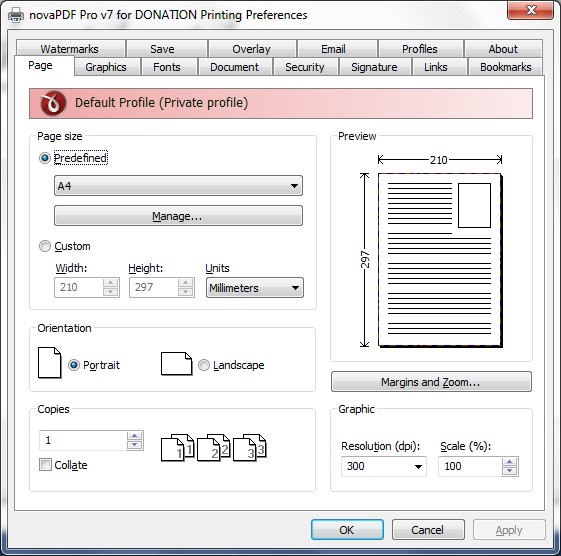
As you can see in this example the page size has already been set to A4.
This topic was last edited on Sep 4, 2024