Please first read Creating Mail Merge Letters for an overview of these features.
Using Letters ⇒ One Letter, you can create one letter for the current Donor. It can include just Donor information, or also include information on the current donation for that donor (the one with the pointing hand symbol beside it on the main window), on the total donations (and optionally list of donations) for a range of dates for that donor, on the pledge and donations made to fulfill that pledge for the donor, or on the currently selected receipt for that donor, or in some cases for Canadian users for the selected Gift in Kind receipt for that donor. (A receipt is considered to be selected if the current donation for the donor on the main window is part of that receipt, i.e. shows that Receipt #.)
More details on the types of letter available are listed in the Help topic on Creating Mass Mailings. The only difference between the lists of types of letter in these two options are that for Letters ⇒ One Letter, the 2nd option is for the current donation that you have clicking into on the main window, whereas for Letters ⇒ Mass Mailing, the 2nd option is for sending individual letters for each donation made within a prompted-for range of dates.
If you enter the program with the Donors Only Password, only the Donor Information Only type of letters are available, and the donor fields related to donation amounts are removed.
There are several training videos on Mail Merge letters and receipts on the Demos and Samples web page, if you would prefer to see these features demonstrated live, rather than reading about them.
Before you can use this feature the first time, you will want to create or modify a template letter file that will form the basis of the letter. A number of sample letters and receipt templates are provided that you can modify for your use. They are stored in the database, and extracted to the Letters subdirectory under the program's Data Directory when you actually use them. The following are the names of the standard sample letters provided with DONATION, which are by default used for both Letters ⇒ One Letter and Letters ⇒ Mass Mailing:
Type of Information |
Letter Name |
Donor Information only |
donors_merge |
Current Donation Information |
donations_merge |
Total Donations Information |
donationTotals_merge |
Pledge Information - name depends on your pledge type settings in the Pledges tab of Maintenance ⇒ Main Window Options: |
|
For Simple Annual Pledge |
pledges_simple_merge |
For Annual with Start Date |
pledges_with_category_merge |
For Multi-Year |
pledges_multi_year_merge |
Selected Receipt Information - name depends on your "Receipt Style / Location" setting in Maintenance ⇒ Receipt Options: |
|
For Canada (English) |
receipts_merge_canada |
For Quebec (bilingual) |
receipts_merge_bilingual |
For Quebec (French only) |
receipts_merge_french |
For U.S.A. |
receipts_merge_usa |
For Australia (DGR) |
receipts_merge_aus_dgr |
For Australia (non-DGR) |
receipts_merge_aus_other |
For New Zealand |
receipts_merge_new_zealand |
For Other countries |
receipts_merge_other |
Gift in Kind Receipt Information - name depends on your "Receipt Style / Location" setting in Maintenance ⇒ Receipt Options. Only applies to Canadian options. |
|
For Canada |
receipts_gik_merge_canada |
For Quebec (bilingual) |
receipts_gik_merge_bilingual |
For Quebec (French only) |
receipts_gik_merge_french |
The files are stored and editing as HTML files, the type that are used for web pages. This is actually a very good "common denominator" file format, that works well for doing mail merge letters or receipts, and can also be handled by most word processing programs.
You select the Type of Information using the radio buttons at the top left of the Merge One Letter window that comes up when you select Letters ⇒ One Letter (as shown below). After making that selection, the merge fields available for that type of letter are shown in a list box at the top right of the window. You can't do anything with that Merge Fields list - it's just for your information.
Here is a screenshot of the Merge One Letter window:
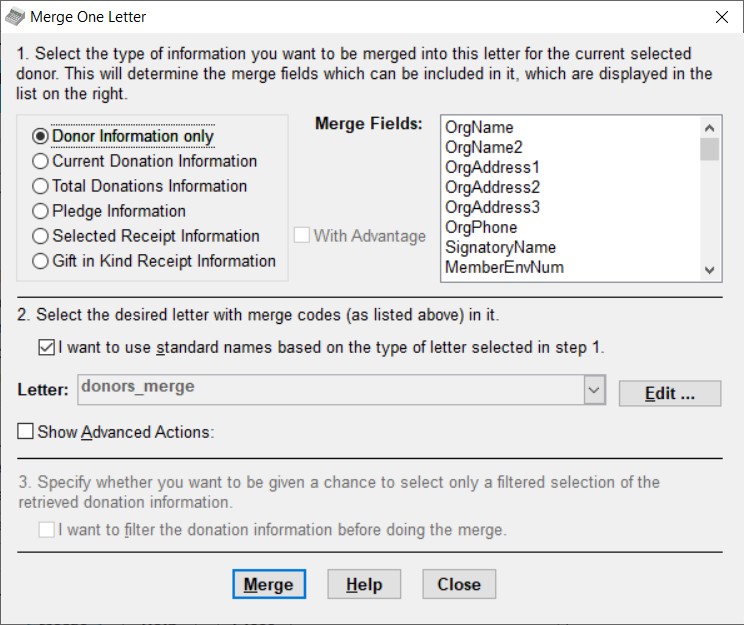
Notes: The radio button in section 1 of this window, "Pledge Information", does not appear if you have selected to not show the Annual Pledge field in the Donor Details tab of the Maintenance ⇒ Main Window Options window. And the radio button "Gift in Kind Receipt Information" only appears if you are in Canada. (See Handling Gifts in Kind for more information.)
Section 3 of this window, which is shown greyed out (disabled) in the image above, becomes enabled only when you select "Total Donations Information" in Section 1. See below for information on using it.
Type of Information Options
The following are the options for Type of Information in in the Merge One Letter window that comes up when you use Letters ⇒ One Letter:
| Donor Information only | Creates one letter for the currently displayed donor on the main widow, which can include limited summary financial information for them for the whole year, like TotalAmount, their total givings. |
| Current Donation Information | For this option, you must have clicked on a donation row on the main window first, and the letter can then include fields with the details of that donor and that donation. |
| Total Donations Information | Prompts for a range of dates when you click Merge, then the letter can include details of the current donor and their donations within that range of dates, both total donations information and details. Letters for this option can include the «DetailsTable» and «SummaryTable» merge fields, giving details or summary by category information on the donations included in the totals. |
| Pledge Information | Creates a letter about the current donor's pledge, with different default letters being used (and different merge fields being available) for the different pledge types, set in the Pledges tab of the Maintenance ⇒ Main Window Options window. No date range is prompted for with this option - it always reports on the entire pledge period, or the entire fiscal year, if you select the option on that window for pledges to be on a fiscal year basis. Letters for this option can include the «DetailsTable» merge field, which gives details of the donations during the current year (or fiscal year) that are considered to be fulfilling the pledge. When you have selected the Annual with Start Date and Category pledge type, one additional special table field is provided: «DetailsTableAllCategories», which lists all donations regardless of their donation category, or whether they go towards fulfilling the pledge. |
| When you have selected the Multi-Year pledge type, two additional special table fields are provided: «DetailsTableAllYears», which lists all donations that fulfill the pledge over the entire range of dates within the multi-year pledge, and «PledgeYearsTable», which lists the donor's year-by-year pledge amounts. Note: This option is removed if you have selected not to display the Annual Pledge field on the Donor tab of the Maintenance ⇒ Main Window Options window. |
| Selected Receipt Information | For this option, you must have clicked on a donation row on the main window first, that already has a Recpt # filled in, because a receipt has been created for it with one of the Receipt menu options. The letter then uses the information in that receipt. Letters for this option can also include the «DetailsTable» and «SummaryTable» merge fields, giving details or summary by category information on the donations included in the receipt. This option can be used either after Generating Receipts Using Mail Merge, or even if you generate the regular built-in receipts, and subsequently want to create separate cover letters to go with those receipts. (However, you can instead add a cover letter to the standard template you are using for the receipts, so that this does not have to be done separately.) You cannot create new receipts with this option, only reprint existing ones or create letters based on their existing information. |
| Gift in Kind Receipt Information | This only appears if you are in Canada. It is like Selected Receipt Information, but only processes special gift in kind receipts. It also does not support the «DetailsTable» or «SummaryTable» merge fields, because a gift in kind receipt is always only for one donation, and the details of that donation are available in the merge fields. You cannot create new receipts with this option, only reprint existing ones or create letters based on their existing information. |
When ranges of dates are involved, as in the Total Donations Information letters, or the TotalAmount (which is for the whole year) in the Donor Information letters, the current working year in the program is used. If you are in a country such as the United Kingdom, Australia or New Zealand, and have selected to use Fiscal Year Data Entry and Receipting, and are working on a fiscal year, that is the range of dates that is available.
The "With Advantage" checkbox shown in the above image of the window is only present for Canadian users, and is only relevant for Selected Receipt Information or Gift in Kind Receipt Information merges. Selecting it means that the filenames of the default mail-merge documents used have "_adv_desc" added - for instance "receipts_merge_canada_adv_desc" for Canadian English receipts, instead of just "receipts_merge_canada". See Donations and Receipts with Advantage for details.
Editing the Initial Template Letter and Receipt Files
To edit a sample letter, once you are in the Merge One Letter window (after selecting Letters ⇒ One Letter), select the radio button at the top left for the Type of Information you want included in the letter (options as listed in the table above). Make sure that the checkbox for using standard names for the Letter is checked, which causes the standard name above to be shown for the Letter. (Note: You can't select a different name, unless you uncheck the checkbox.)
Then if you click the Edit button just to the right of the Letter name, you will be put into the internal editor window, viewing that letter. You will see that there are special placeholders (called "merge fields") where the merged in information will go. For instance, «Name» will be replaced by the business name of the donor if there is one, or otherwise the full name (First Name plus Last Name). Each field that can be replaced has a specific name, and each name is preceded by « and followed by ». There is a drop-down list of the insertable fields on the editor window, and an Insert button beside the list that inserts the currently selected field on the list into the document, at the current cursor position.
For more details on the internal editor and the mail merge fields available for each type of letter, follow the links earlier in this sentence.
All of the sample template letters and receipts include any logo bitmap you have specified in the Logo and Signatures window, in the top-right corner of the letter. The sample receipts also include any signature bitmap you specified in that window, above the signature line.
Both the Total Donations Information and Selected Receipt Information types of merge letter have two special merge fields available to them, «DetailsTable» and «SummaryTable». The Details Table generates a table of individual donation details, either for all donations within a selected date range for the Total Donations Information option, or for all donations included in the receipt for the Selected Receipt Information option. The Summary Table generates a summary by category of donation, for the same sets of donations.
The Pledge Information letters also have the «DetailsTable» merge field available, although its details are slightly different than in the other types of letter that include it. Pledge letters do not support the «SummaryTable» field, because usually pledges are for only one donation category, so a summary by category section would not be needed. If you are using the pledge type Annual with Start Date and Category, one additional special merge field is available: «DetailsTableAllCategories», If you are using the pledge type Multi-Year, two further special merge fields are available, «DetailsTableAllYears» and «PledgeYearsTable». Please also see Pledges in DONATION for further details on using mail-merge letters for pledge information.
Full details on all of these special fields (and all other mail merge fields) are in the Help topic on mail merge fields.
Note to French Speakers: If you use « and » as quotation marks in your documents, there is a potential problem with quoted text being seen as merge fields, and causing errors in merges. However, as long as your quotation includes at least one space, it will be ignored, so hopefully this will not be a problem.
When you are satisfied with any changes that you wish to make to the sample letter, use File ⇒ Save in the editor to save your changes, then exit that editor window to come back to the Merge One Letter window.
Normally you only have to edit these files the first time you use them, unless or until you decide you want to change their wording again.
There is a separate section on Generating Receipts using Mail Merge which says a lot more about the sample Receipt Information letters.
Unless you need multiple letters with varying wording for each type of information (for example for Donor Information letters), we recommend that you just use the standard named sample letter files, with their contents edited as desired. That way, you don't have to remember the names, because the program brings them up automatically.
If you do want to select a different name for the Letter, however, uncheck the checkbox for using standard names, and select the name from the drop-down Letters list (if it is already there).
There are some other options though, which require you to check the "Show Advanced Actions" checkbox, which displays three additional buttons to its right, as follows:
If you have an existing template letter, but want another one for the same type of information (for example Donor Information), perhaps for a different purpose or situation, you can click "Show Advanced Actions", and then use the Edit Copy button that appears. Just select the letter you want to copy from in the Letter drop-down list (most likely by using the standard name), then click Edit Copy. It will prompt you with a "Name for Copy of File to Edit". Specify the new name you want to copy to. (The default it will show you will be the name of the file you are copying from, with "Copy" added, but you will probably usually want to change that, to a name that indicates what this letter is actually for. Do not add a ".htm" extension.) When you click OK in that window, the editor will open, editing a copy of the originally specified Letter, but with the new name. And when you return to the Merge One Letter window from the editor, the new name will be displayed, ready for you to do the merge with it.
If you have created letters that you no longer need, and they are cluttering up the Letters drop-down list, you can click "Show Advanced Actions", and then use the Delete button that appears to delete the selected letter. (Original letters that were installed with the program, for which you have not created an edited version, cannot be deleted.)
Reverting to the Original Template installed with DONATION
If you have been editing a mail-merge template that came with DONATION and decide you have messed it up and want to start over with the original template, you need to delete your edited version and then re-make those changes in the version from the upgrade. This would also be appropriate if you find out that there is some improvement in an updated mail-merge template document installed by an upgrade to DONATION, and you want to use that improved version, when you have already made some edits.
To do this, in this Letters ⇒ One Letter window, you need to make sure the desired letter name is visible in the Letter Field. First, select the correct type of letter in Section 1 of the window, and be sure that the "I want to use standard names ..." checkbox is checked in Section 1. (The templates delivered with DONATION are all the ones with the standard names.)
Then click the "Show Advanced Actions" checkbox, and then the Delete button at appears, to delete your edited version. (If there is no edited version, you get a message to that effect, and nothing is deleted.) After that, the last version installed with DONATION will become the official version. To edit it to put in any changes you want to make, use the Edit button.
To create a new template letter that does not start out as a copy of an existing one on the drop-down list, or to import one that you have created elsewhere or for a different database, click "Show Advanced Actions", and then use the Browse & Edit button that appears to bring up a Document File to Merge window in which you can select a desired existing file. You can select either HTML files or Microsoft Word files (with either the .doc or .docx extension) with the Browse & Edit button. You can select a Microsoft Word file, after changing the file type drop-down in that window, normally to the right of the File name field, from HTML Files to Microsoft Word Documents. If you do that, it will be converted and saved as an HTML file in the Letters subdirectory of the program's data directory before editing it. If you select an HTML file, and it is not in that Letters subdirectory, it will be copied to there.
Having said that, importing external files that did not start out as copies of mail-merge templates delivered with DONATION means you will have to insert all of the merge fields yourself in the editor. In addition, not all formatting that you can do with Microsoft Word will be retained well when the imported file is converted to HTML. As a result, if it is at all possible to start with an existing template file (or a copy of one), as explained above, and edit it to make your desired changes, that is highly recommended!
Doing the Merge
Once you have selected the desired Type of Information, and you are satisfied with the contents of the Letter drop-down, just click the Merge button to do the merge. That will open up the editor again, possibly briefly display the template Letter File, and shortly fill in all of the merge fields with the appropriate data from your donor, donation(s) and/or receipt, depending on which Type of Information you selected. It automatically saves the merged letters in a standard save filename, as explained below.
If you are using the Total Donations Information option, however, when you click Merge you will first see a "Select Dates for Mail Merge" window. That allows you to specify a range of dates within the current year, so that only donations within that range of dates are included in the merged data. This allows you to do things like quarterly report letters to your donors. The default for this window is from January 1st (or the fiscal year start, if you are working on a fiscal year) up to the current date, which may often be what you will want.
You can make editing changes in this merged file if you want, for instance to further personalize a letter. If you wish, save those changes with File ⇒ Save. But changes that you want to be retained for subsequent uses of the same letter must be made in the original template file (before the merging), with the Edit button.
The filename for the output merged letter (the one with real data merged into it, rather than merge fields) is always based on the name of the Letter File, by adding "_save.htm" to the name. For instance, the default Letter for Donor Information is "donors_merge", so the corresponding output merged file will be "donors_merge_save.htm".
Then, just print the letter with File ⇒ Print, the Print toolbar icon in the editor, or Ctrl+P. For Selected Receipt Information merges, you will be prompted to print a 2nd copy for your records. You can also optionally email the receipt or letter to any donor who has an email address, with the File ⇒ Email/Print menu option or the Email toolbar icon.
Finally, exit the editor window to come back to the Merge One Letter window.
If you are done, click Close to close that window and go back to the program's main window. Or, you can do more merge documents for the same donor.
Filtering Donations in Total Donations Information Merges
When you are doing Total Donations Information merges, the checkbox for I want to filter the donation information before doing the merge becomes enabled. If you check it, then when you click Merge, after the prompting for a range of dates to include, you will be shown a window displaying all of the donations for the current donor, within that range of dates. You can click the Filter button on that window, and add a filter to restrict the donations that will be included, based on rules you supply. See Filtering Reports for details on how filtering works (it is the same for this window as for reports!).
If you add such a filter, it will affect the totals in the TotalAmount, EligibleAmount and AdvantageAmount merge fields, and also the contents of the tables created by the DetailsTable and SummaryTable merge fields.
One reason that you might want to do this would be to restrict the donations included in this letter to either just the receiptable donations, or just the non-receiptable donations, by filtering on the receiptable field. (See Non-Receiptable Donors and Donations to understand what this means.)
Another use might be to restrict the donations included to just one donation category, though doing that with a Total Donations Information merge would only make sense if the donor had multiple donations with that category. For a single donation in a category, you would likely do a Current Donation Information merge instead.
Click Merge on that window showing the donations data to continue with the mail merge, or you can click Cancel to cancel the merge. If your filter eliminates all of the donations for the donor, no letter will be merged.
Mail Merge Letters and Receipts and Multiple Databases
If you have multiple databases for multiple organizations, and switch databases, your template letters and receipts are specific to each database. If you need the same mail merge letter or receipt in multiple databases, you will have to separately create and edit it in each one.
Alternatively, if you have created and edited it in one database, and need it in another one, after switching to the other database you can click the "Show Advanced Actions" checkbox in this window, then use the Browse and Edit button to select the letter file and load it into that database.
Converting old Microsoft Word Mail Merge Letters
The internal editor was introduced in version 3.10 of DONATION, in May 2008. If you were using the mail merge features of DONATION before that, you were using letters documents in Microsoft Word (filenames ending in .doc) or WordPerfect (filenames ending in .wpd).
If you want to convert existing customized letter files from Microsoft Word, you can do so. Just make sure the checkbox for using standard names for the Letter is unchecked, then click "Show Advanced Actions" and use the Browse button that appears, to select the Letter File. In the Document File to Merge dialog that comes up, change the files type drop-down at the bottom to "Word Document Files (*.doc, *.docx)", then select your existing mail-merge letter file to be converted. When you click Open, it will walk you through a few messages explaining that it is converting it from the .doc filename to a .htm filename (for example from donors_merge.doc to donors_merge.htm), and then put you into the internal editor editing that .htm file. You may have to do some further "touch ups" to make it look good in the internal editor, but your merge fields and your text and formatting should be pretty much present. Once you have edited, saved and closed the letter file, you can use Merge as normal to do the merging of data into that converted letter.
I'm sorry, but there is no such feature for automatically converting existing WordPerfect mail merge files. (Far fewer people use WordPerfect.) However, you should be able to open your existing WordPerfect documents in WordPerfect directly, and save them as HTML files, by using File ⇒ Publish To ⇒ HTML. (At least, that's how it is done in WordPerfect 11, which is the version we have.) Then you can open those files in the internal editor in DONATION by using Browse to select them, and insert the desired merge fields. (Merge fields from existing letters either get dropped, or don't get translated to the right sort of merge fields in the HTML files, depending on whether you are using letters that you previously used with Letters ⇒ One Letter, or with Letters ⇒ Mass Mailing.)
This topic was last edited on Feb 17, 2023