ACCOUNTS can print cheques that you enter for your bank account, on standard 3-part voucher cheque forms, with the cheque on top. (If you are ordering such cheques, you need to order voucher cheques that are compatible with Intuit QuickBooks.)
Note: Currently ACCOUNTS can only print cheques for countries like Canada, the U.S.A., Australia and New Zealand that use dollars and cents in their currency. That is because it uses the words "Dollars" and "Cents" in the version of the cheque amount that is printed out in words.
To print cheques, you can either use the File ⇒ Print Cheques main menu option, the Print Cheques quick link on the main menu, or the right-click menu option Print Cheques in the register window for your bank account(s). When you do that, a window such as the following comes up:
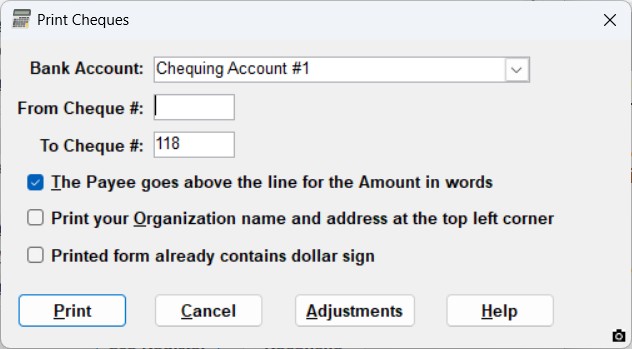
The Bank Account drop-down list contains all of your bank accounts that you have set up in your Chart of Accounts. If you come in from a register window, however, this value will be pre-selected to be the account you were in the register for, and cannot be changed.
Also, after the first time you use this from the main menu, the Bank Account that you chose will be remembered, and automatically selected for you the next time. (You can still change it, of course, if you do have more than one chequing account.) You can select an account from the drop-down list, or you can just start typing the name of the desired account, and it will appear via autocomplete.
You fill in the From Cheque # and To Cheque # fields with the range of cheque numbers that you want to print. Those numbers are entered as the Number field on a register window, or the Cheque # field on the windows for writing cheques or paying bills.
The To Cheque # is automatically initialized to be the last cheque number in the selected Bank Account, and will change if you select a different bank account. You can change that, if desired.
Only cheques dated within the last year are considered when finding cheques that match your selected range of cheque numbers. This prevents accidentally reprinting duplicates from long ago, if you have a new batch of cheques that duplicate earlier cheque numbers.
The checkbox for The Payee goes above the line for the Amount in words allows you to switch between two different cheque layouts that we have observed in samples that are supposedly compatible with QuickBooks.
•Having this checkbox unchecked is the default, and it seems to be consistent with how at least a Canadian version of QuickBooks prints cheques. With this setting, there is a "PAY" field on the pre-printed cheque first, to the right of which goes both the amount in words and the amount in numbers. Below that there is a pre-printed "TO THE ORDER OF" field, to the right of which goes the name and (if available) the address of the vendor or other payee.
•When this checkbox is checked, there is a pre-printed "PAY TO THE ORDER OF" field first, to the right of which goes the vendor or payee's name. To the right of that there is a line for the amount in numbers. Below that is a line for the amount in words. Below that, the vendor/payee name is printed a 2nd time, and (if it is available) their address.
If you check the Print your Organization name and address of the top left corner checkbox, it does just that. If you leave it unchecked, the assumption is that your pre-printed cheques already have that printed on them.
Check the Printed form already contains dollar sign checkbox if there is a large dollar sign present on your pre-printed cheques, which the numeric dollar amount should follow. If this is unchecked, the amount the program prints on the cheque follows two asterisks (to clearly separate it from whatever precedes it on the line) and starts with a dollar sign, like "**$100.00". If it's checked, only values like "100.00" are printed.
One thing to watch out for with cheque numbers is that some pre-printed cheques have leading zero's in the cheque numbers, like "00123". You must enter such cheque numbers as just "123", without the leading zeros, or ACCOUNTS will not find them when you ask for them to be printed. (The program does warn you if you try to enter cheque numbers that start with zeros.)
To be considered to be a cheque that can be printed, as explained above, a transaction must have a cheque number in the Number field, that is all digits with no leading zero's. It can have any Type (transaction type), or no Type, except for GENJRNL (which is for Journal Entries, which are also numbered).
The cheque number values you enter in this window must be within the range of cheque numbers that are present in the register for your selected account, within the last year. There is no validation as to whether you have printed the same cheque numbers before, but that really shouldn't be a problem, since you will be using pre-printed cheques that already have the account number on them!
When you have entered the fields to your satisfaction, clicking the Print button takes you to the normal window for viewing and printing reports, with the fields that will be printed on your cheque forms displayed. You will need to click Print on that window as well, to actually print the cheques.
When you are viewing the cheques on the reports window, there is boldface field at the top right that shows the cheque number. As a note following that displayed field says, though, it will not be printed on the cheques (which are assumed to be pre-numbered). It is only for you to review, to make sure that the cheque numbers you entered in the program match the ones on the pre-printed forms that you are about to use. (If the numbers don't match, you may end up having to correct the cheque numbers in the register window.)
Cheques that are for a bill payment entered via the Actions ⇒ Pay Bills menu option, or for a transaction entered on the Write Cheques window or directly on a register window where the Payee / Description field was set to be a Vendor name, will also have that vendor's address printed on the cheque, in an area that should fit well into standard window envelopes.
For cheques made out to vendors for whom you have filled in a "Name for Cheques" field, that name will be printed on cheques rather than the vendor's Name field.
The memo line on the cheque will be filled in with "Acct #" and the vendor's Account Number field, if this is a cheque for a vendor that has that field filled in, or otherwise, the Memo field from the transaction, if it was filled in.
Splits Printed on the two Voucher Sections
On the 2nd and 3rd sections of the cheques (the voucher parts) the splits are listed, giving the names of the accounts involved in the transaction, any memo specific to that split line, and the split amount. The account name will be omitted if you uncheck "Print Account Names on Cheque Vouchers" in the Maintenance ⇒ Main Options window.
At most 14 split lines will fit on the voucher. If there are more splits than that in a transaction for a cheque you are printing, you will receive a warning message to inform you of that fact, because the printed splits won't add up to the cheque total.
If you have a transaction with just one counter account (split line), any memo that is entered for the transaction will actually show up as both a memo for the main cheque (subject to the rules described above where it might be replaced by the vendor's account number) and for the split line.
One unusual situation for the splits is if you are printing a cheque created with the Pay Bills feature. In that case, the sole actual counter account in the bill payment transaction is your Accounts Payable account. (The relevant expense account(s) were on the original entered bill, but not on the bill payment.) However, the program carefully cross-references back to the entry of the bill, and shows the splits for that bill instead of just showing Accounts Payable. It can even be a bit more complicated, because a bill payment could be for more than one bill, and it could also include only partial payment for the bill(s) it is paying! Regardless, the voucher will show that calculated out correctly, using proportional amounts in the case of partial bill payments.
For cheques that are not actual bill payments, the splits on the voucher are shown in the order they were entered. For actual bill payments, for technical reasons (related to the possibility of a bill payment covering multiple bills) they are instead shown in alphabetical order.
Adjusting the Print Positions
The first time you try printing cheques from ACCOUNTS, it is strongly recommended that you start by printing just one cheque onto plain white paper. Hold that page up against one of your pre-printed cheque forms, and view it with a strong light behind it, to make sure that everything is in the right place. Sometimes, depending on your printer, you may just need to adjust the print margins a bit to get everything correct. You can do that with the Margins button on the report-viewing window (which only appears when you are printing cheques, not regular reports). Once you are clear that everything is lined up properly, you can use this window again to print the cheque(s) onto your real forms.
If the Margins adjustment in the report-viewing window is not enough to get the cheques lined up on your cheque forms, and you are sure you have selected the right setting for the checkbox for The Payee goes above the line for the Amount in words, you can use the Adjustments button to change the positions of the various elements printed on the cheque, as required. When you click Adjustments, the following additional section drops down at the bottom of this window:
What you want to do is measure the differences you need to make in the elements that are not printing in the correct place on your cheque forms, and enter those differences in the displayed fields. In the Left (-) / Right (+) field, you enter positive numbers to move that element to the right, and negative numbers to move it to the left. In the Up (-) / Down (+) field, you enter positive numbers to move that element down, and negative numbers to move it up.
You will see in the image above that the "Organization Name and Address" and "Pay to the Order of" fields are greyed-out (not editable).
•"Organization Name and Address" is only not greyed out and editable if the Print your Organization name and address at the top left corner checkbox is checked. That's because if it is unchecked, those fields are not printed anyways, so there is no point in moving them!
•"Pay to the Order of" is only not greyed out and editable if the checkbox for The Payee goes above the line for the Amount in words is checked. That's because it refers to only the first occurrence of the Payee fields on the cheque, above the Amount, which is only printed when that checkbox is checked. The positioning of the 2nd occurrence of the Payee name, and the vendor address, if available, are determined by the "Payee Name and Address" field on this window.
You can choose to use measurements in Inches or Centimetres through the drop-down shown at the top of the above image. You can then experiment with the different settings, again printing on blank paper and holding that up to a real cheque form to see any remaining issues, until you are satisfied. When the Adjustments button has been clicked and this area is thus open, after you use Print, and view and/or print the displayed cheque(s), and close the report-viewing window, this window will still be open, in case you need to make further adjustments. (Normally this window is gone after printing cheques, if you are not making adjustments.)
If you cannot get the cheques to line up, and you are sure that you are using 3-part voucher forms that are compatible with QuickBooks cheque printing, please contact us for assistance. (You may be asked to mail in a voided cheque form for us to inspect.)
Note: The adjustments are stored per chequing account, if you have multiple chequing accounts, and per database / organization, if you have multiple databases. That way if you have differently designed cheques for different bank accounts, you should be able to get them all to line up. The two checkboxes at the top of the window, however, are per database, but not per chequing account. If you did need different settings for those checkboxes for different chequing accounts within the same organization's database, you could just change the values in those checkboxes appropriately whenever you need to print cheques.
You should also be aware that some adjustments of elements, if they are too large, could potentially move those elements past the margins of the page. This could also force a 2nd blank page after each cheque page, if an element extends beyond the right margin (even if the text in it in a specific cheque does not extend that far!). So be sure to check for that very carefully, by scrolling in the displayed cheque, before you decide that your settings are correct. Of course, those errors can be fixed by entering a smaller adjustment for the element in question.
This topic was last edited on Apr 9, 2026